!
This is a build log. Build logs are detailed and comprehensive project records that contain content from the entire design process such as 3D models, product visualizations, design deep-dives, and much more. It is meant to document the project workflow in high detail, as transparantly as possible. Once the project has been completed, a more condensed summary will be available here.
Don't hesitate to get in touch if you have any feedback on the format or content. I'm always open to suggestions!
001: North Launch
April 7, 2025Welcome to the North build log! In this project, I'm incorporating a custom liquid cooling loop into my existing system, with the CPU and GPU cooled using premium parts from EKWB. I’m also adding a vertical GPU mount and creating custom-sleeved cables tailored perfectly for this setup.
I’ve been intrigued by liquid cooling for years but held off due to the complexity and cost. About a year ago, I swapped out my old chassis for the North, and it recently hit me that this case offers great potential for a liquid cooling setup. After a lot of planning and tinkering, I’ve come up with a design that I think is both visually striking and high-performing.
Without further ado, let’s take a look at some crisp renderings!
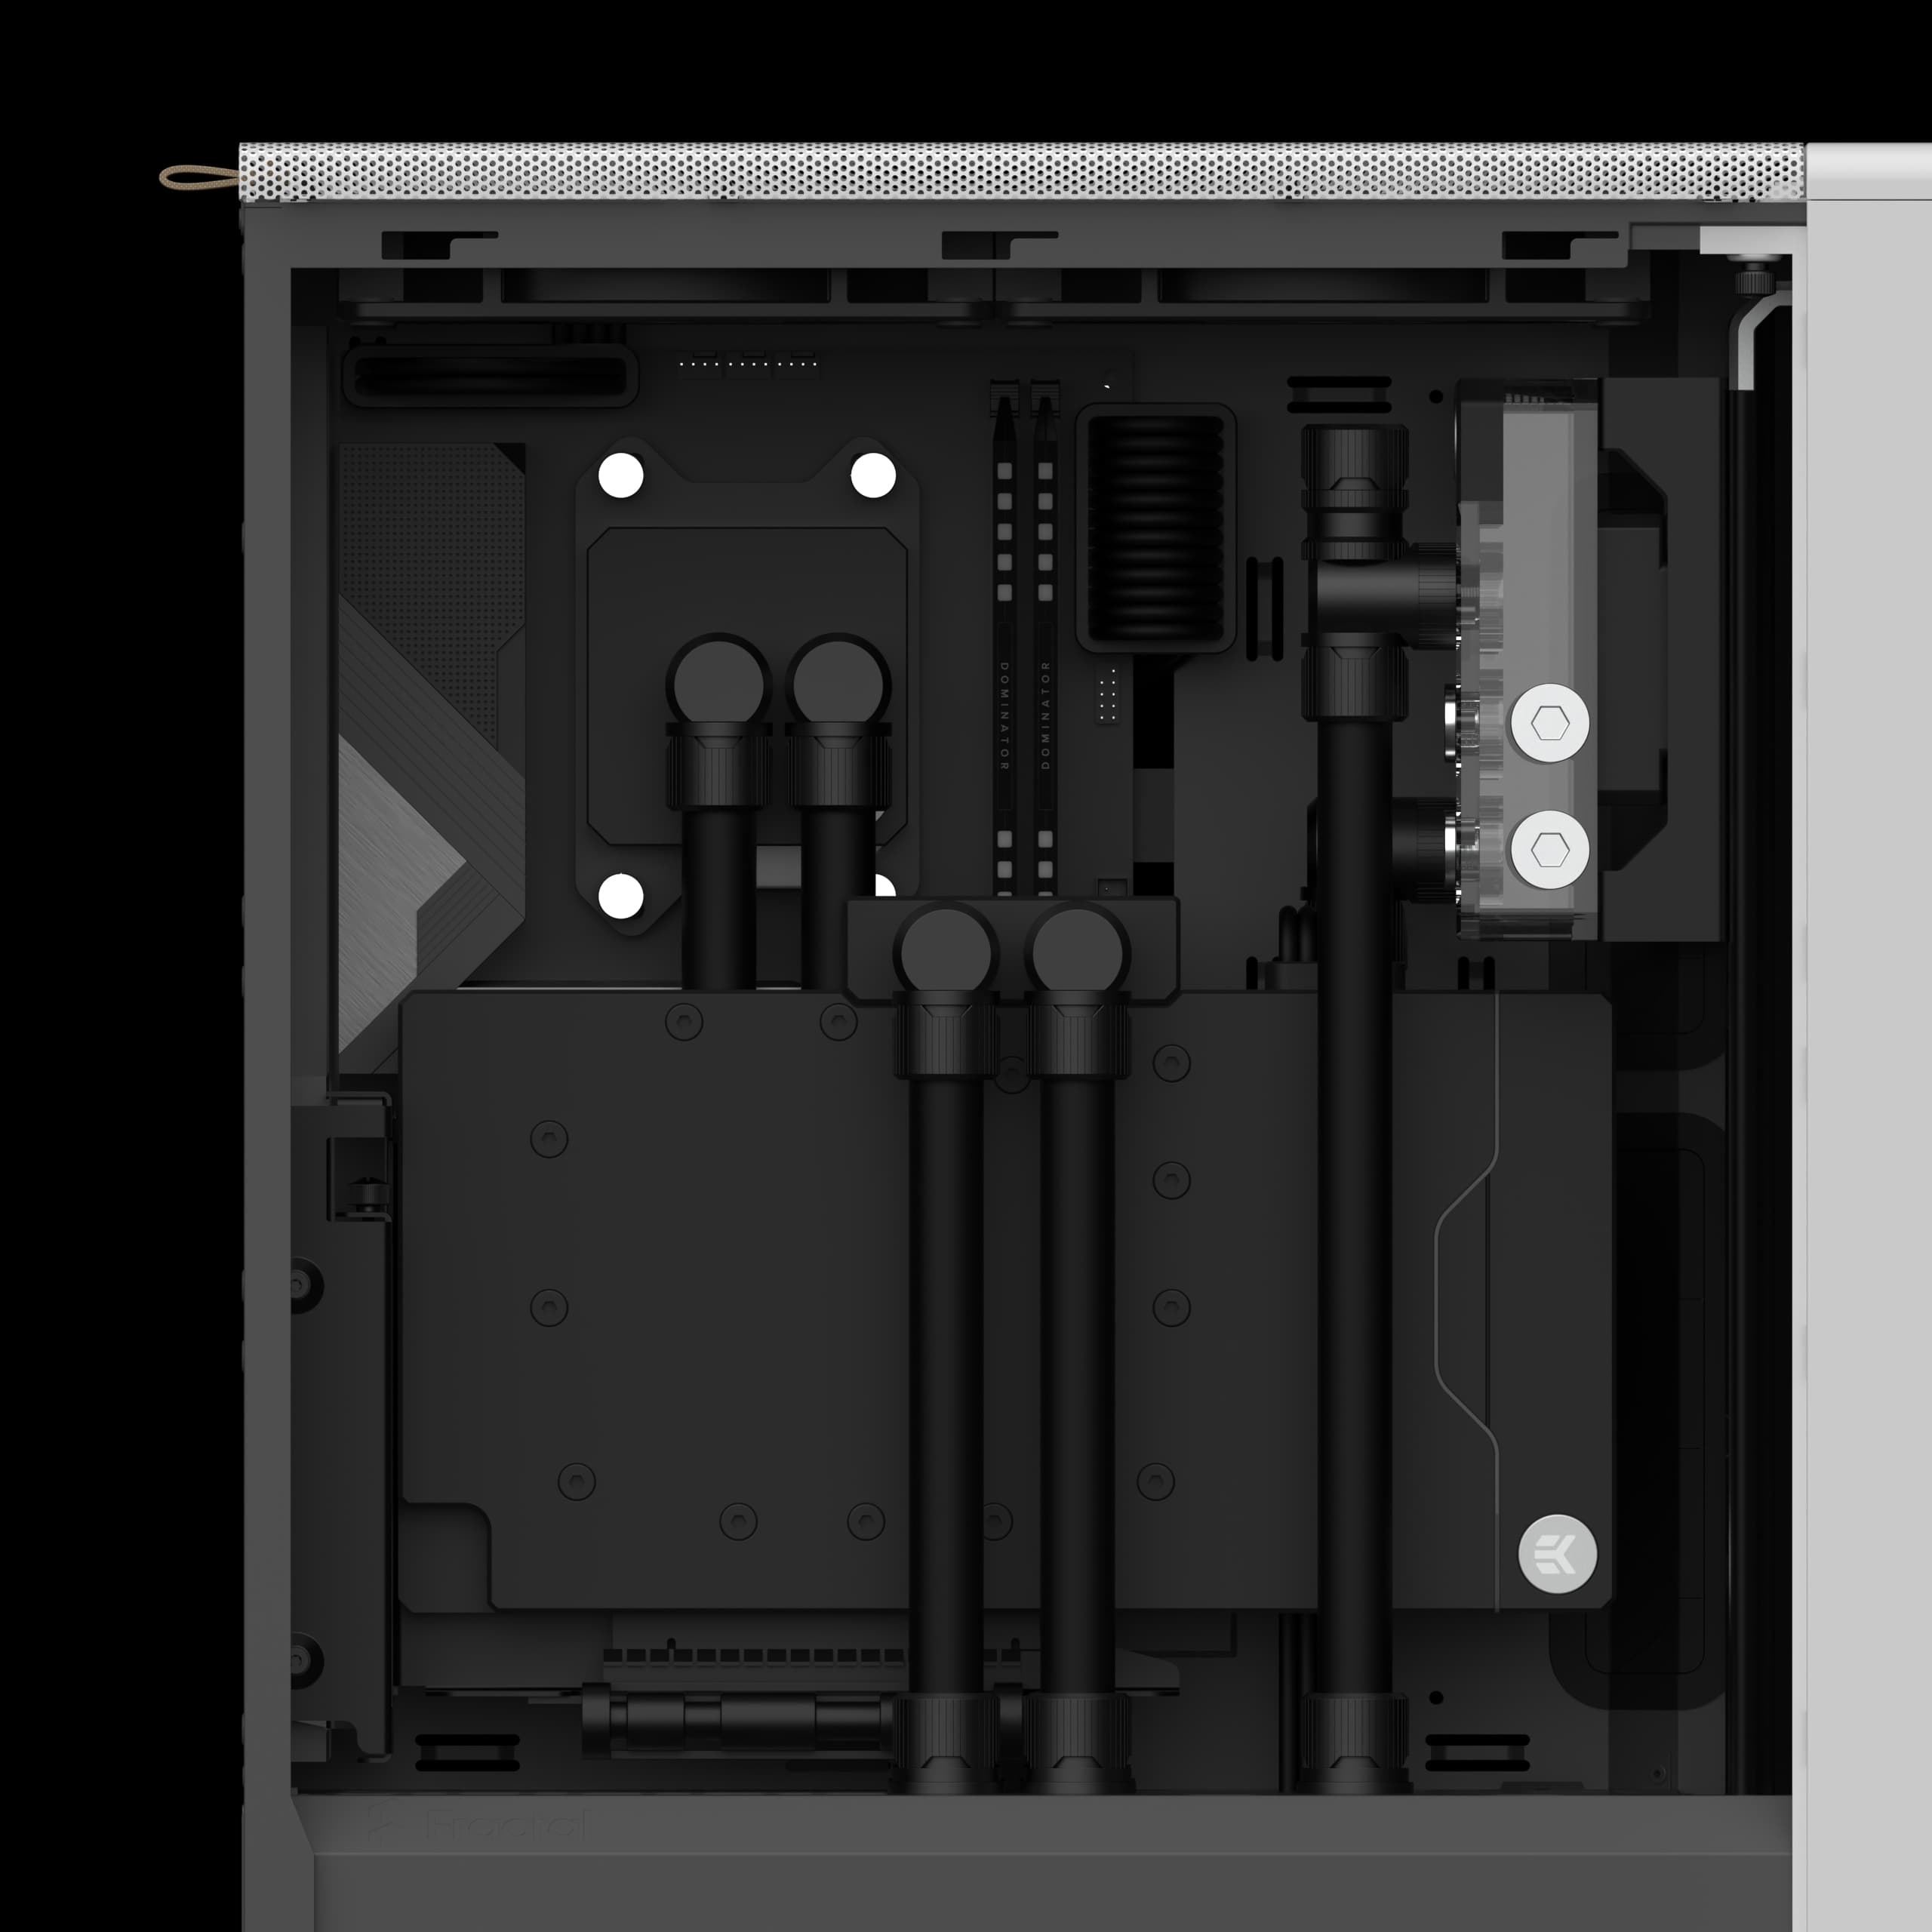
01
/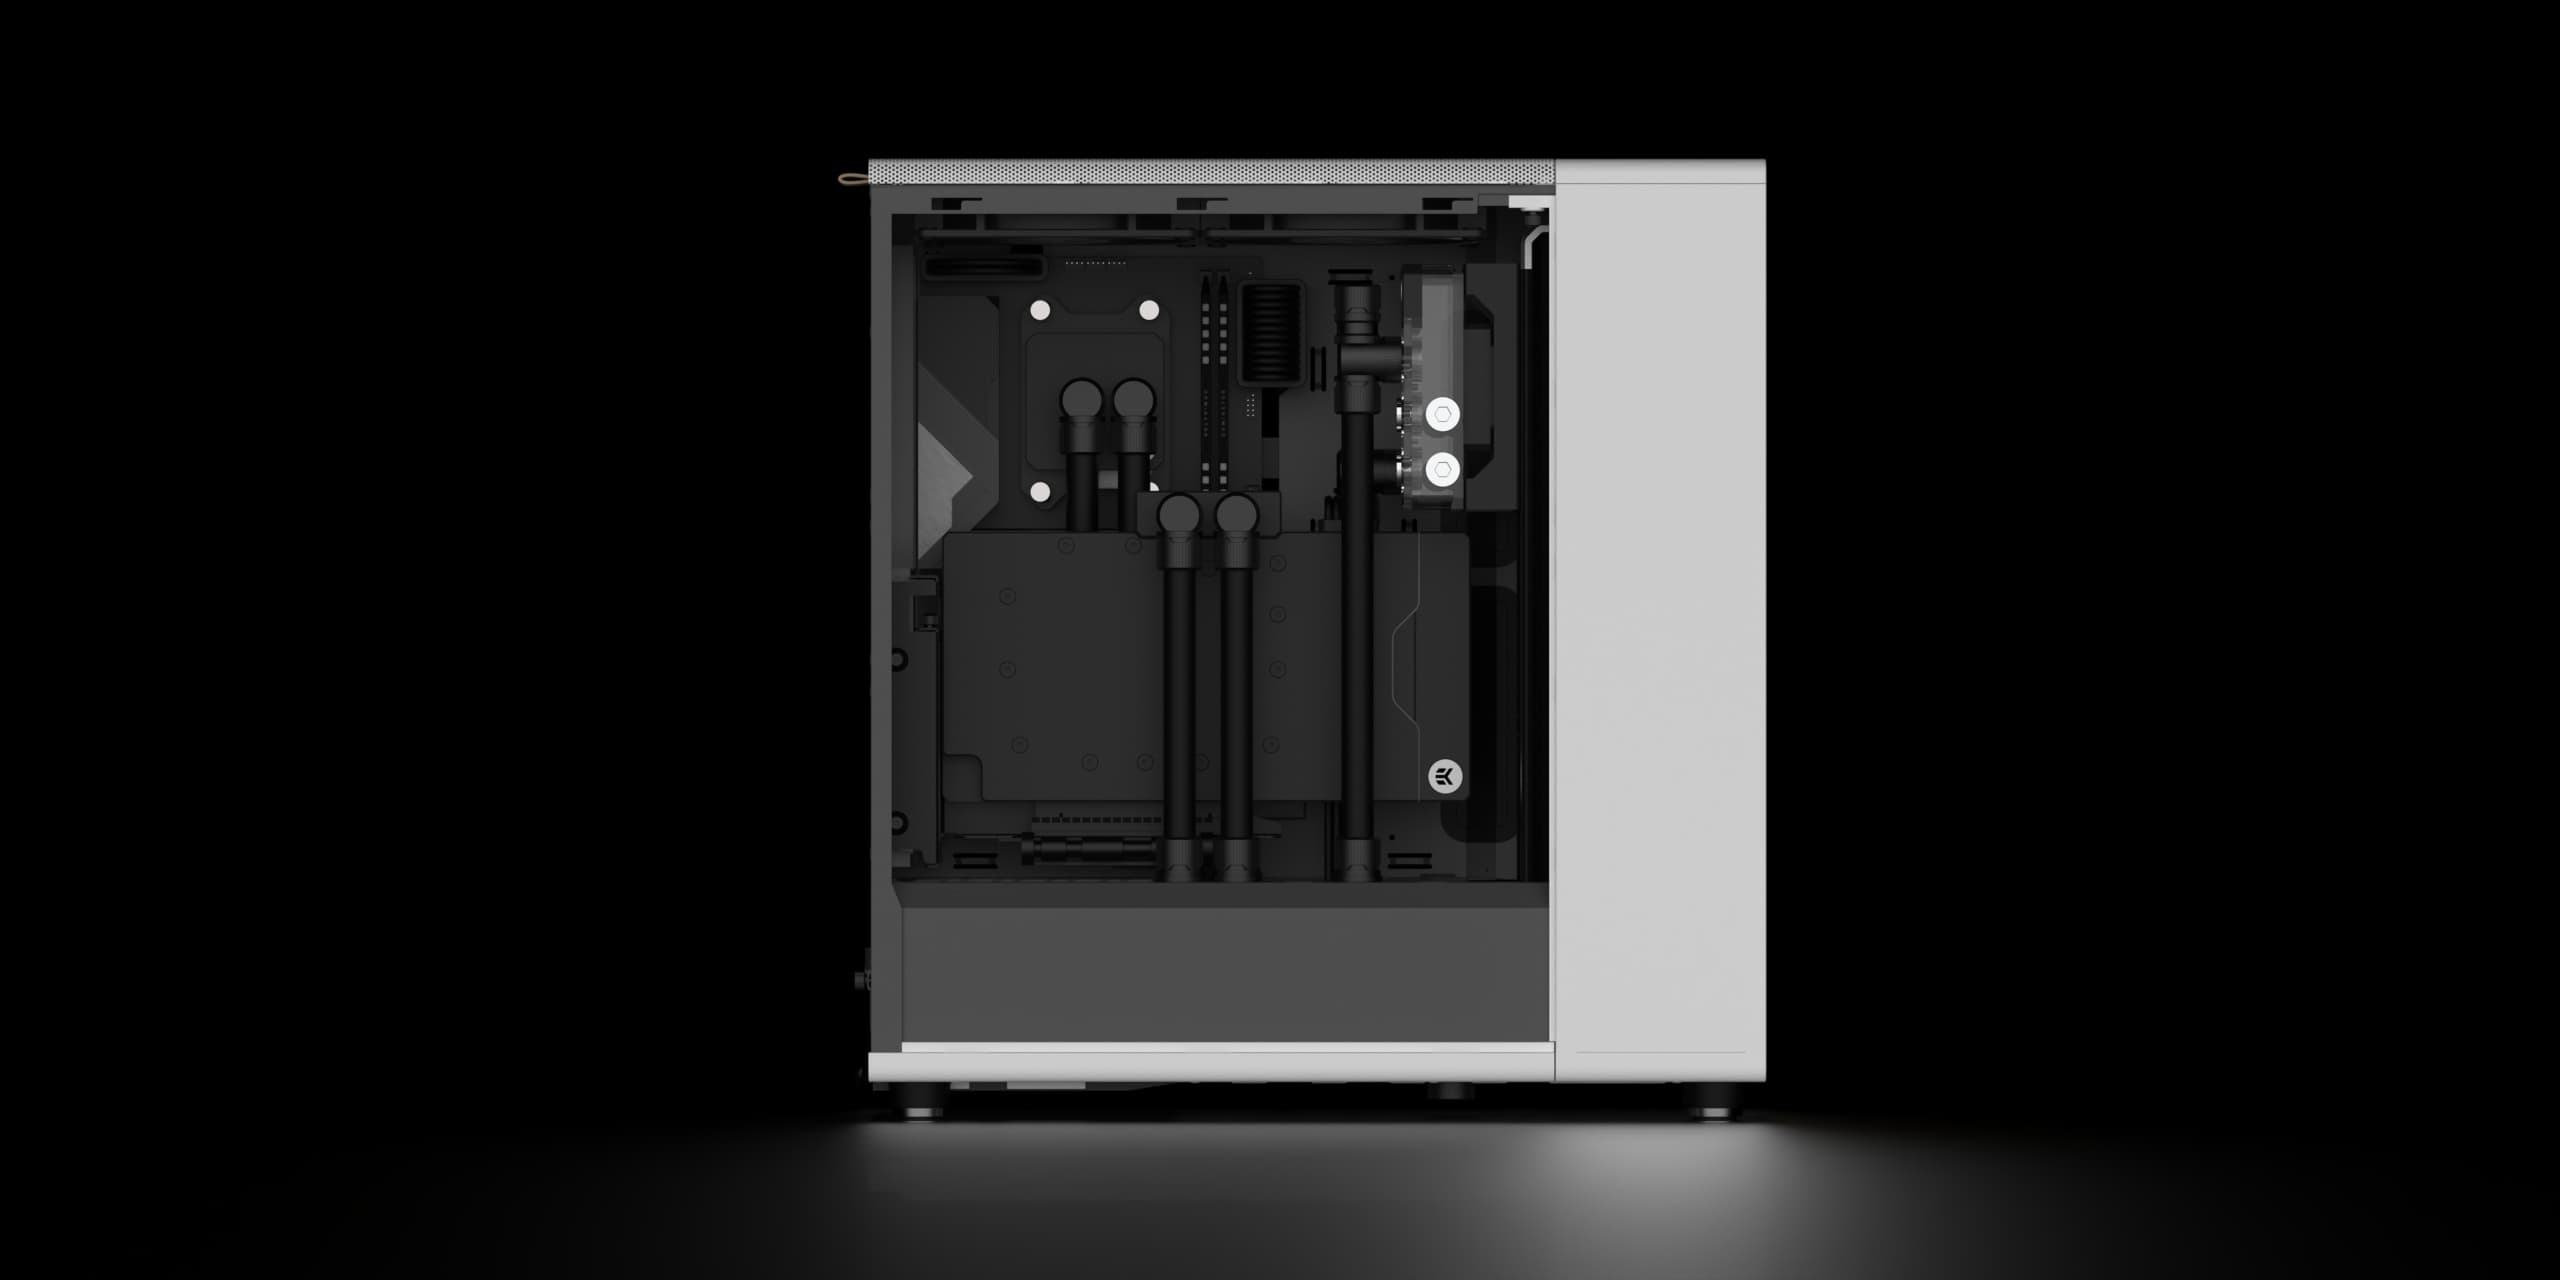
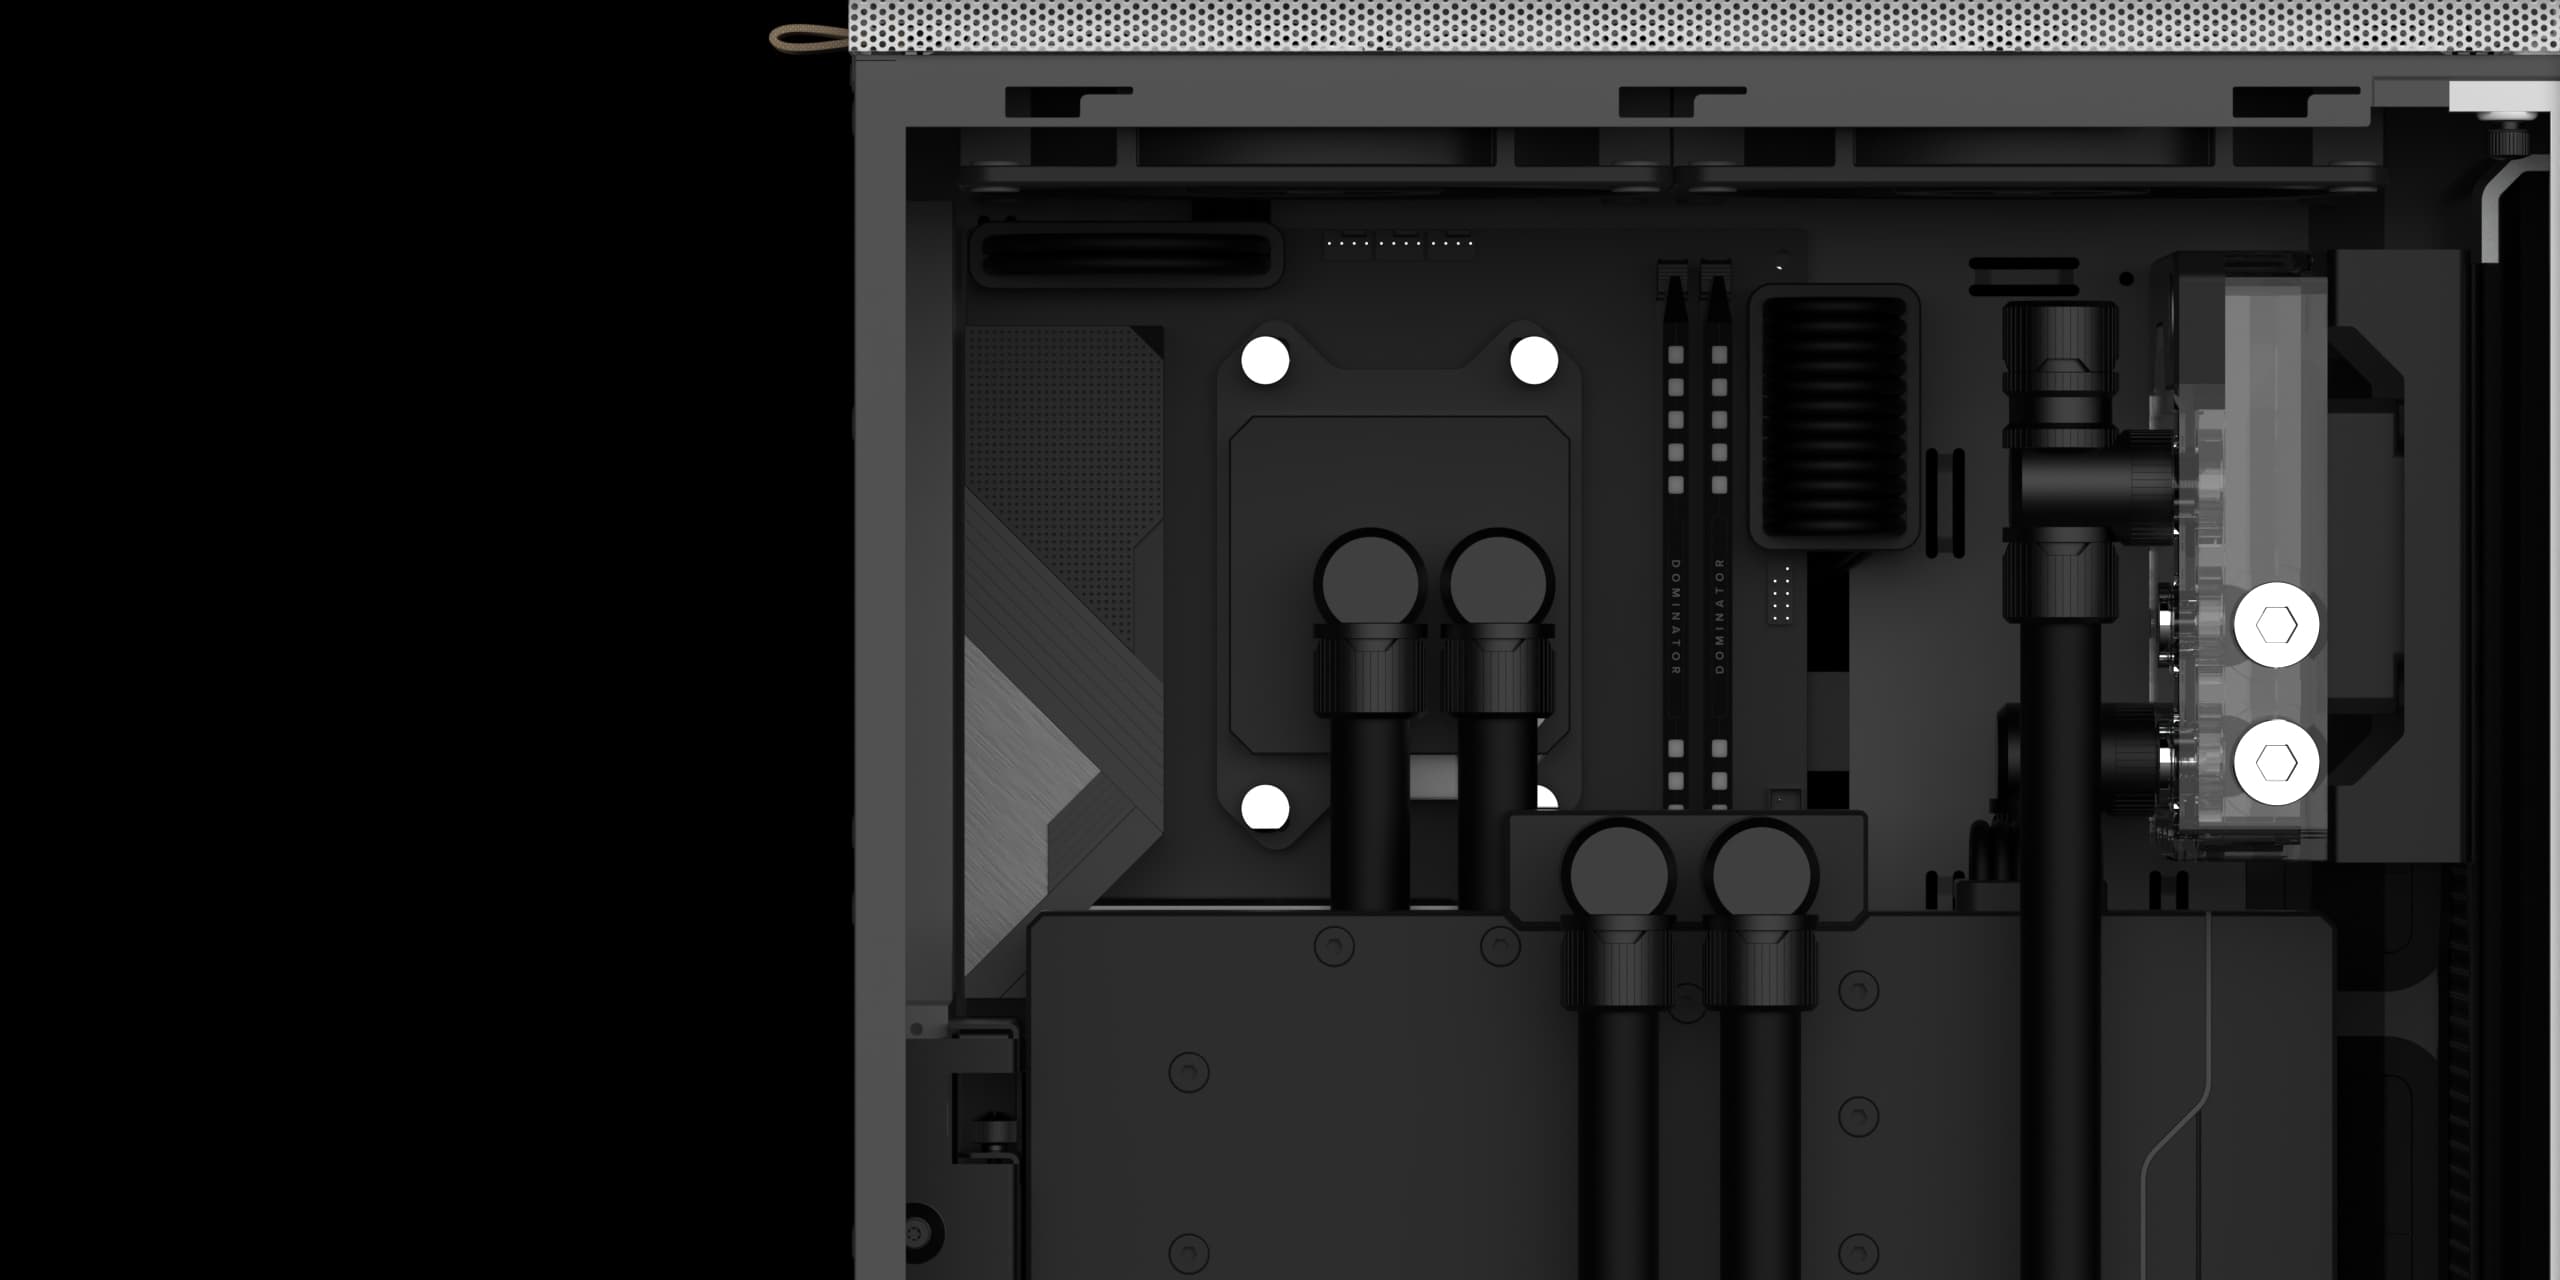
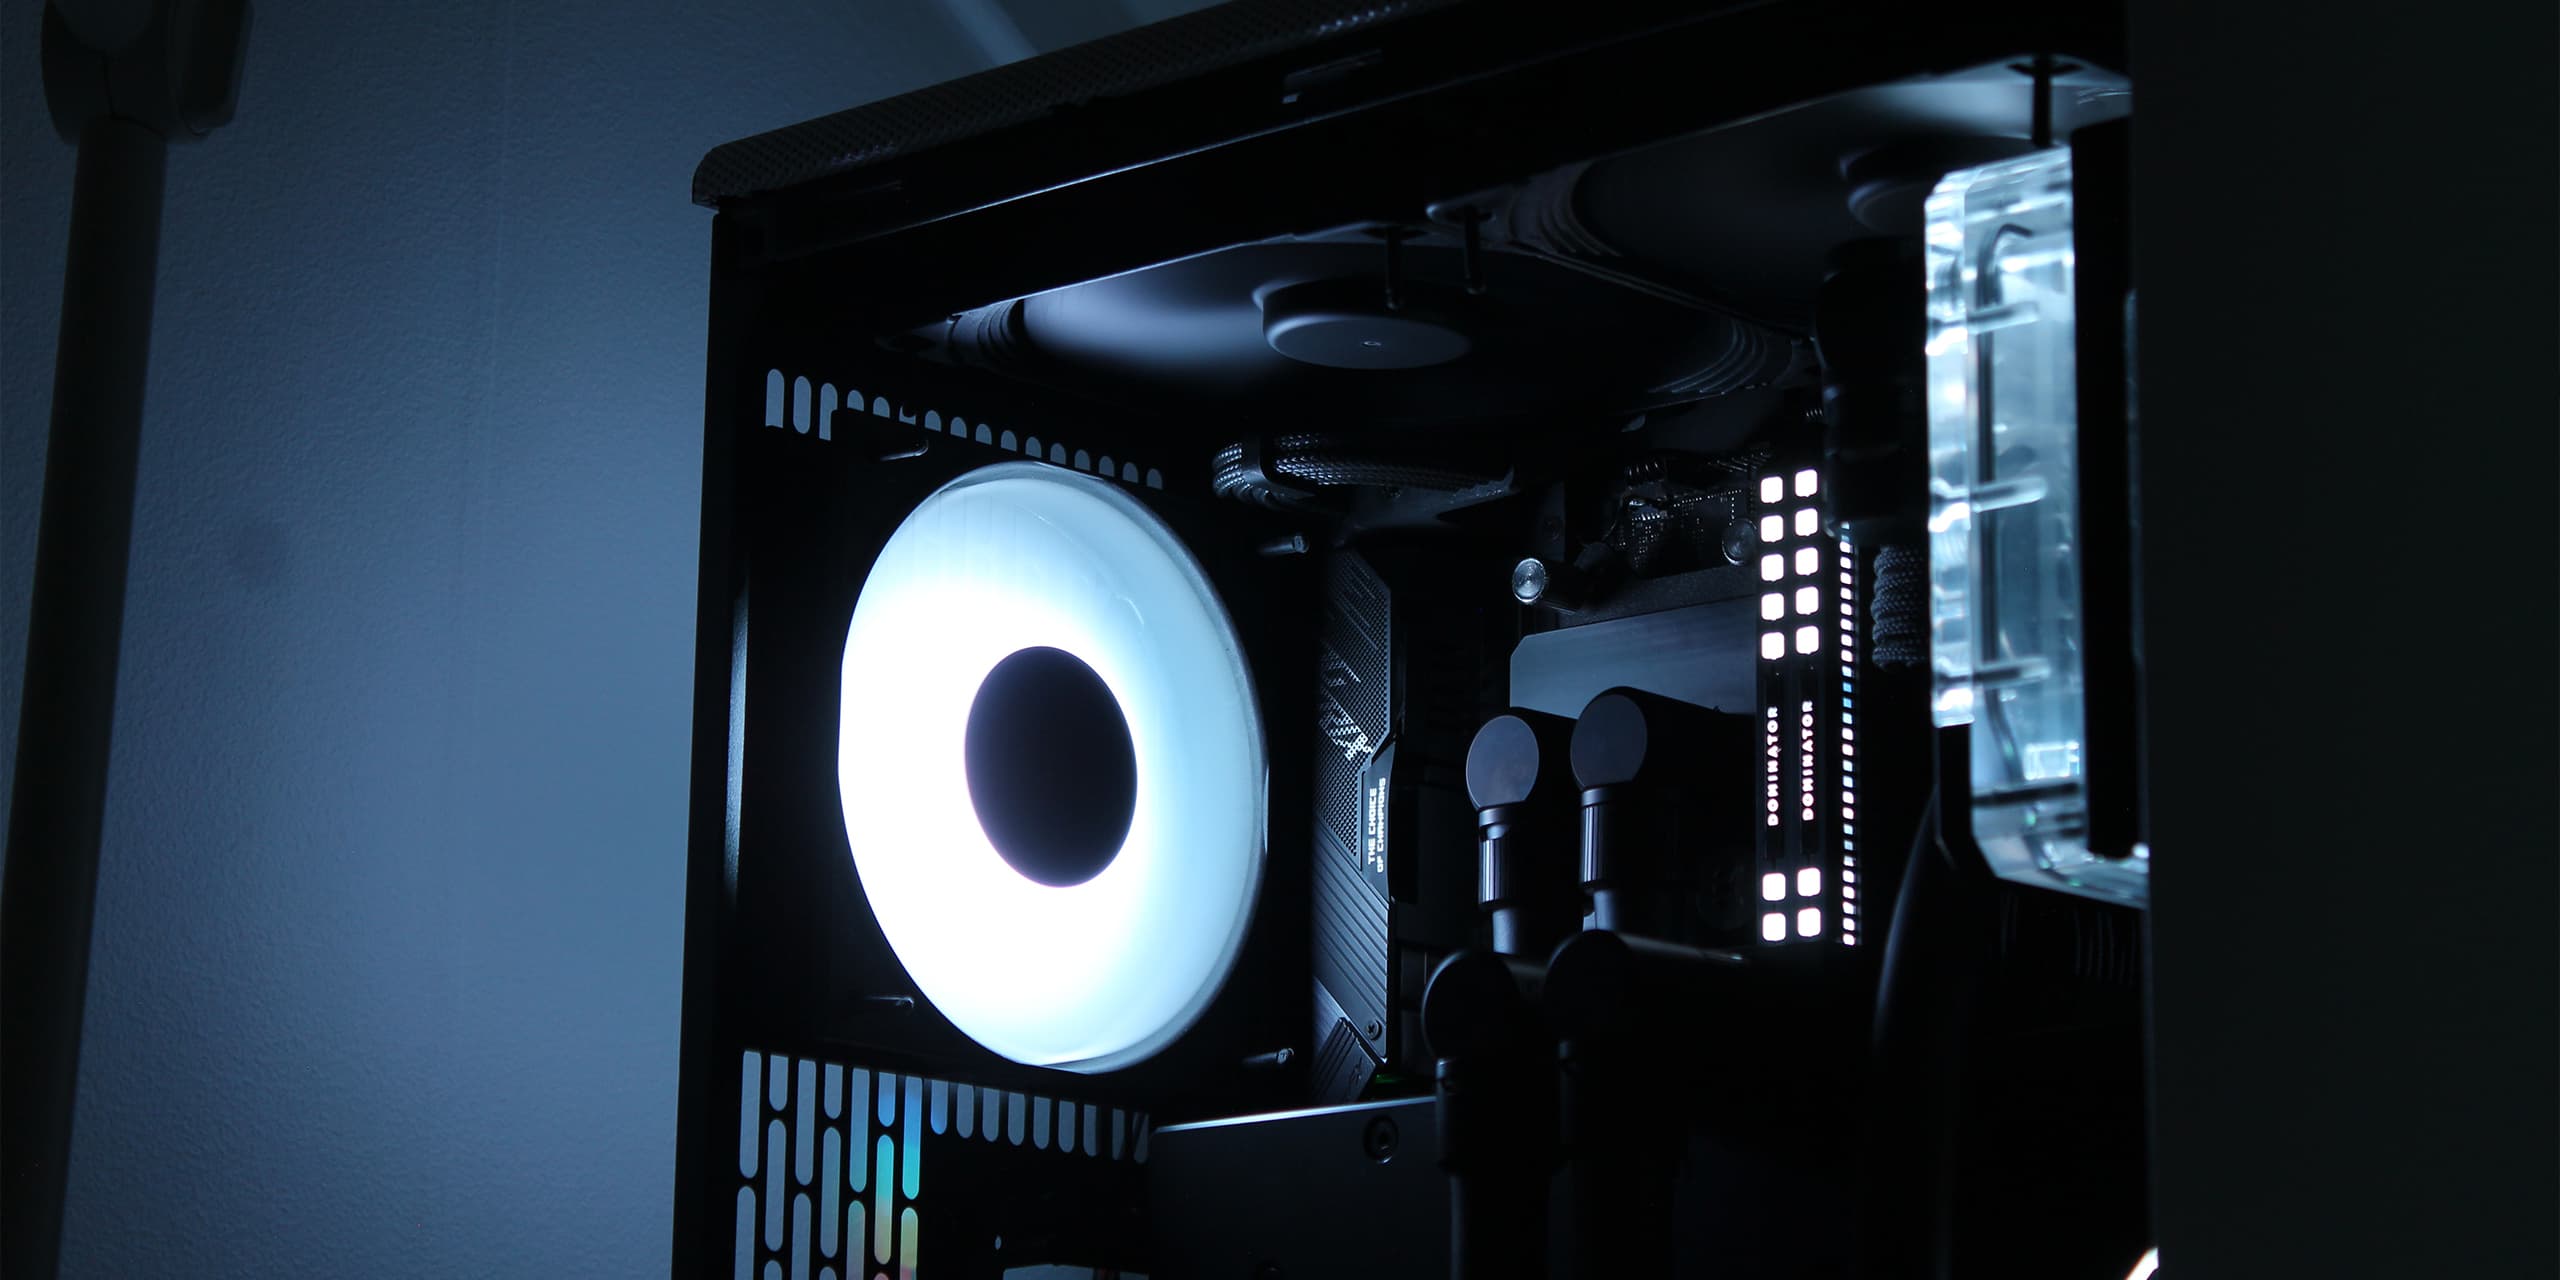
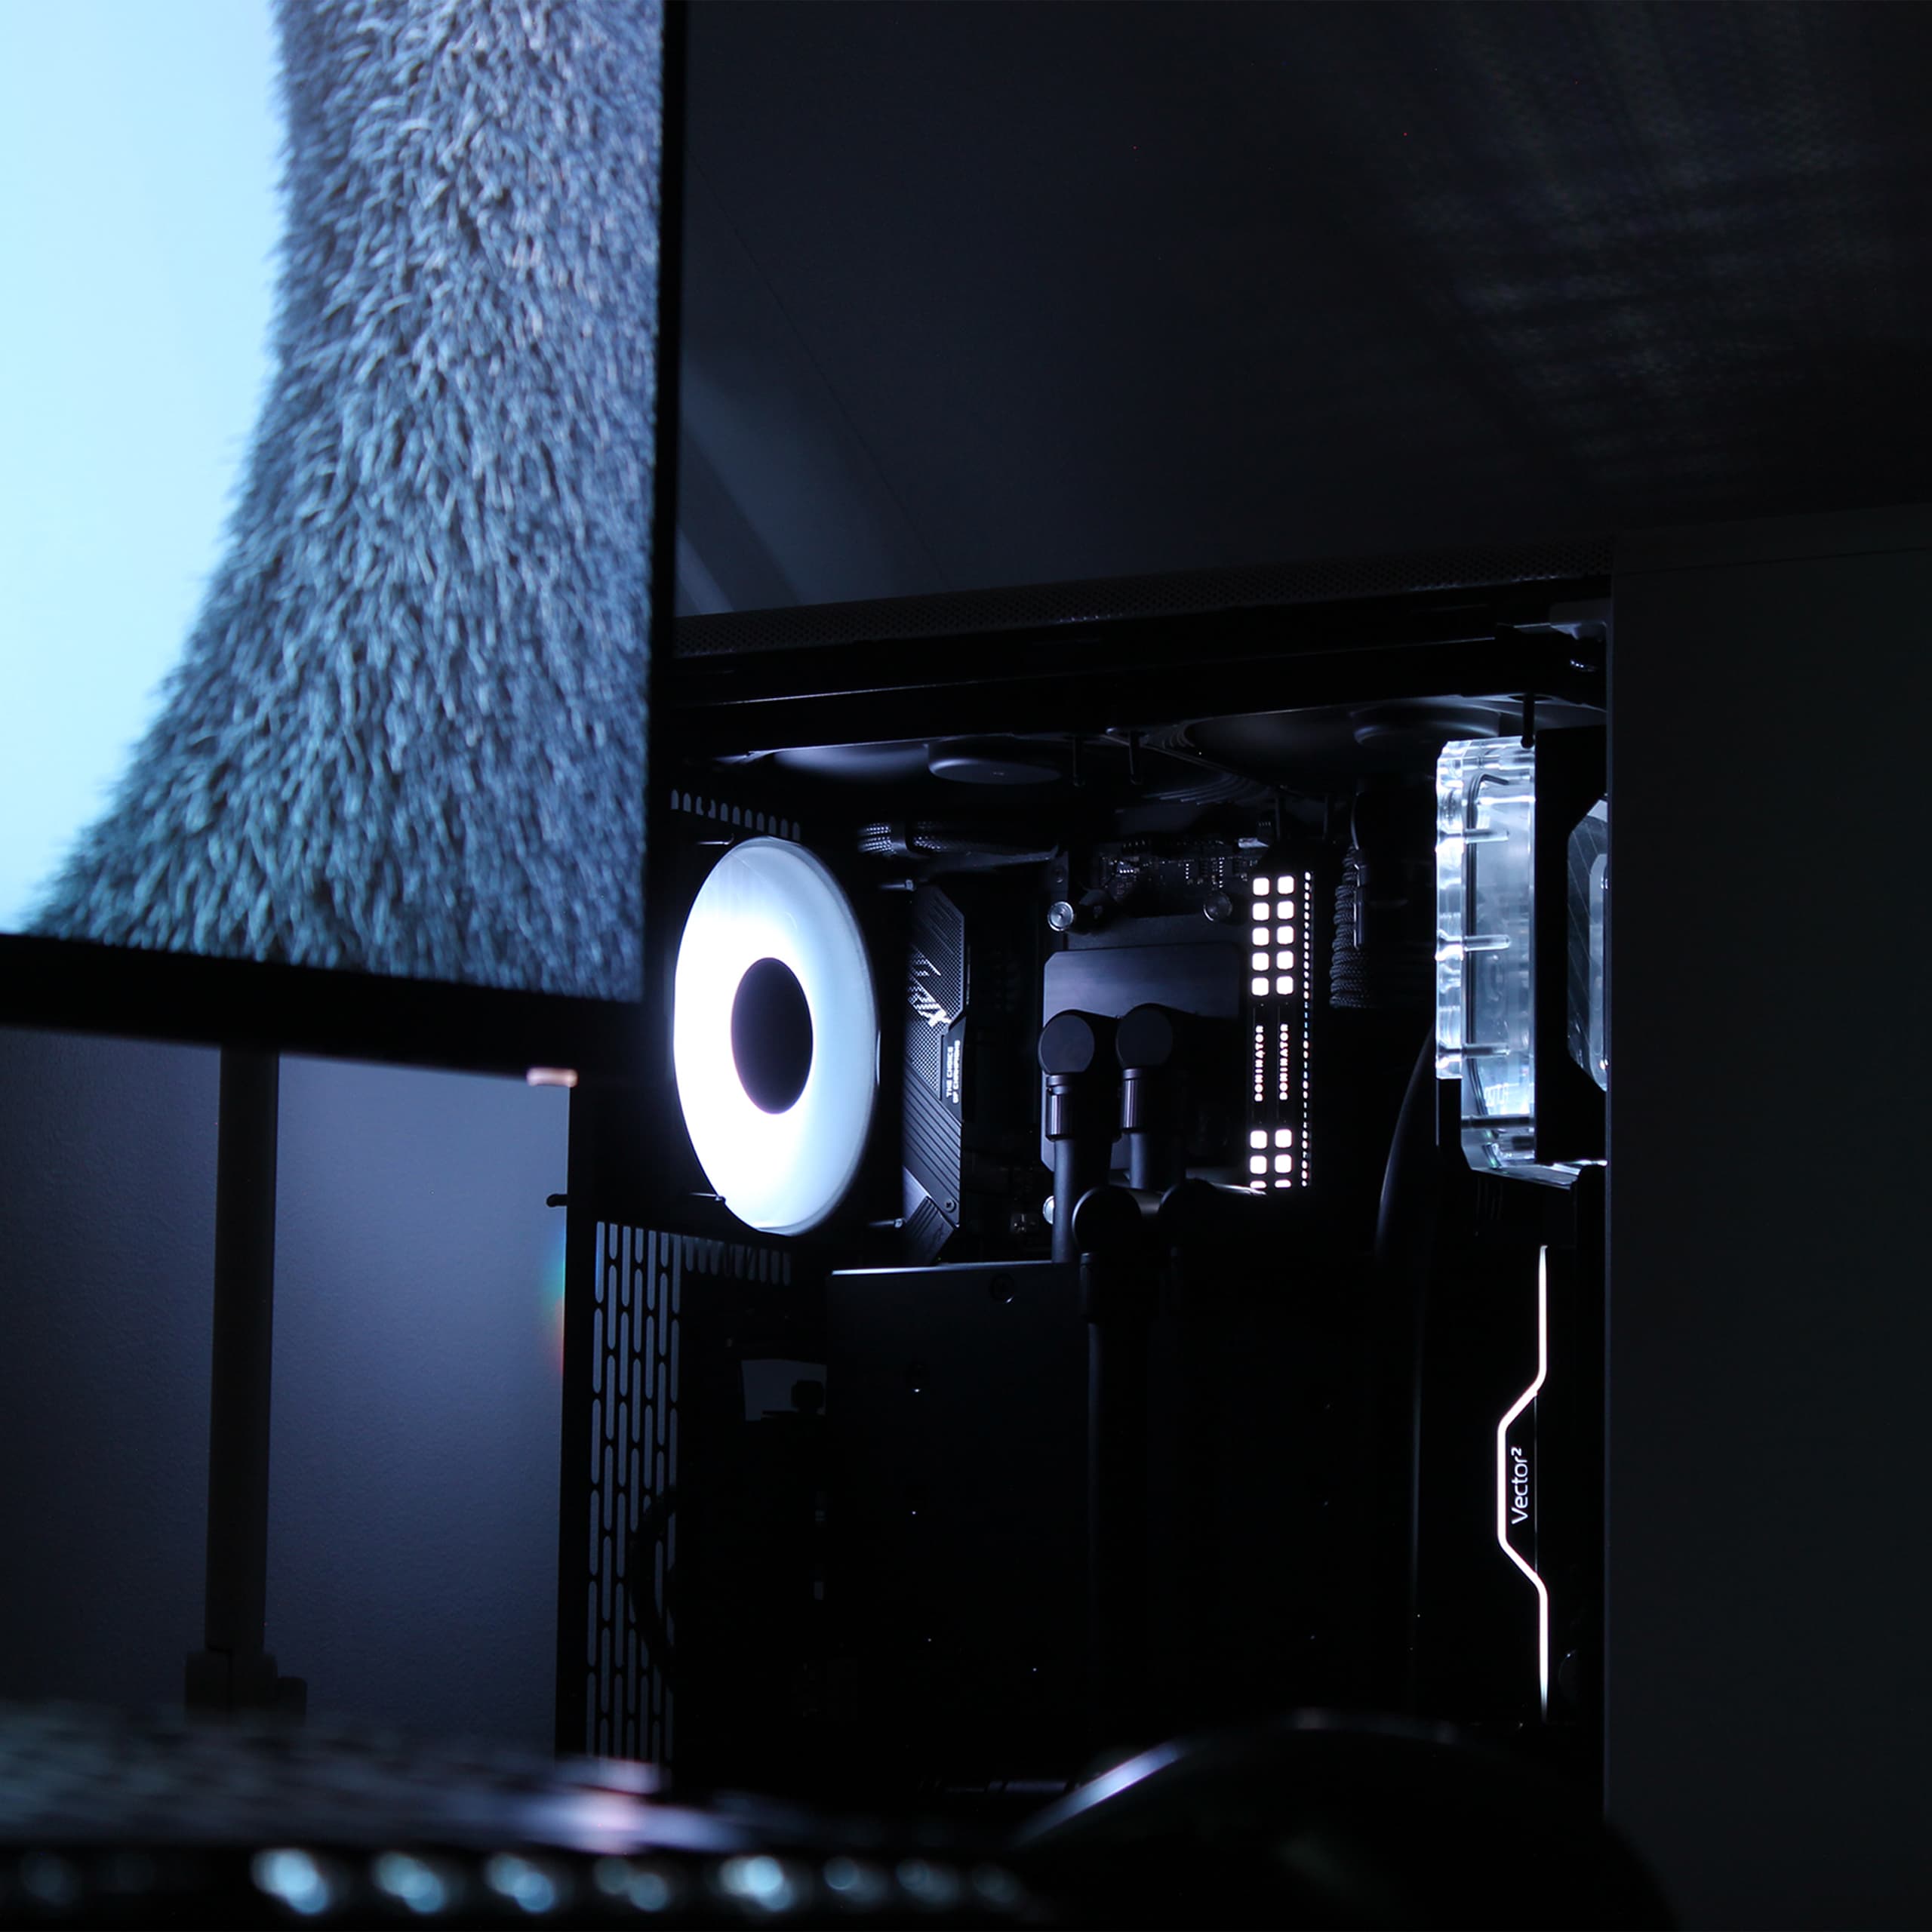
The design of the loop is heavily driven by a vertically oriented graphics card—a feature I've always been intrigued by. When I replaced my old chassis with the Fractal North, I also upgraded my graphics card. Given the nature of targeted advertising, I was presented with ads for the Fractal Design Flex 2 vertical GPU bracket shortly thereafter, which is compatible with the North. This bracket seemed like the perfect addition, especially since I have the mesh version of the case. Orienting the GPU vertically could improve its performance, as it can draw fresh air directly from the mesh side panel, allowing the fans to run at lower speeds and reduce noise.
Unfortunately, the ASUS RTX 4080 TUF—measuring 348mm in length—proved incompatible with a vertical mount in the North. This is seemingly strange, considering the North supports up to 355mm-long graphics cards. Turns out I missed a crucial detail—the Fractal Design Flex 2 bracket offsets the GPU by 15mm, effectively reducing the maximum supported length to 340mm.
This challenge, among other reasons, is what ultimately led me to explore a custom liquid cooling loop for the Fractal North. Liquid cooling not only enhances thermal performance but also addresses the space constraints posed by large, air-cooled GPUs. While GPUs seem to grow larger with each generation, this increase in size is mostly due to the bulky cooling solutions required to manage the heat output of modern hardware. In contrast, the actual PCBs often remain compact—or even shrink—thanks to advancements in component density and manufacturing techniques.
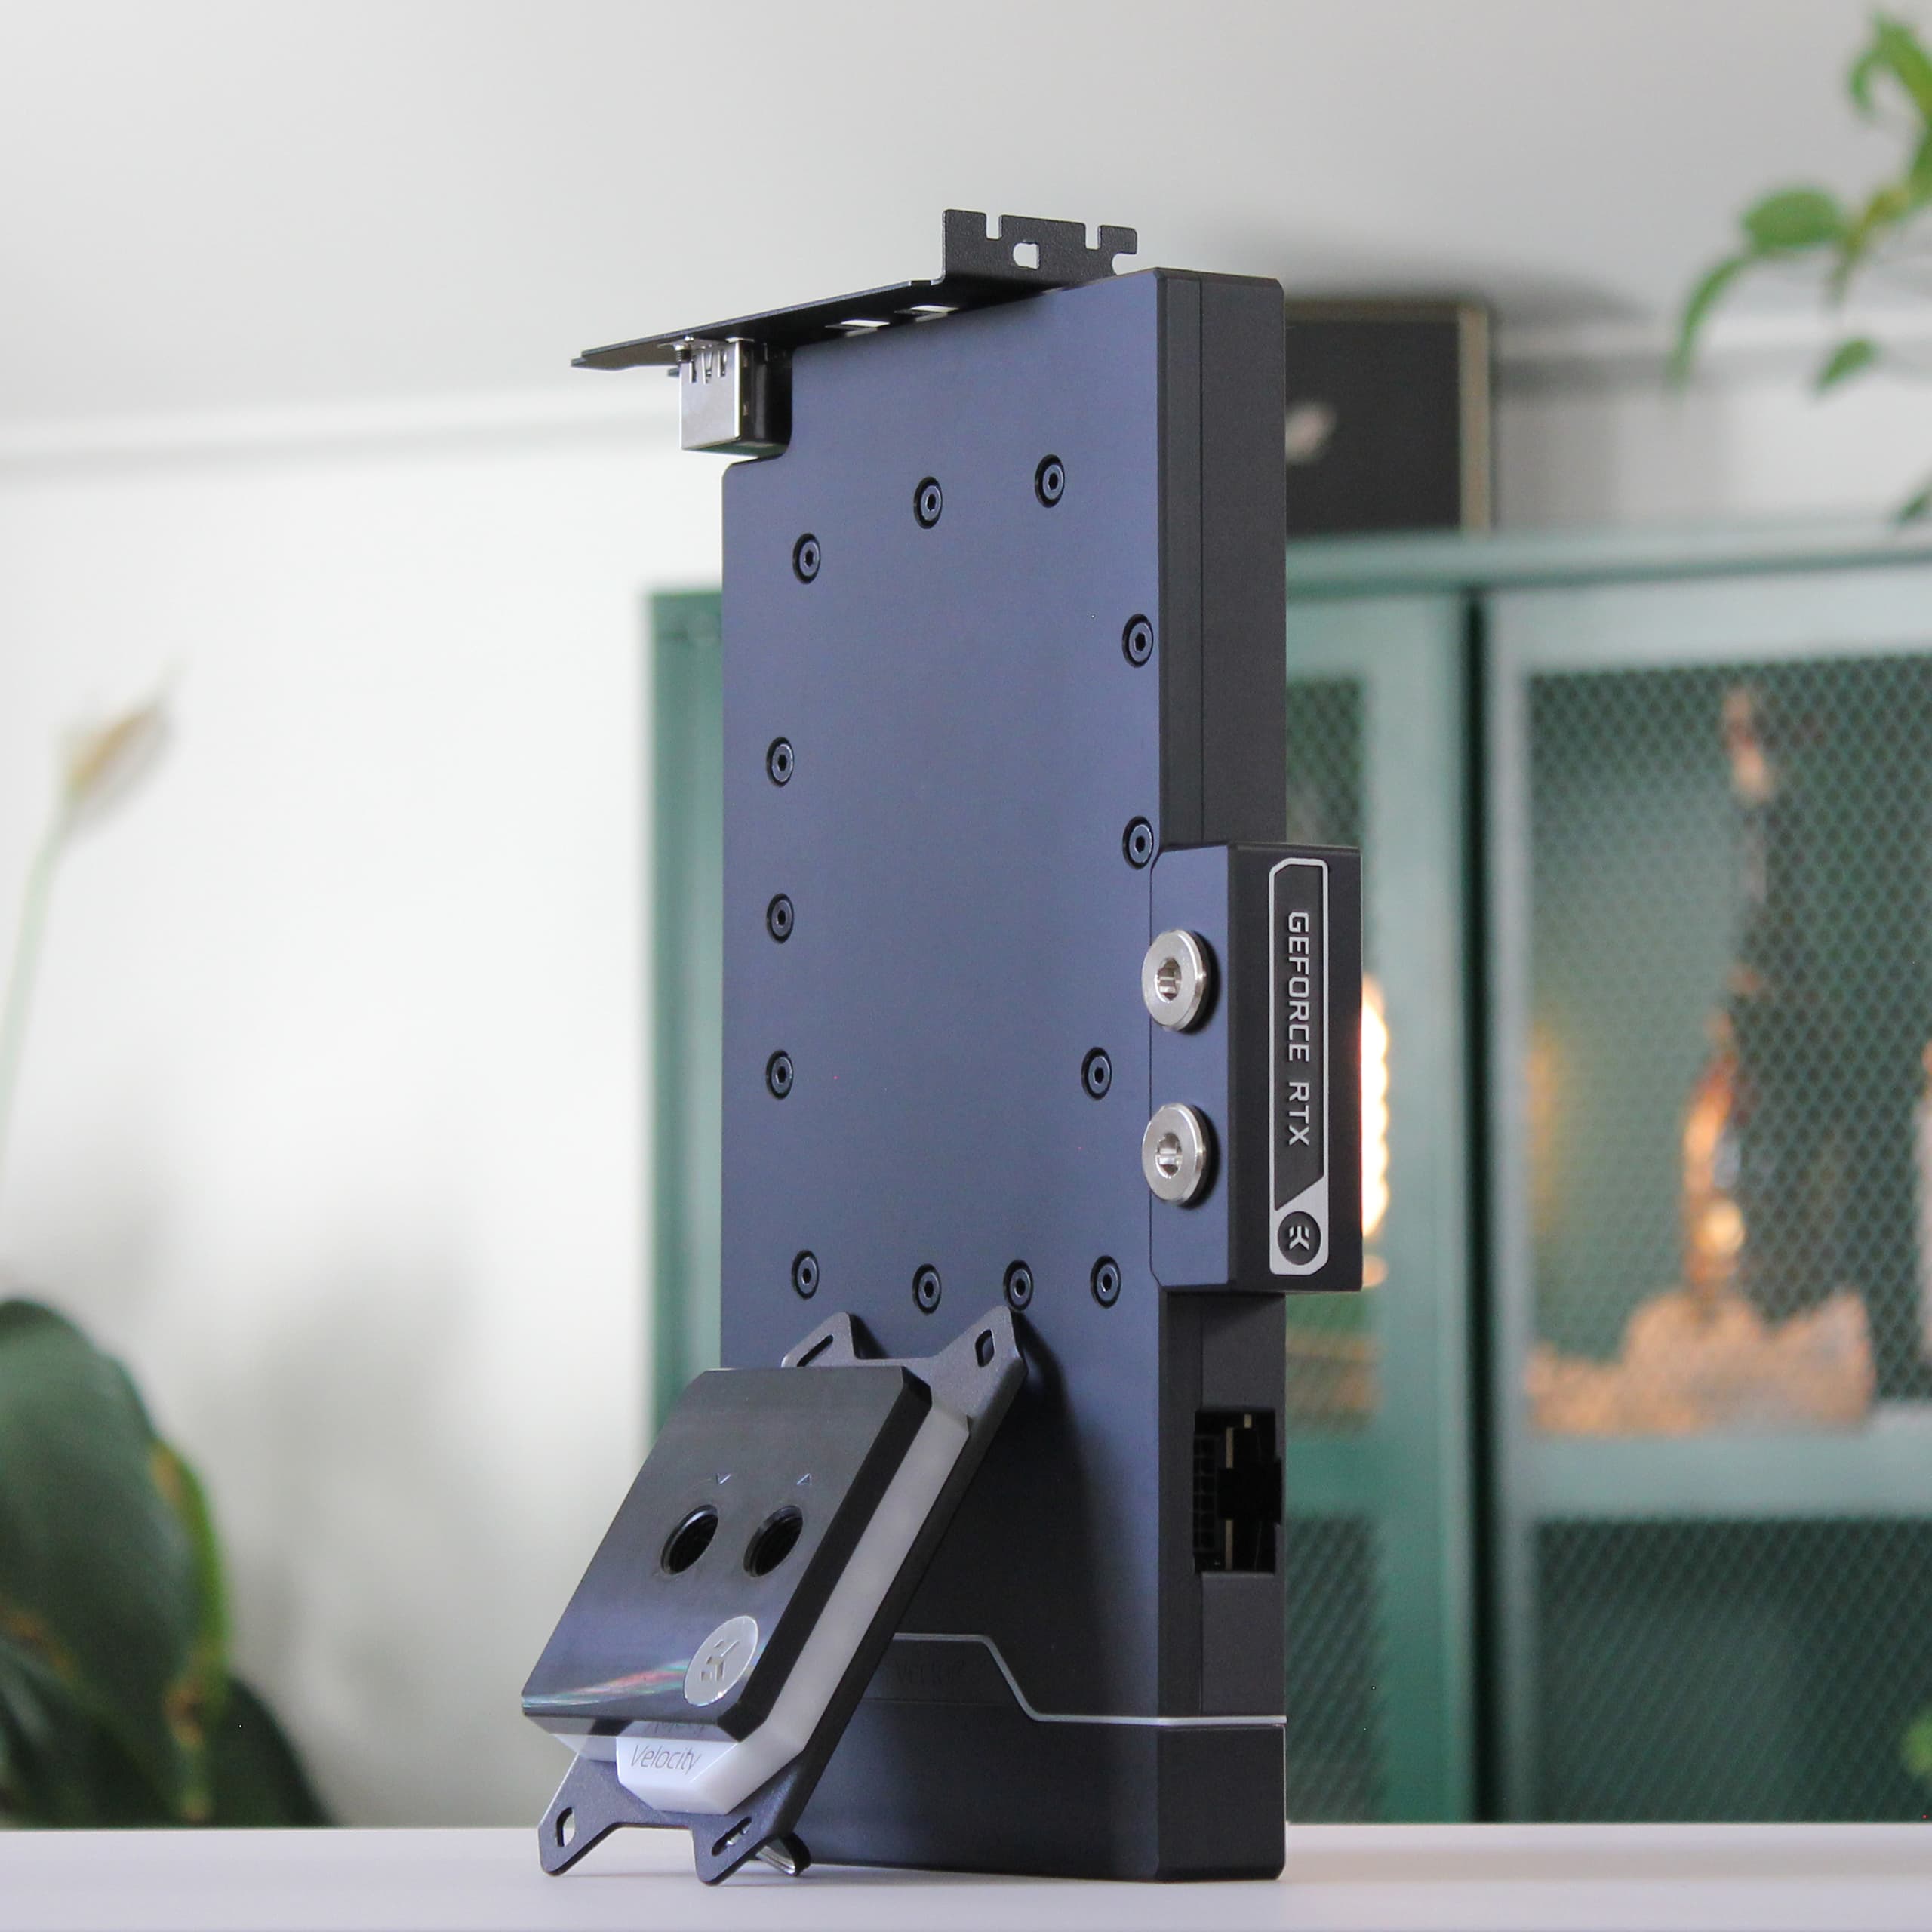
A perfect example of this is the new flagship RTX 5090 PCB, which, despite its massive 575W TDP, is compact enough to fit in the palm of your hand, accounting for only about one-third of the card’s total length. Similarly, the PCB of the ASUS RTX 4080 TUF is significantly smaller than its stock cooler. By installing an EK-Quantum Vector2 water block, the card’s overall size is drastically reduced. The water block is thinner, shorter, and measures just 260mm in length—resulting in a 72% decrease in volume compared to the original air cooler.
While the vertical GPU takes center stage, it’s the combination of components that makes this build stand out. Let’s take a closer look at the full specifications!
Component Specification
Cooling Specification
Cooling Capacity & Power Draw
Cost Breakdown
01
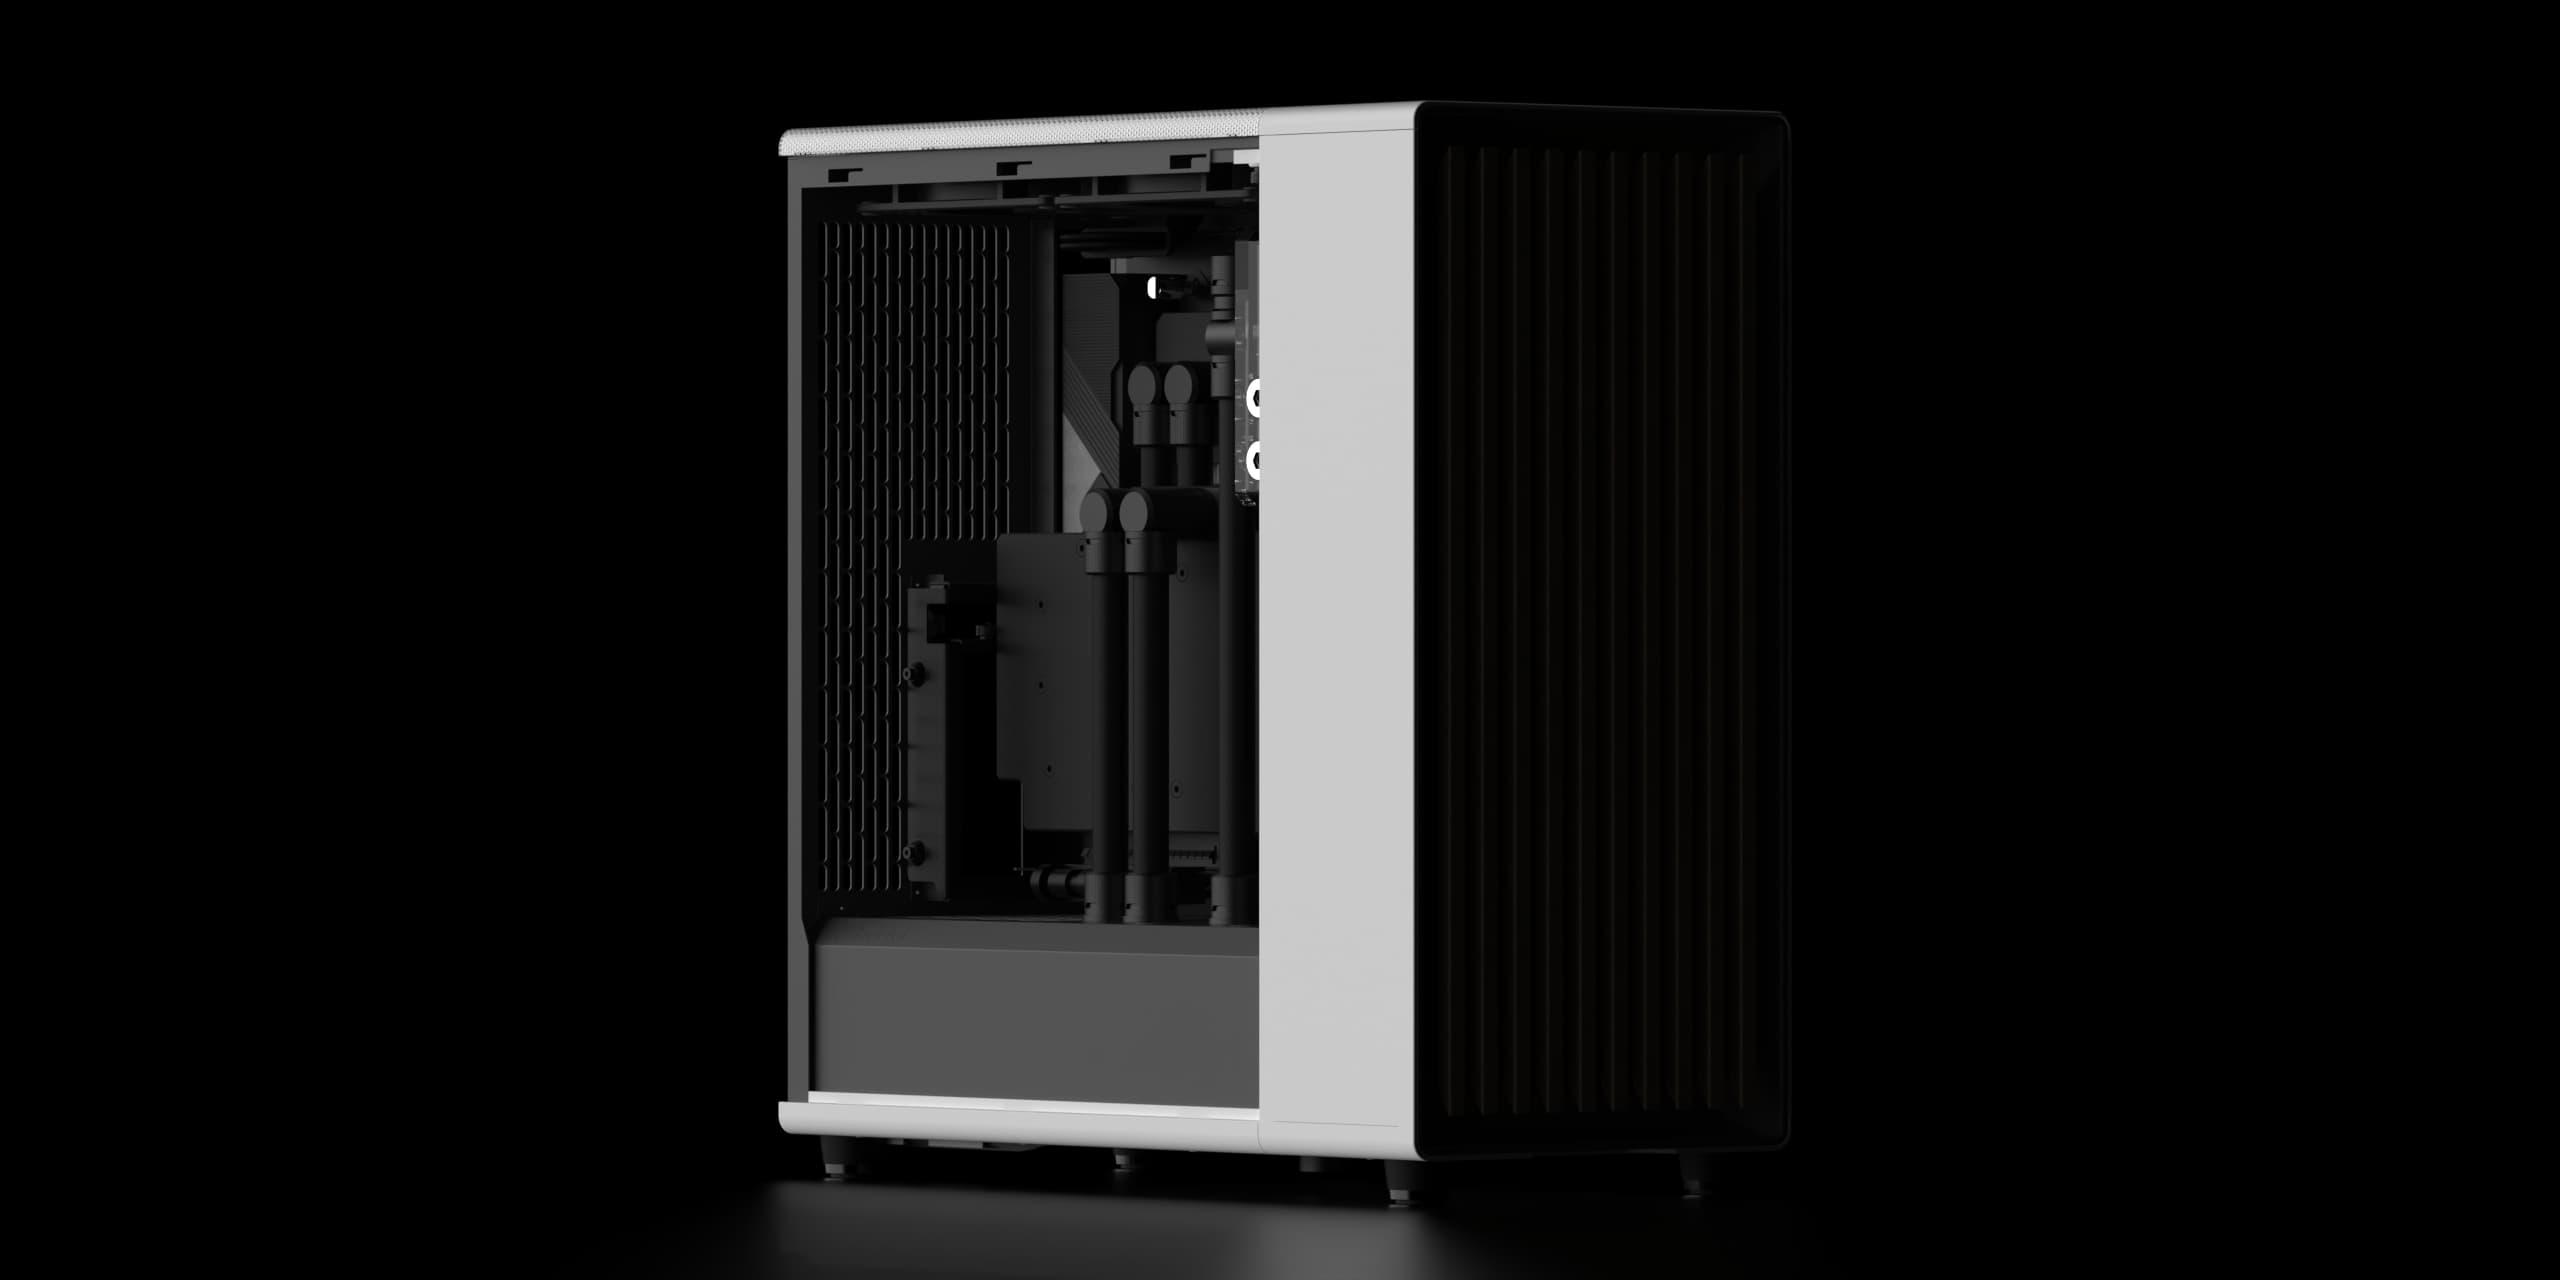
/ 00Verticality
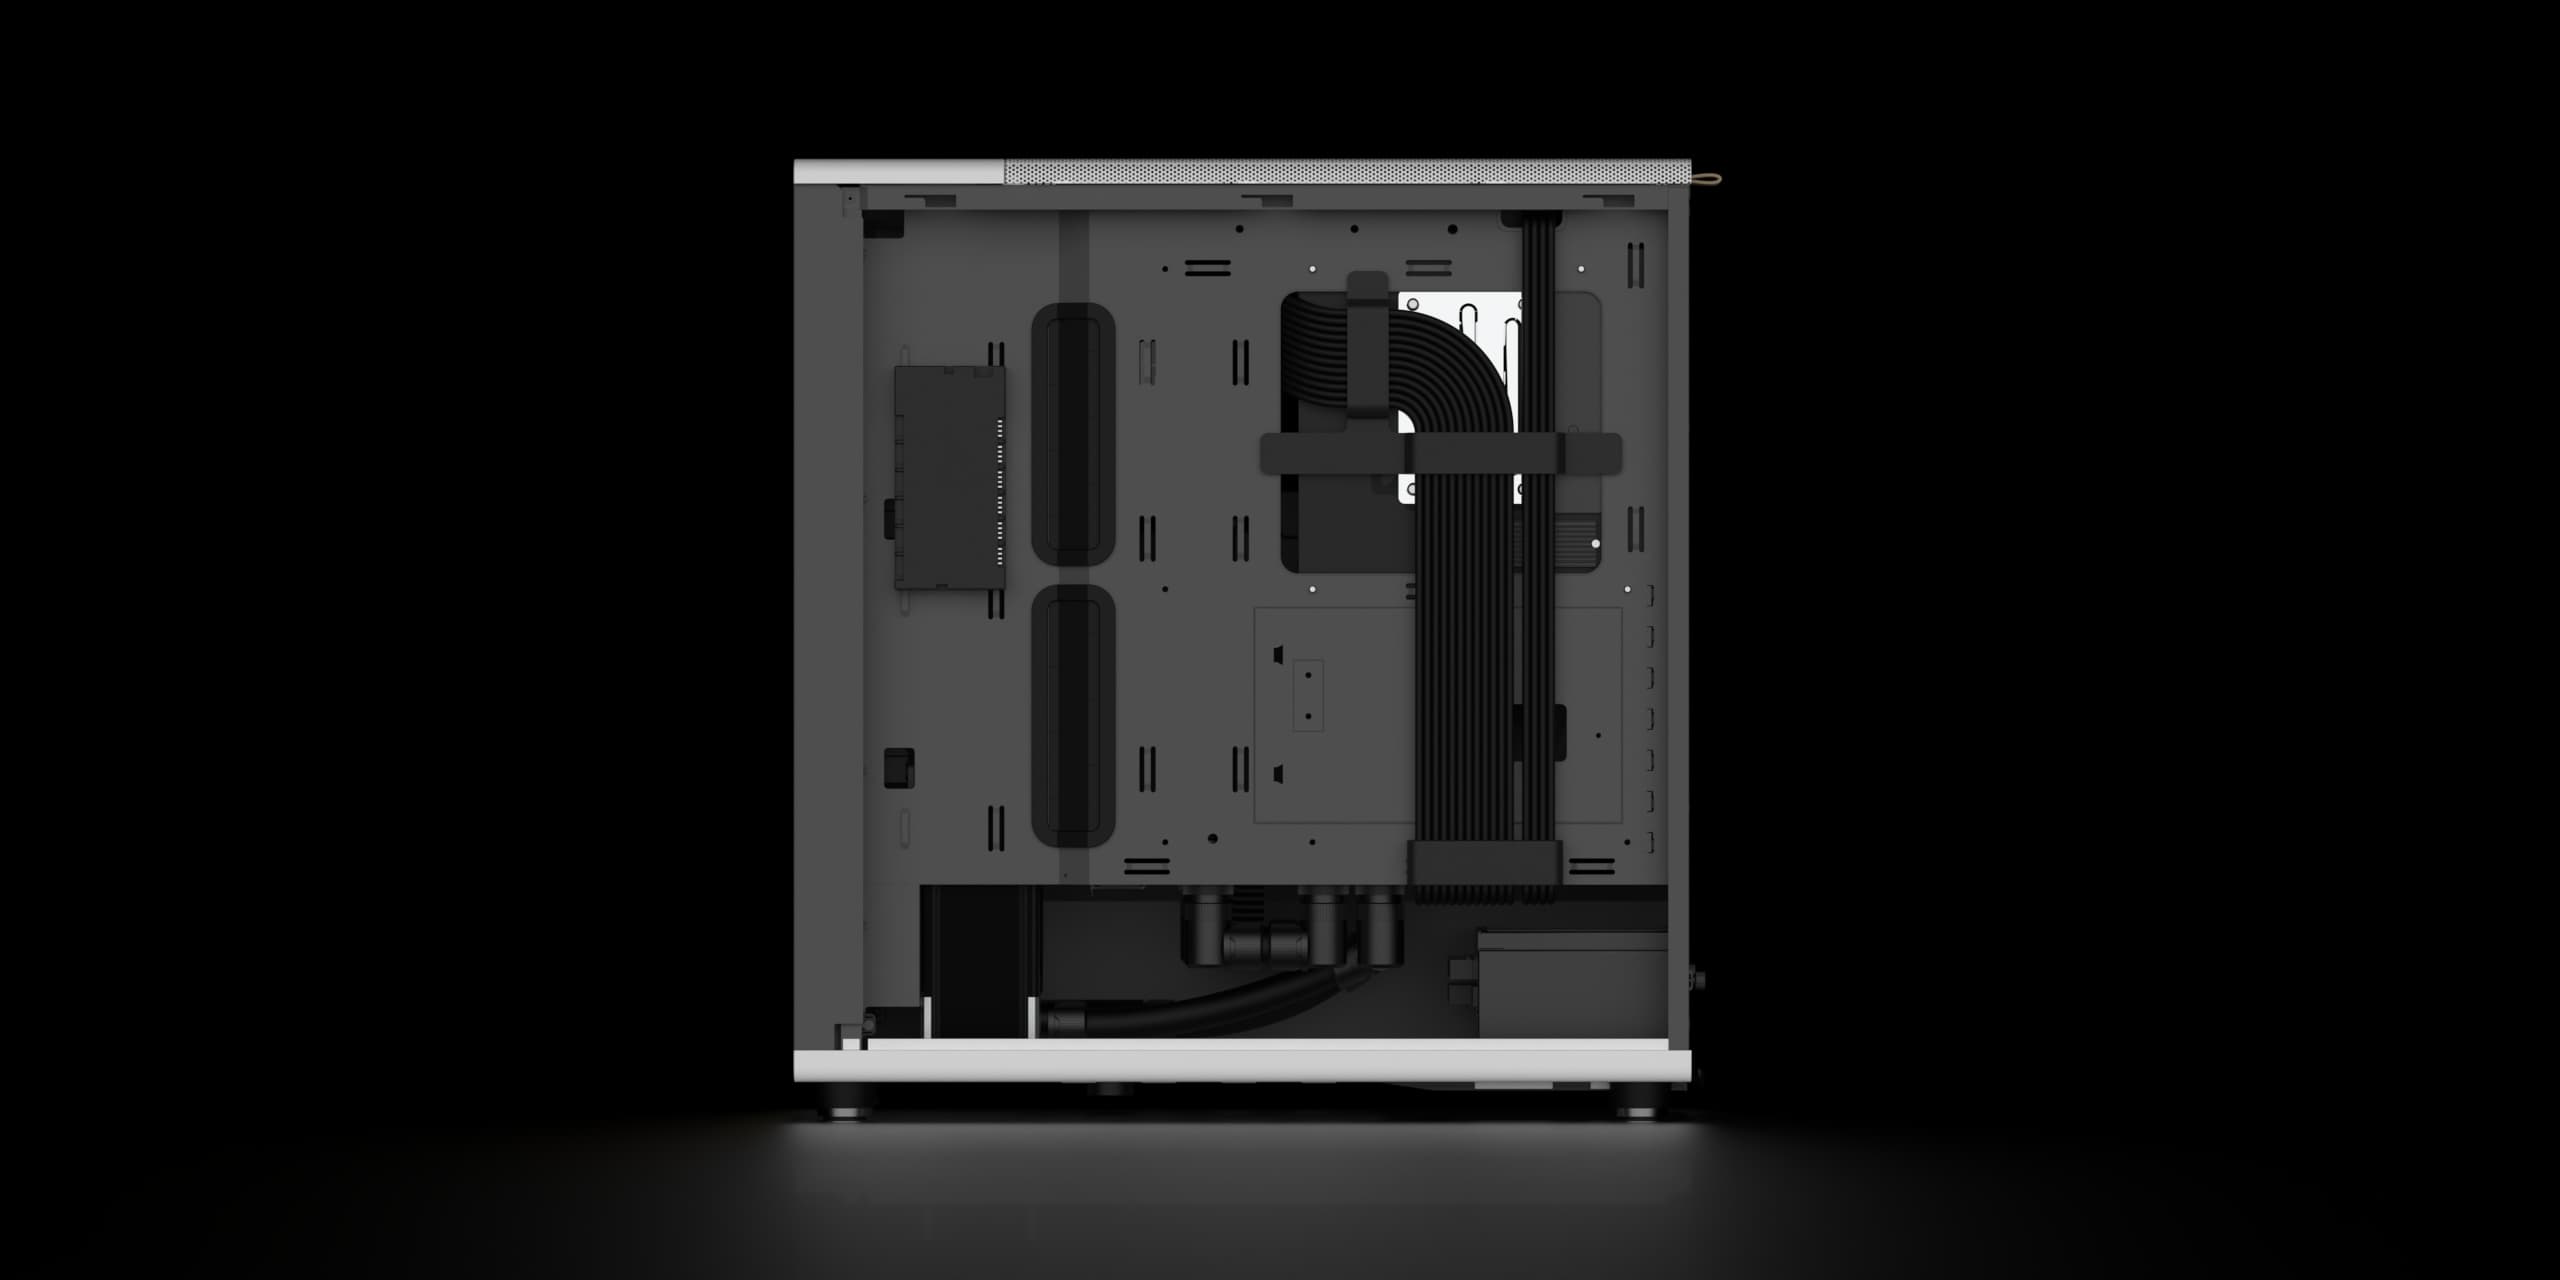
Bottom Chamber
Control Hub
Radiator Fitment
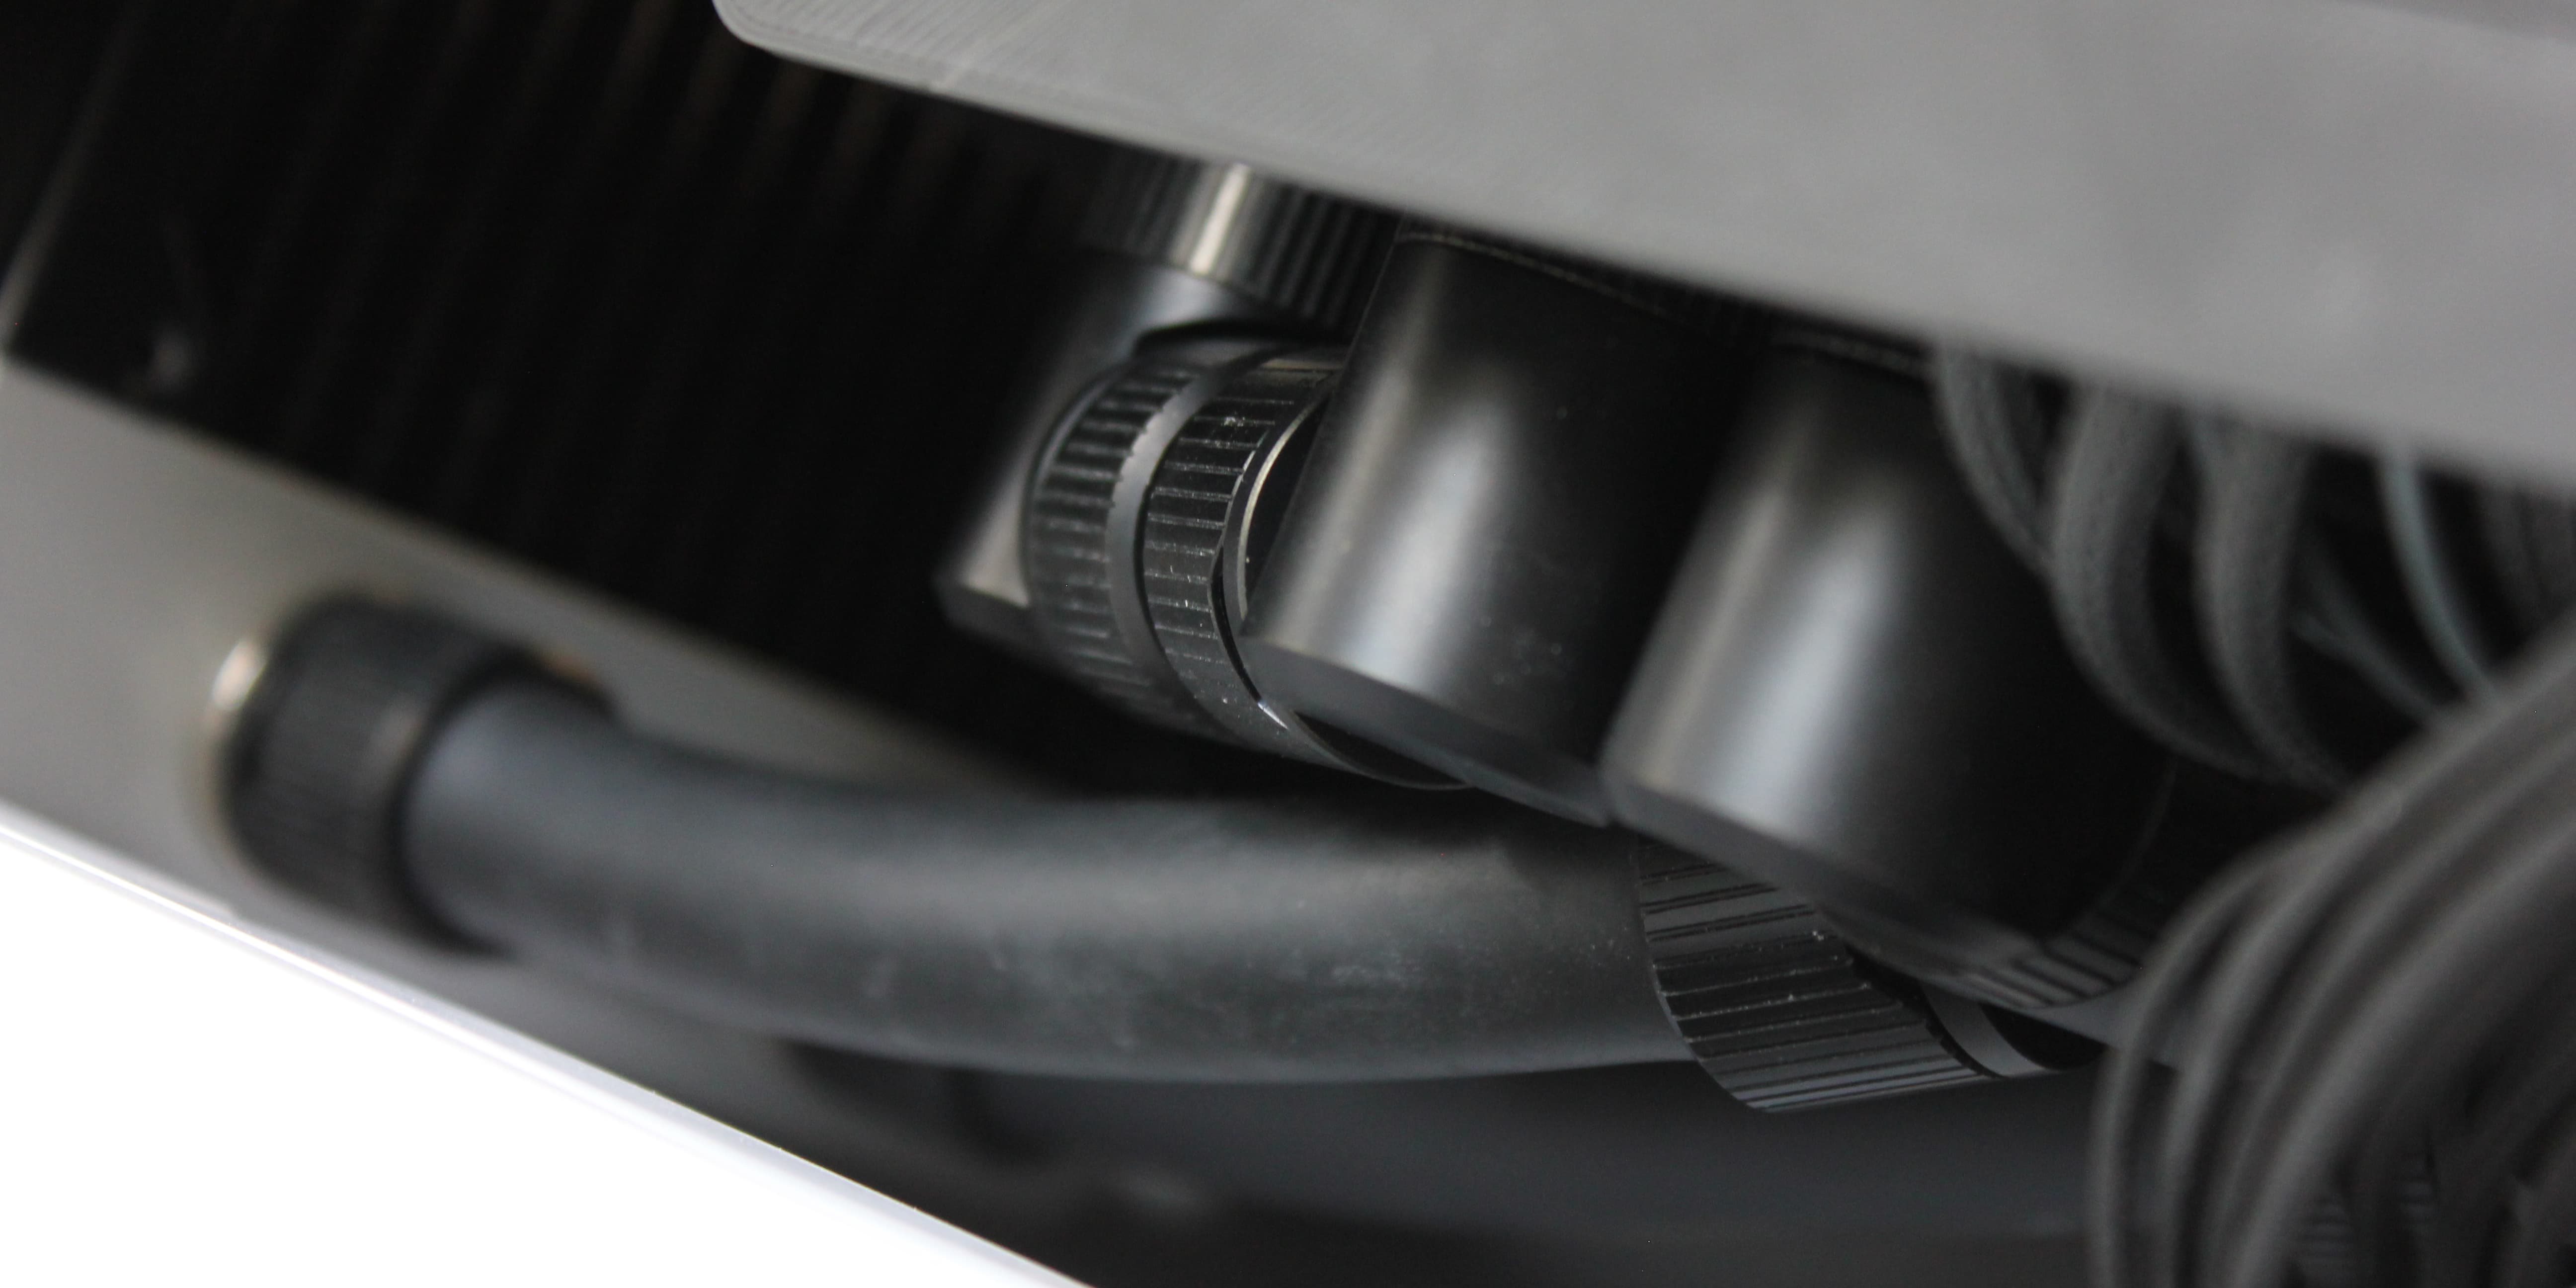
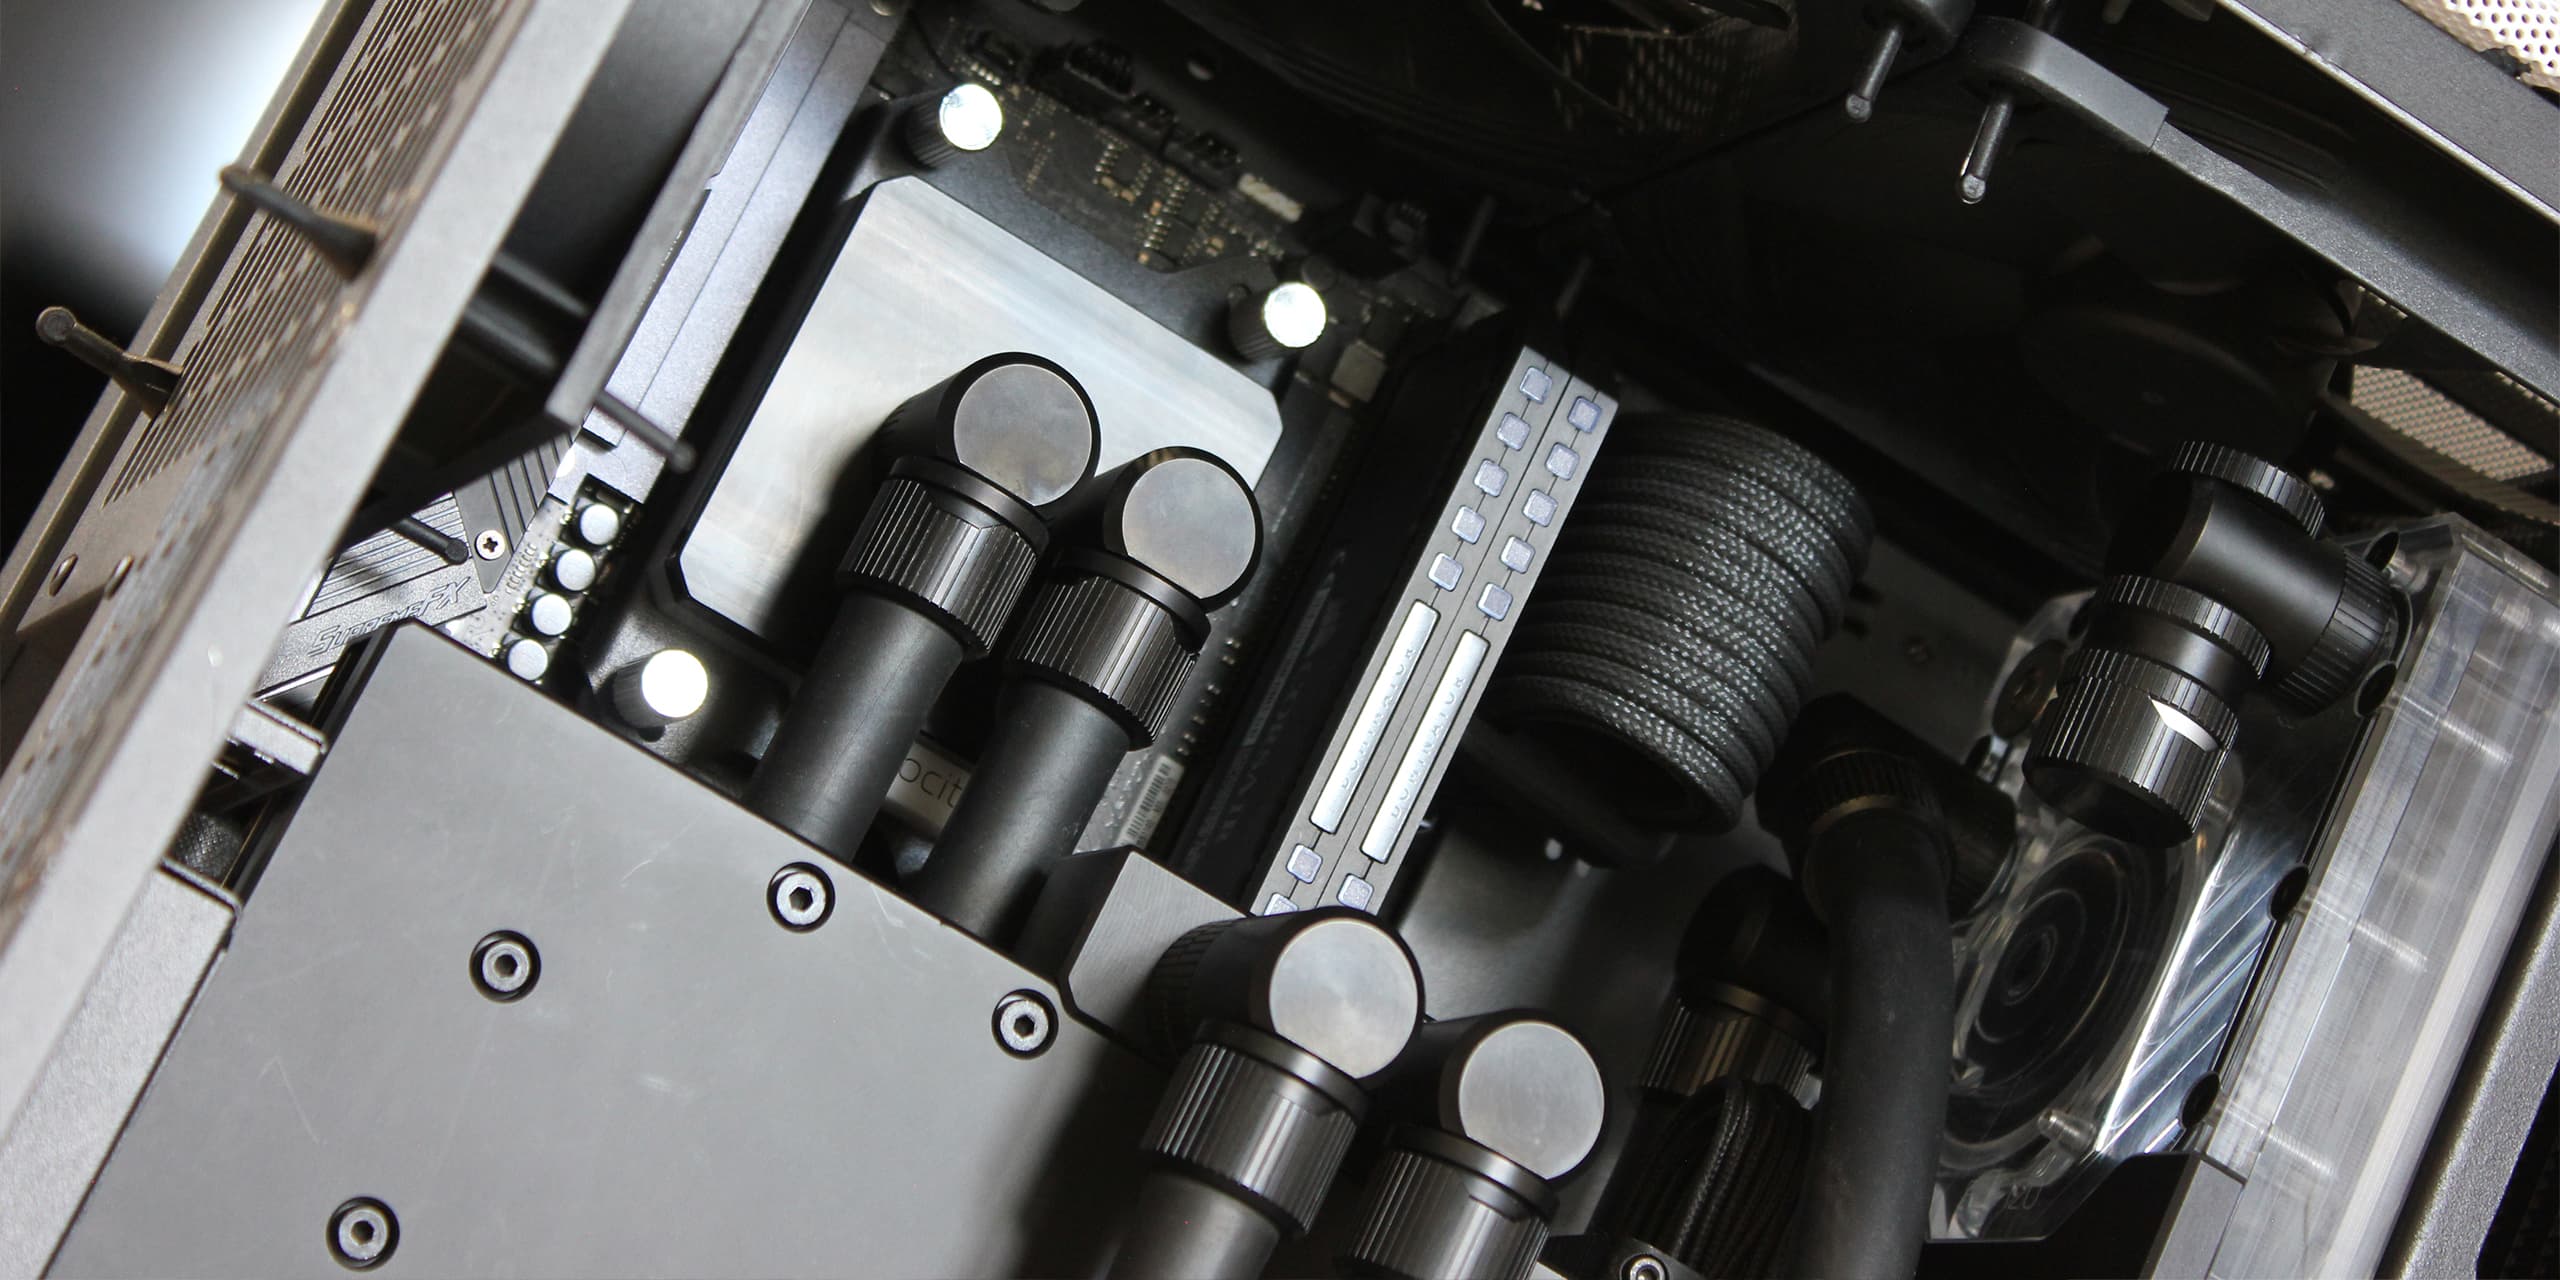
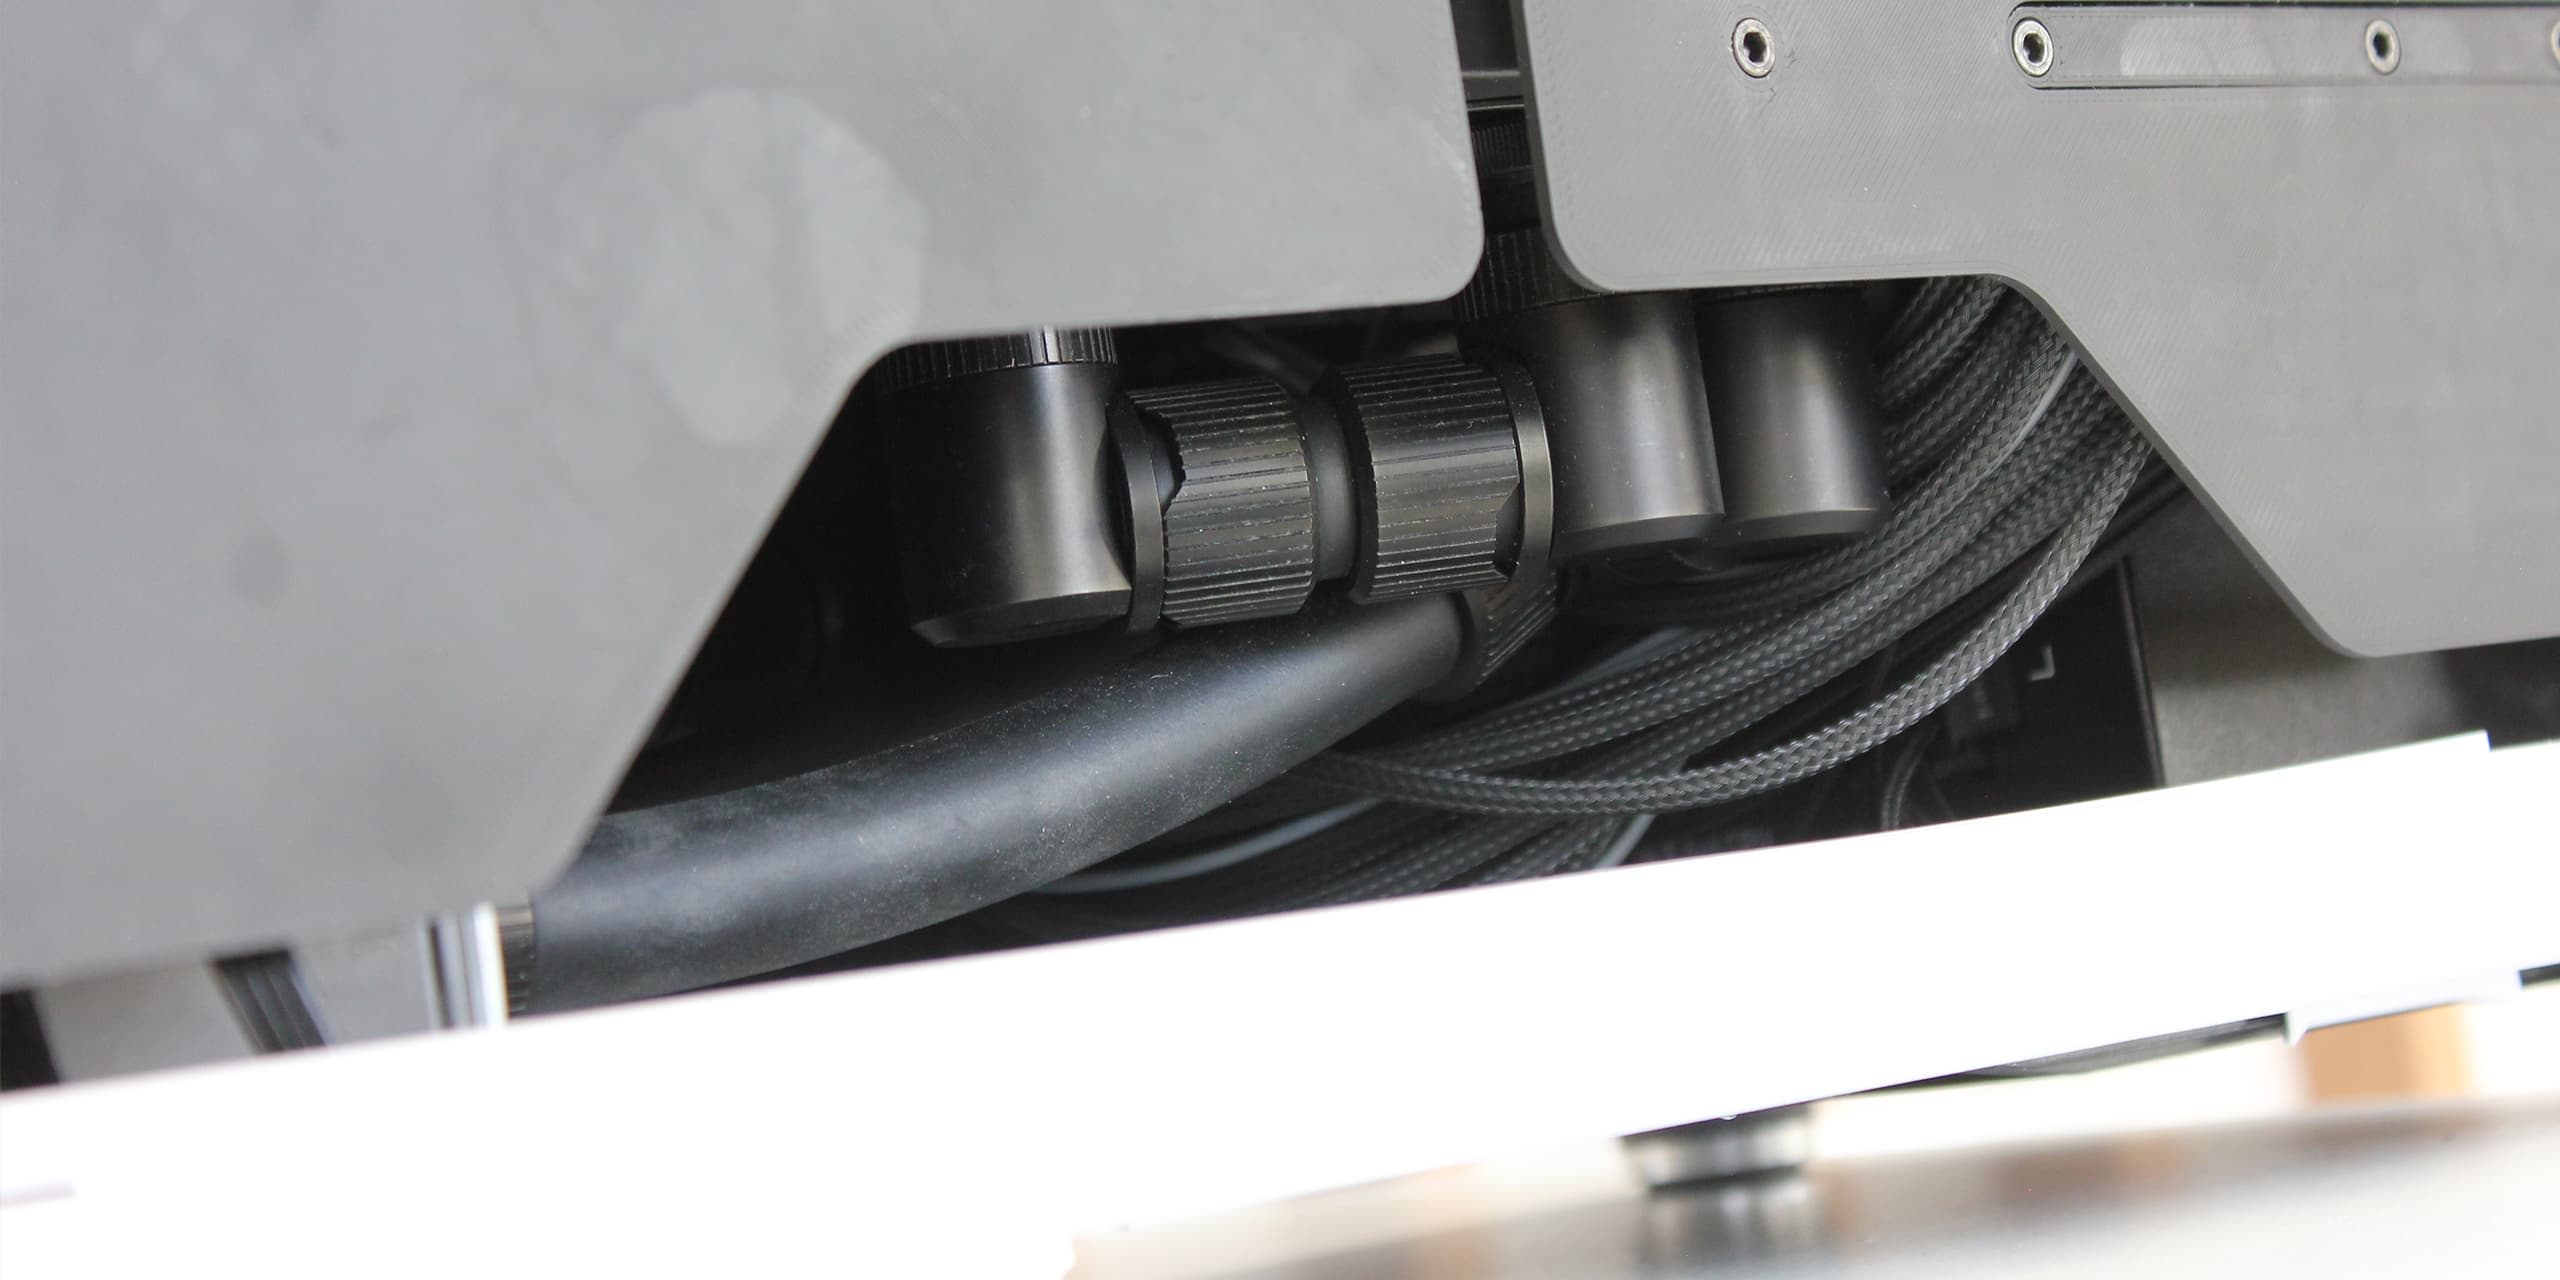
The use of pass-through fittings allows the tubing to be aligned vertically. While this requires some modifications to the chassis it creates a unifying direction to the cooling loop, appearing structured and clutter-free. The vertical GPU also covers some of the less appealing connectors on the motherboard, which further adds to the clean aesthetic.
For convenient filling of the loop, an EK-Quantum Torque Drain Valve is installed onto the reservoir using a T-fitting. This is an exciting and compact innovation from EK with an "axial slide" open/close mechanism. It also has a male thread unlike traditional ball valves, allowing it to be installed without any adapter fitting.
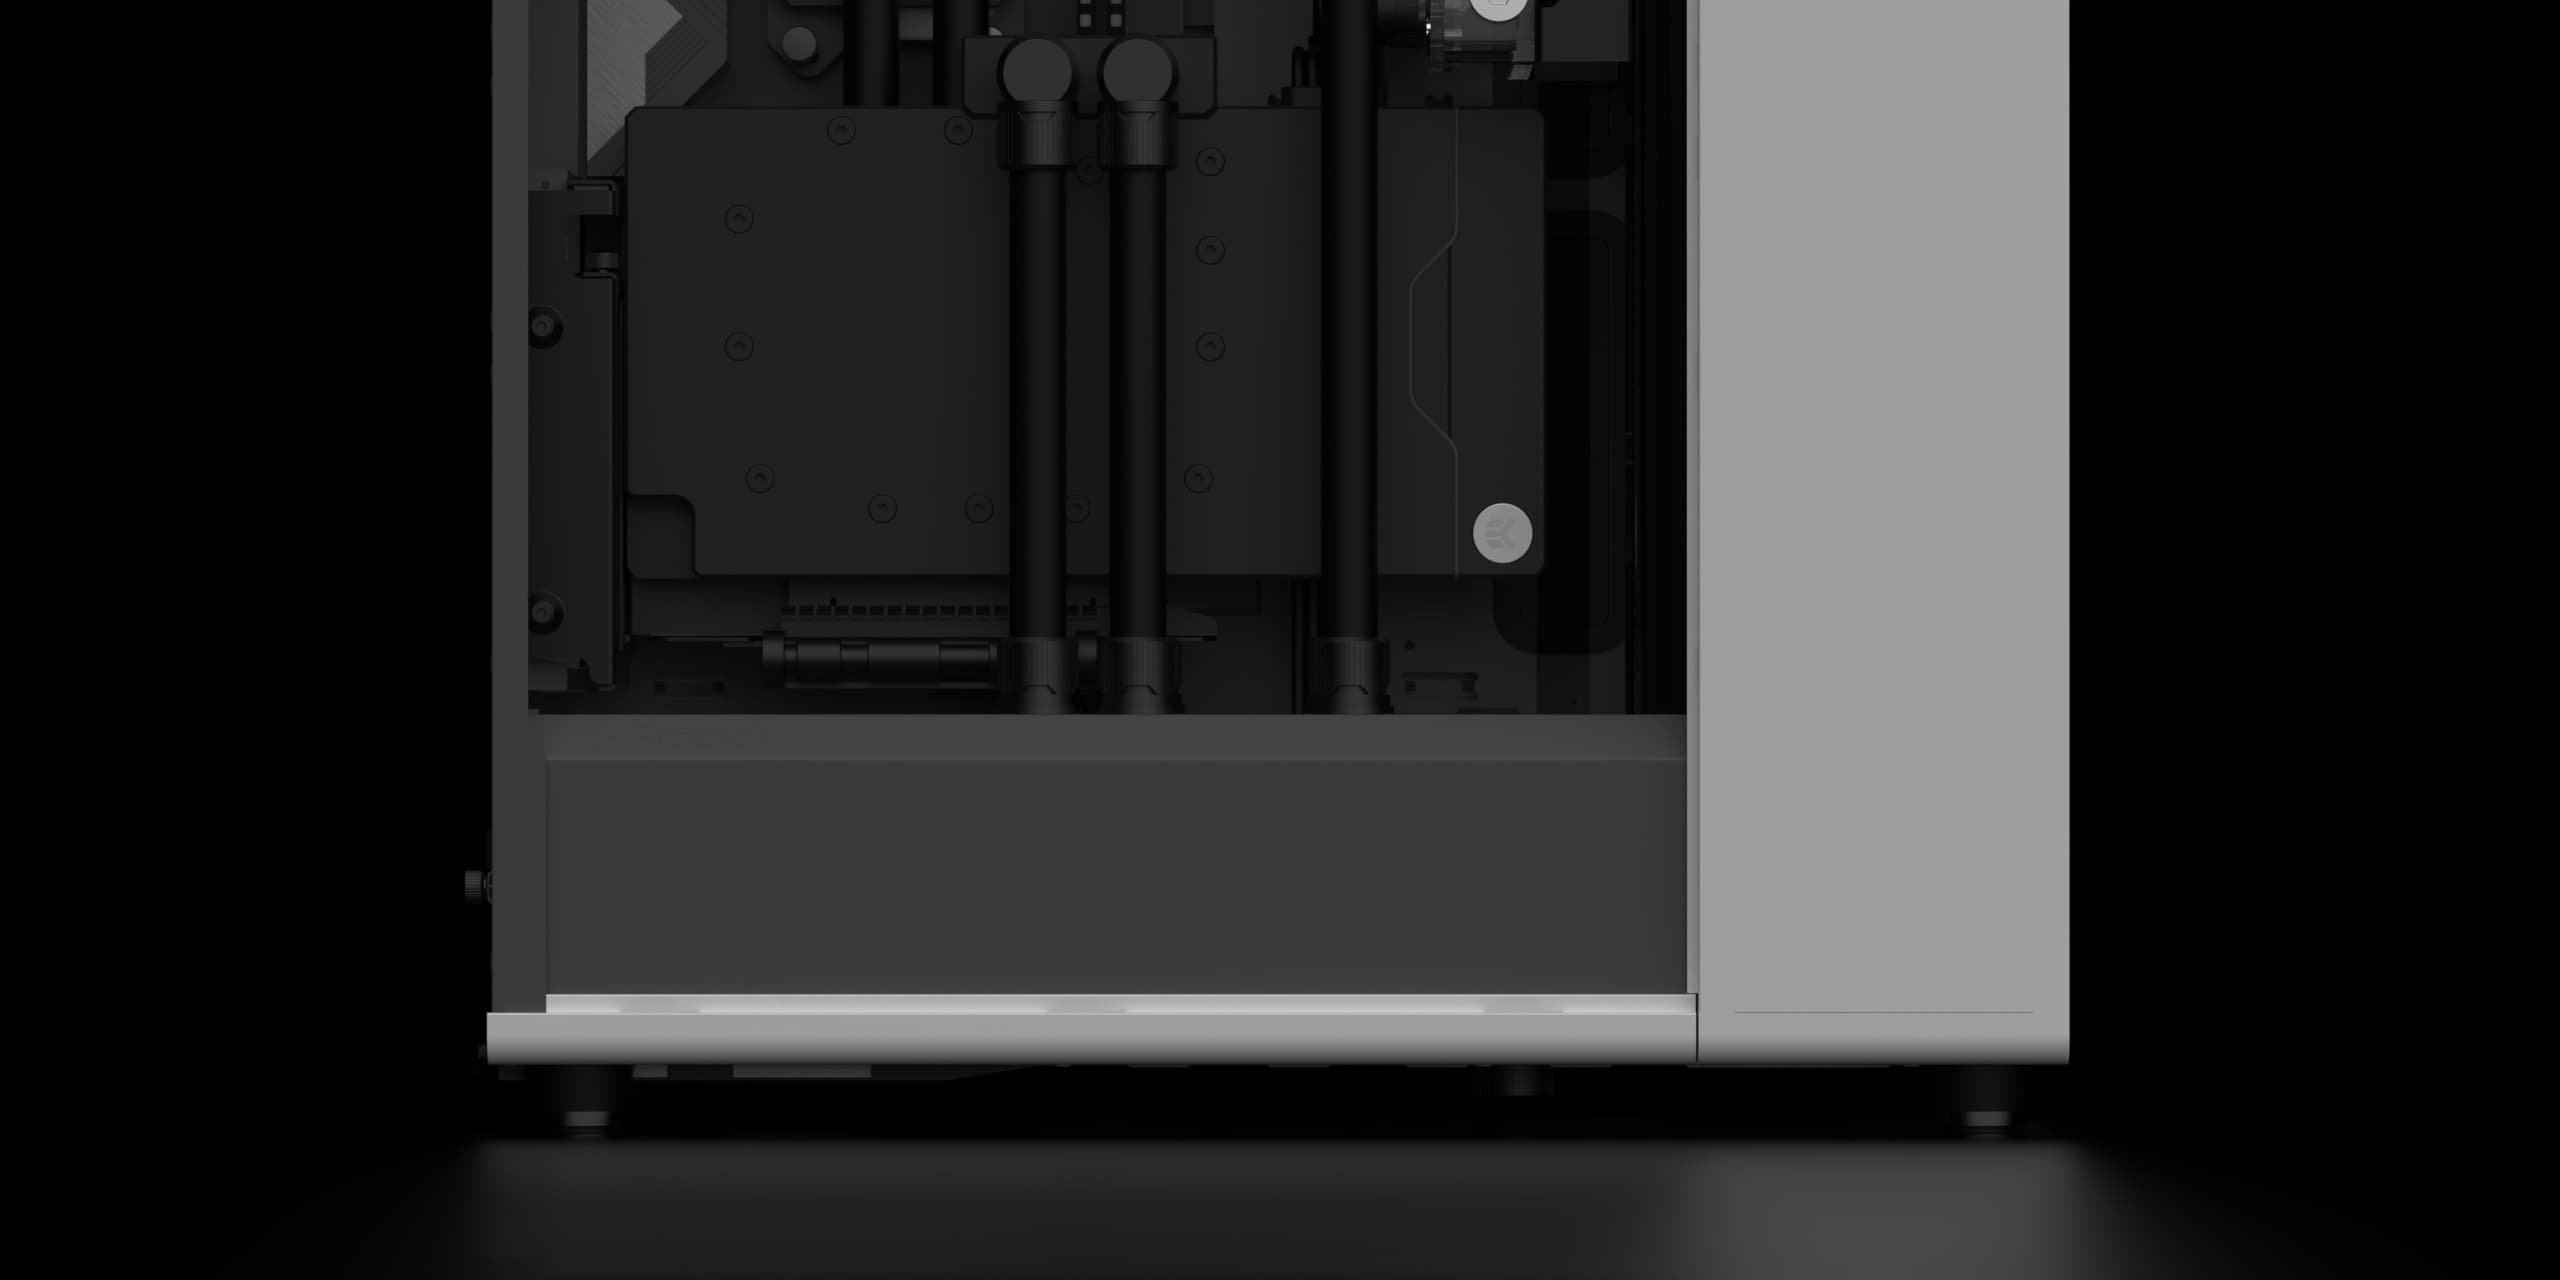
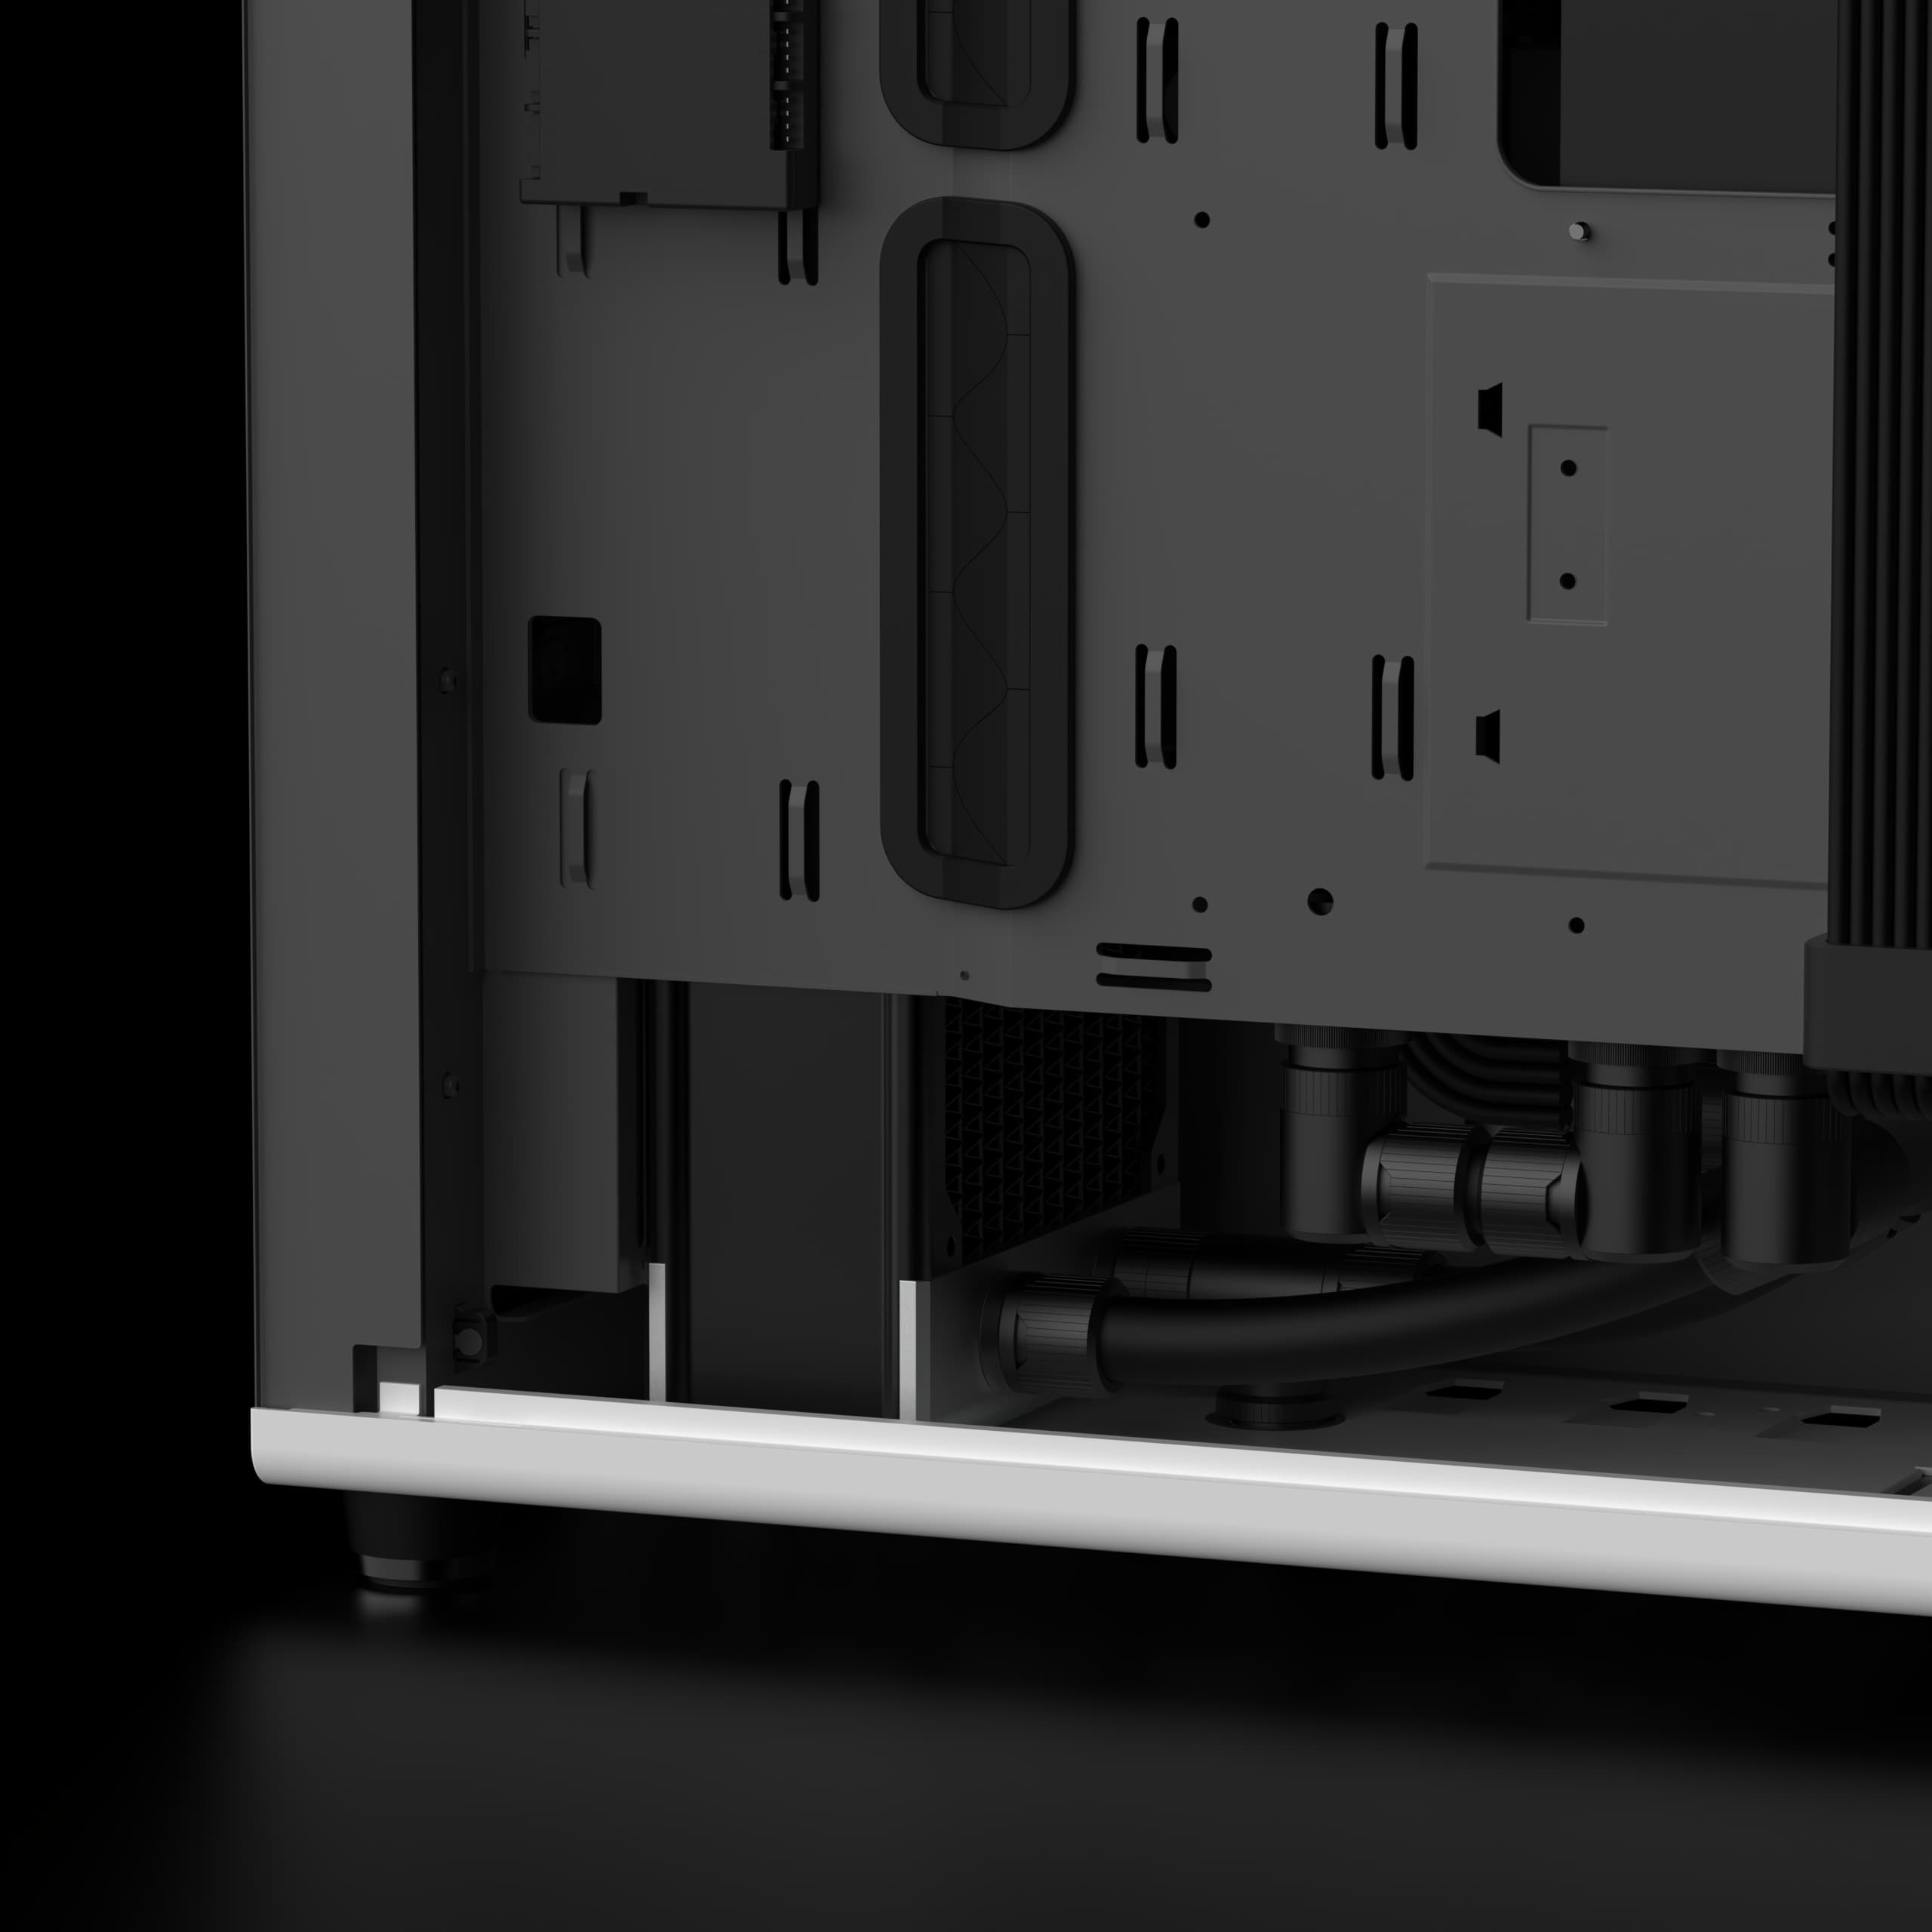
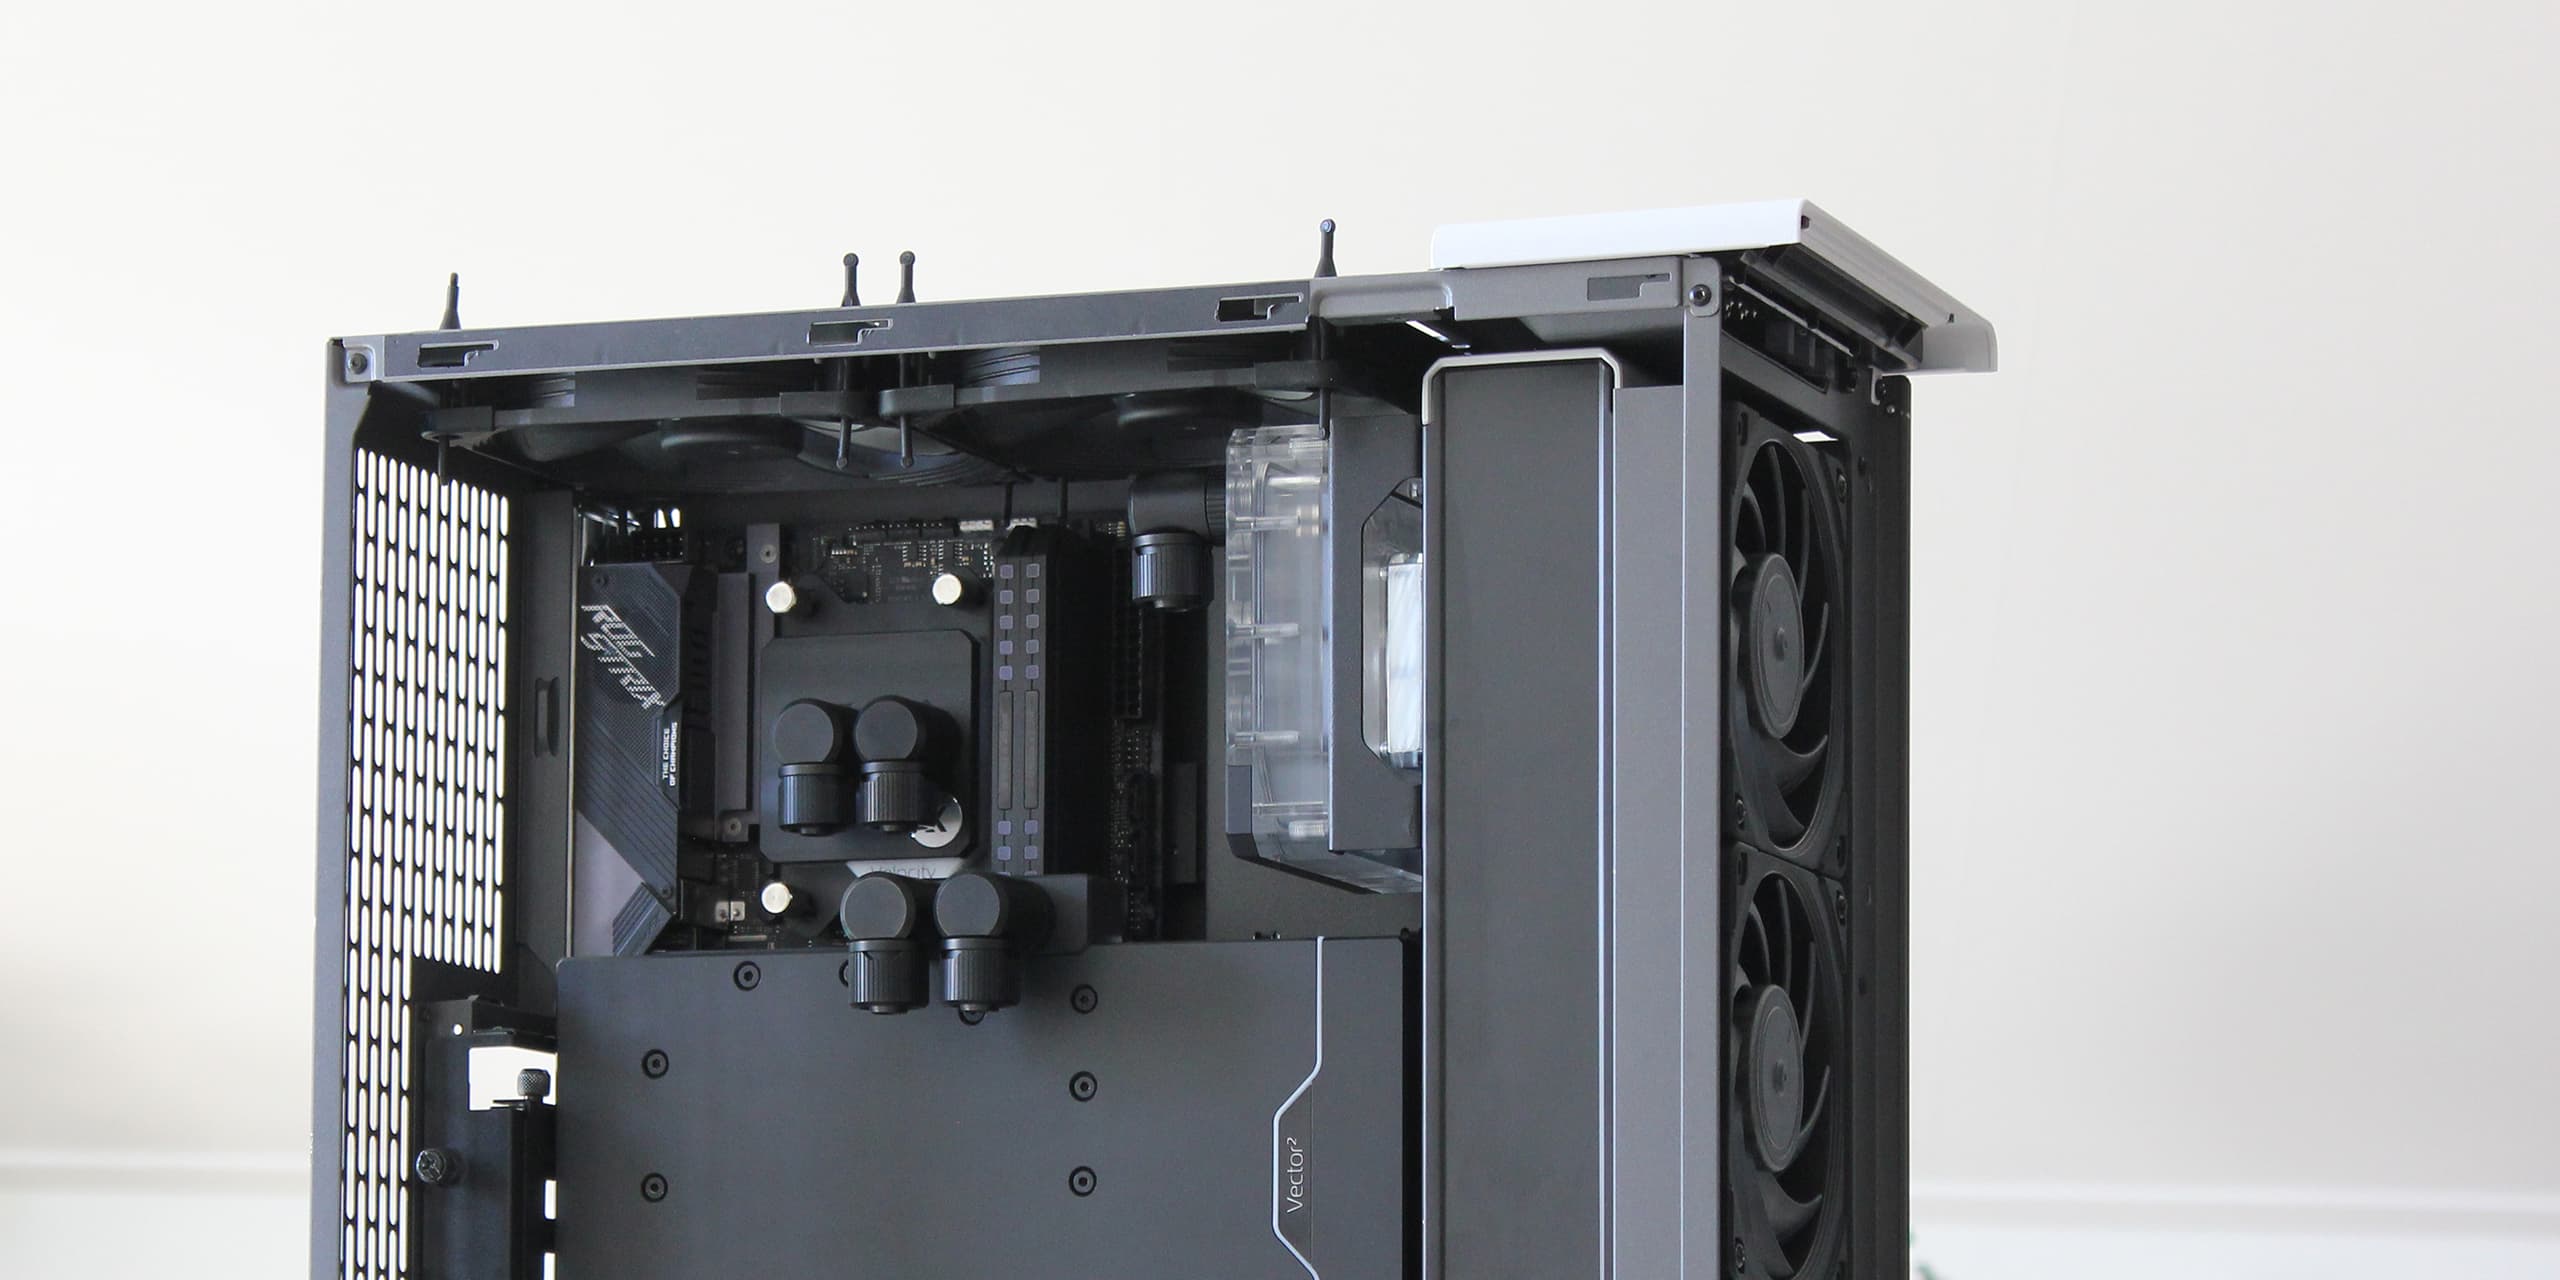
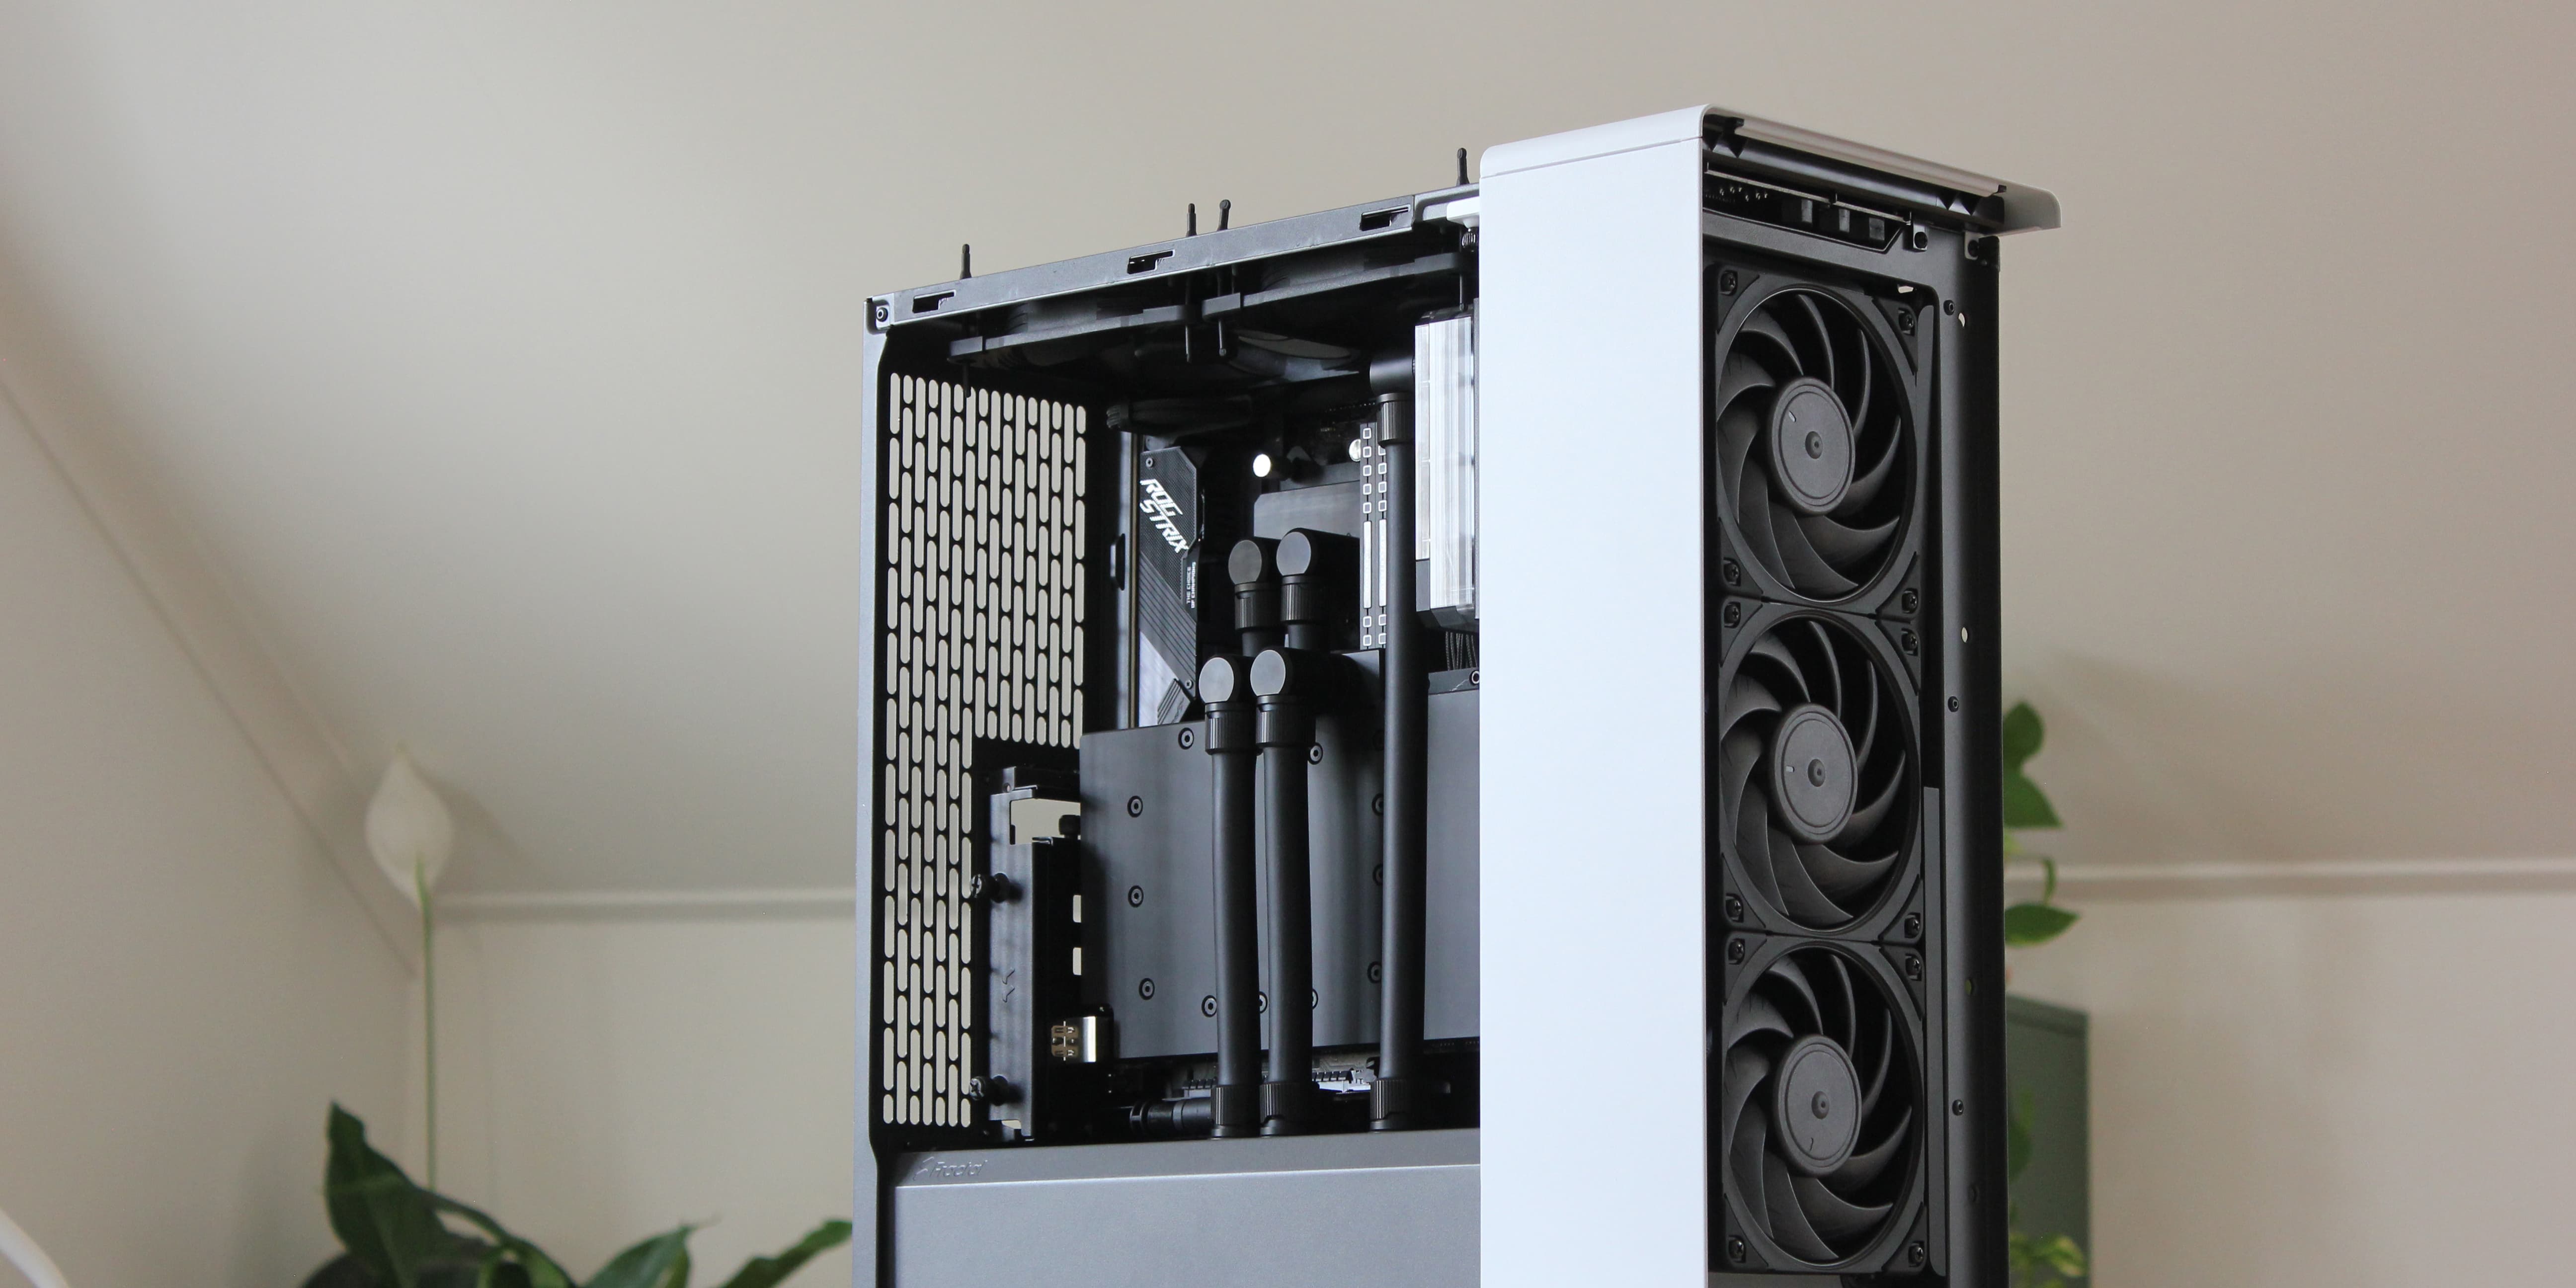
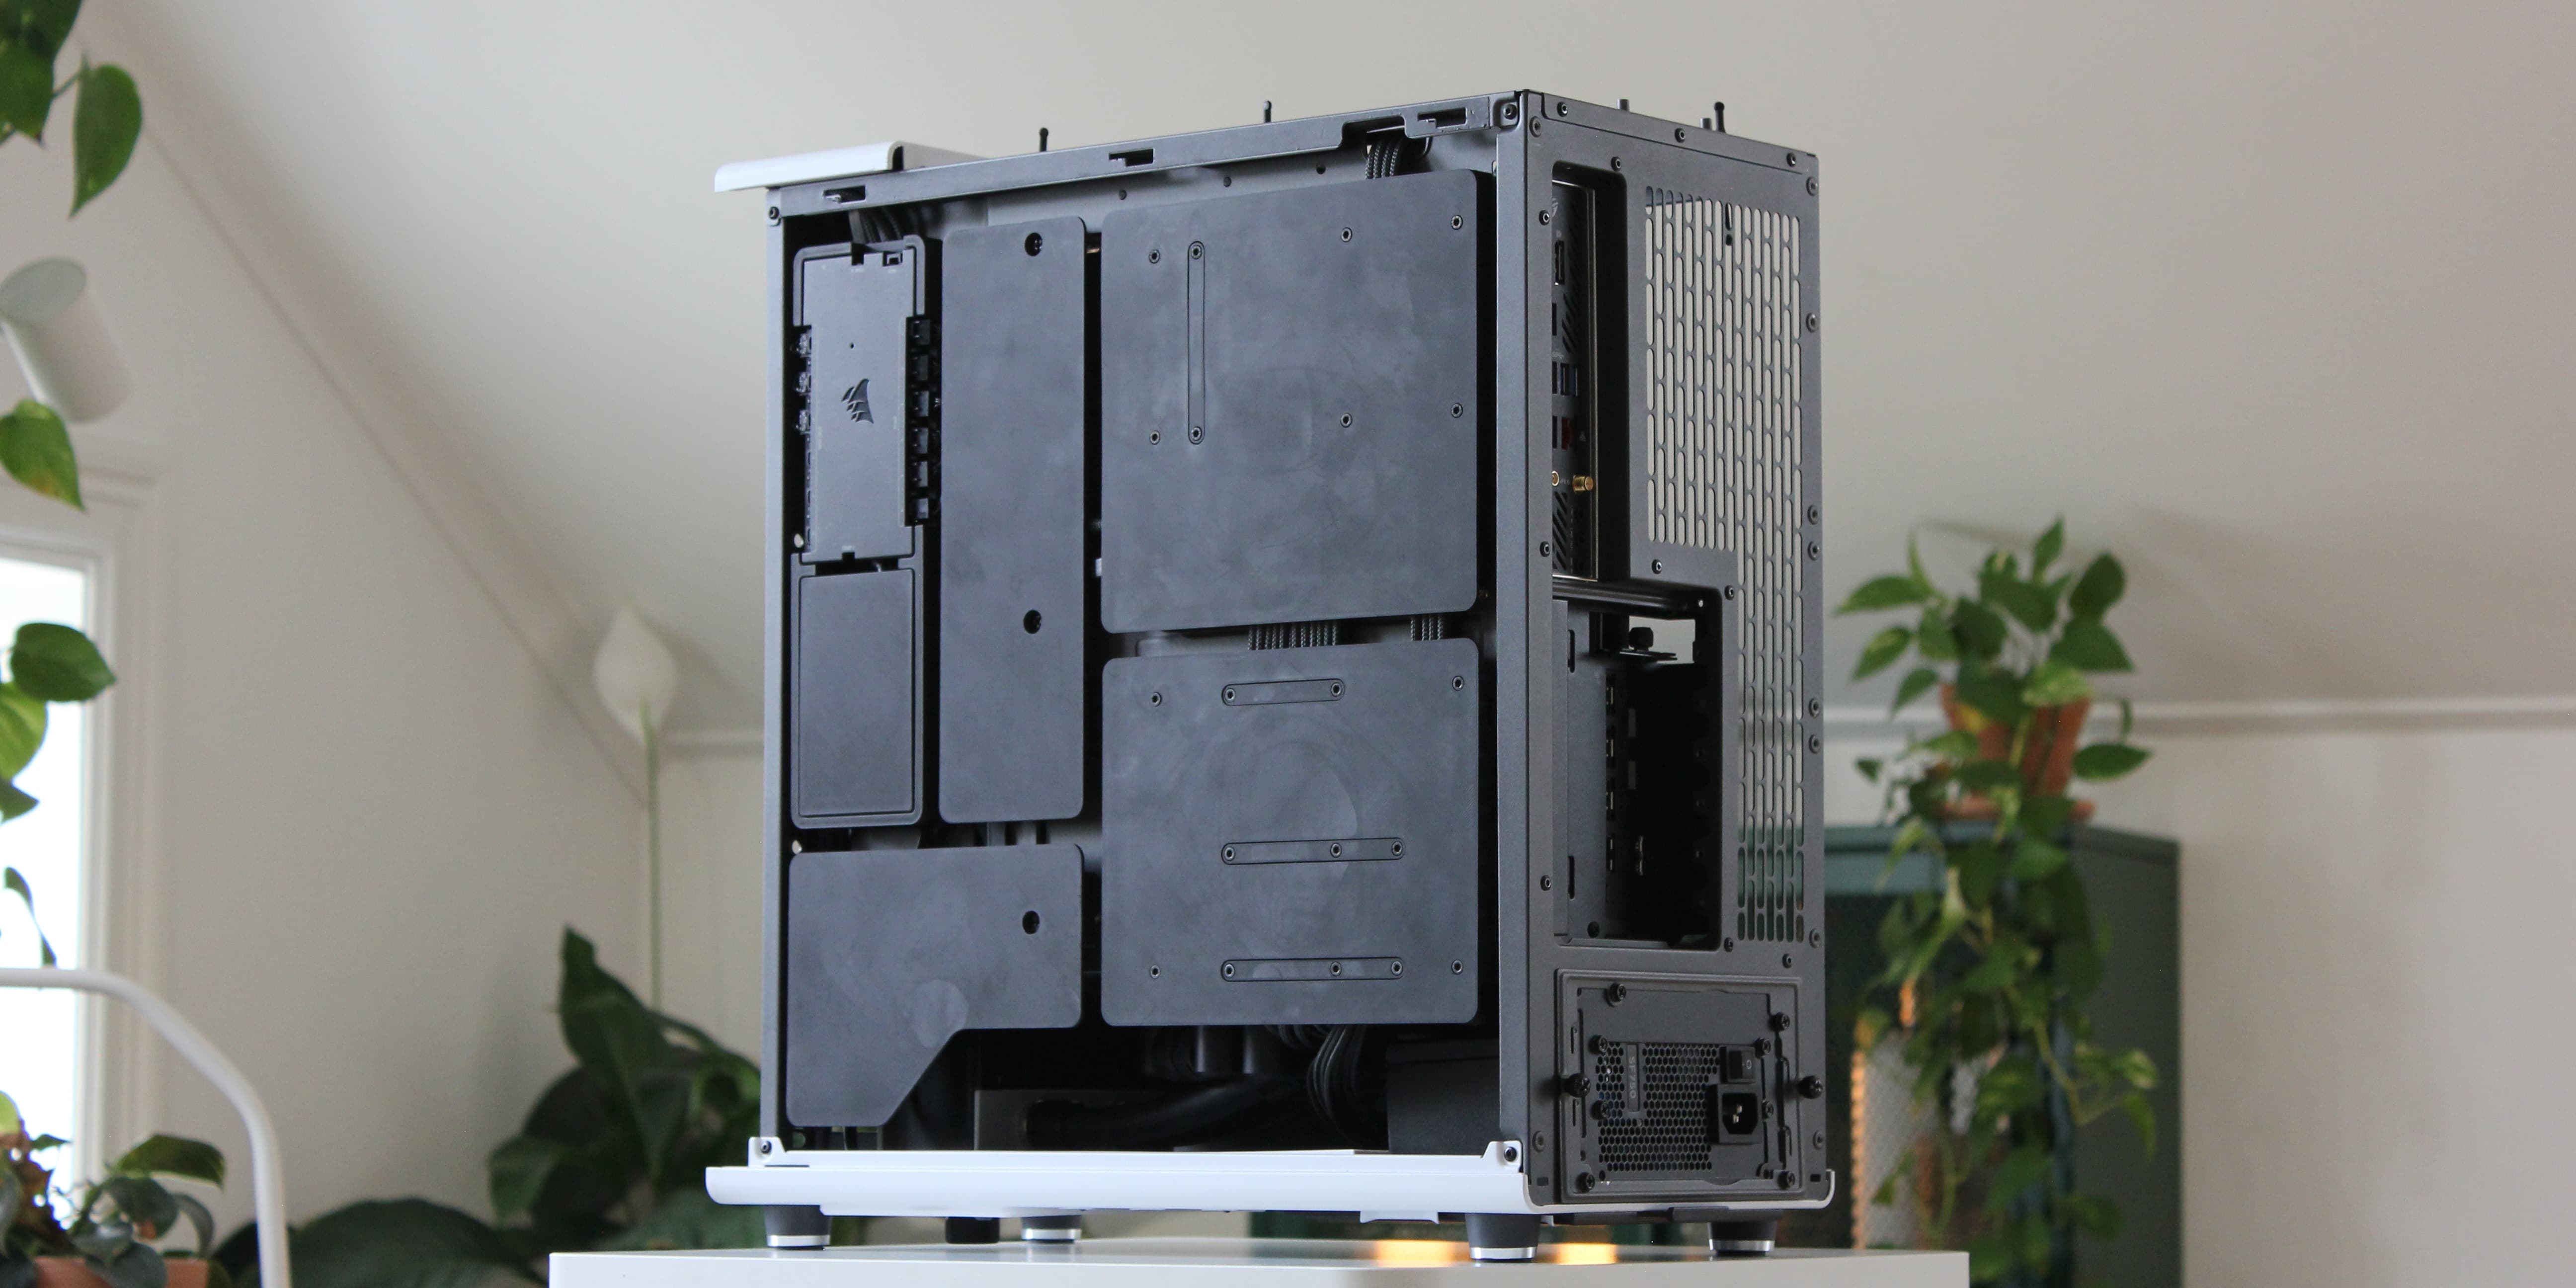
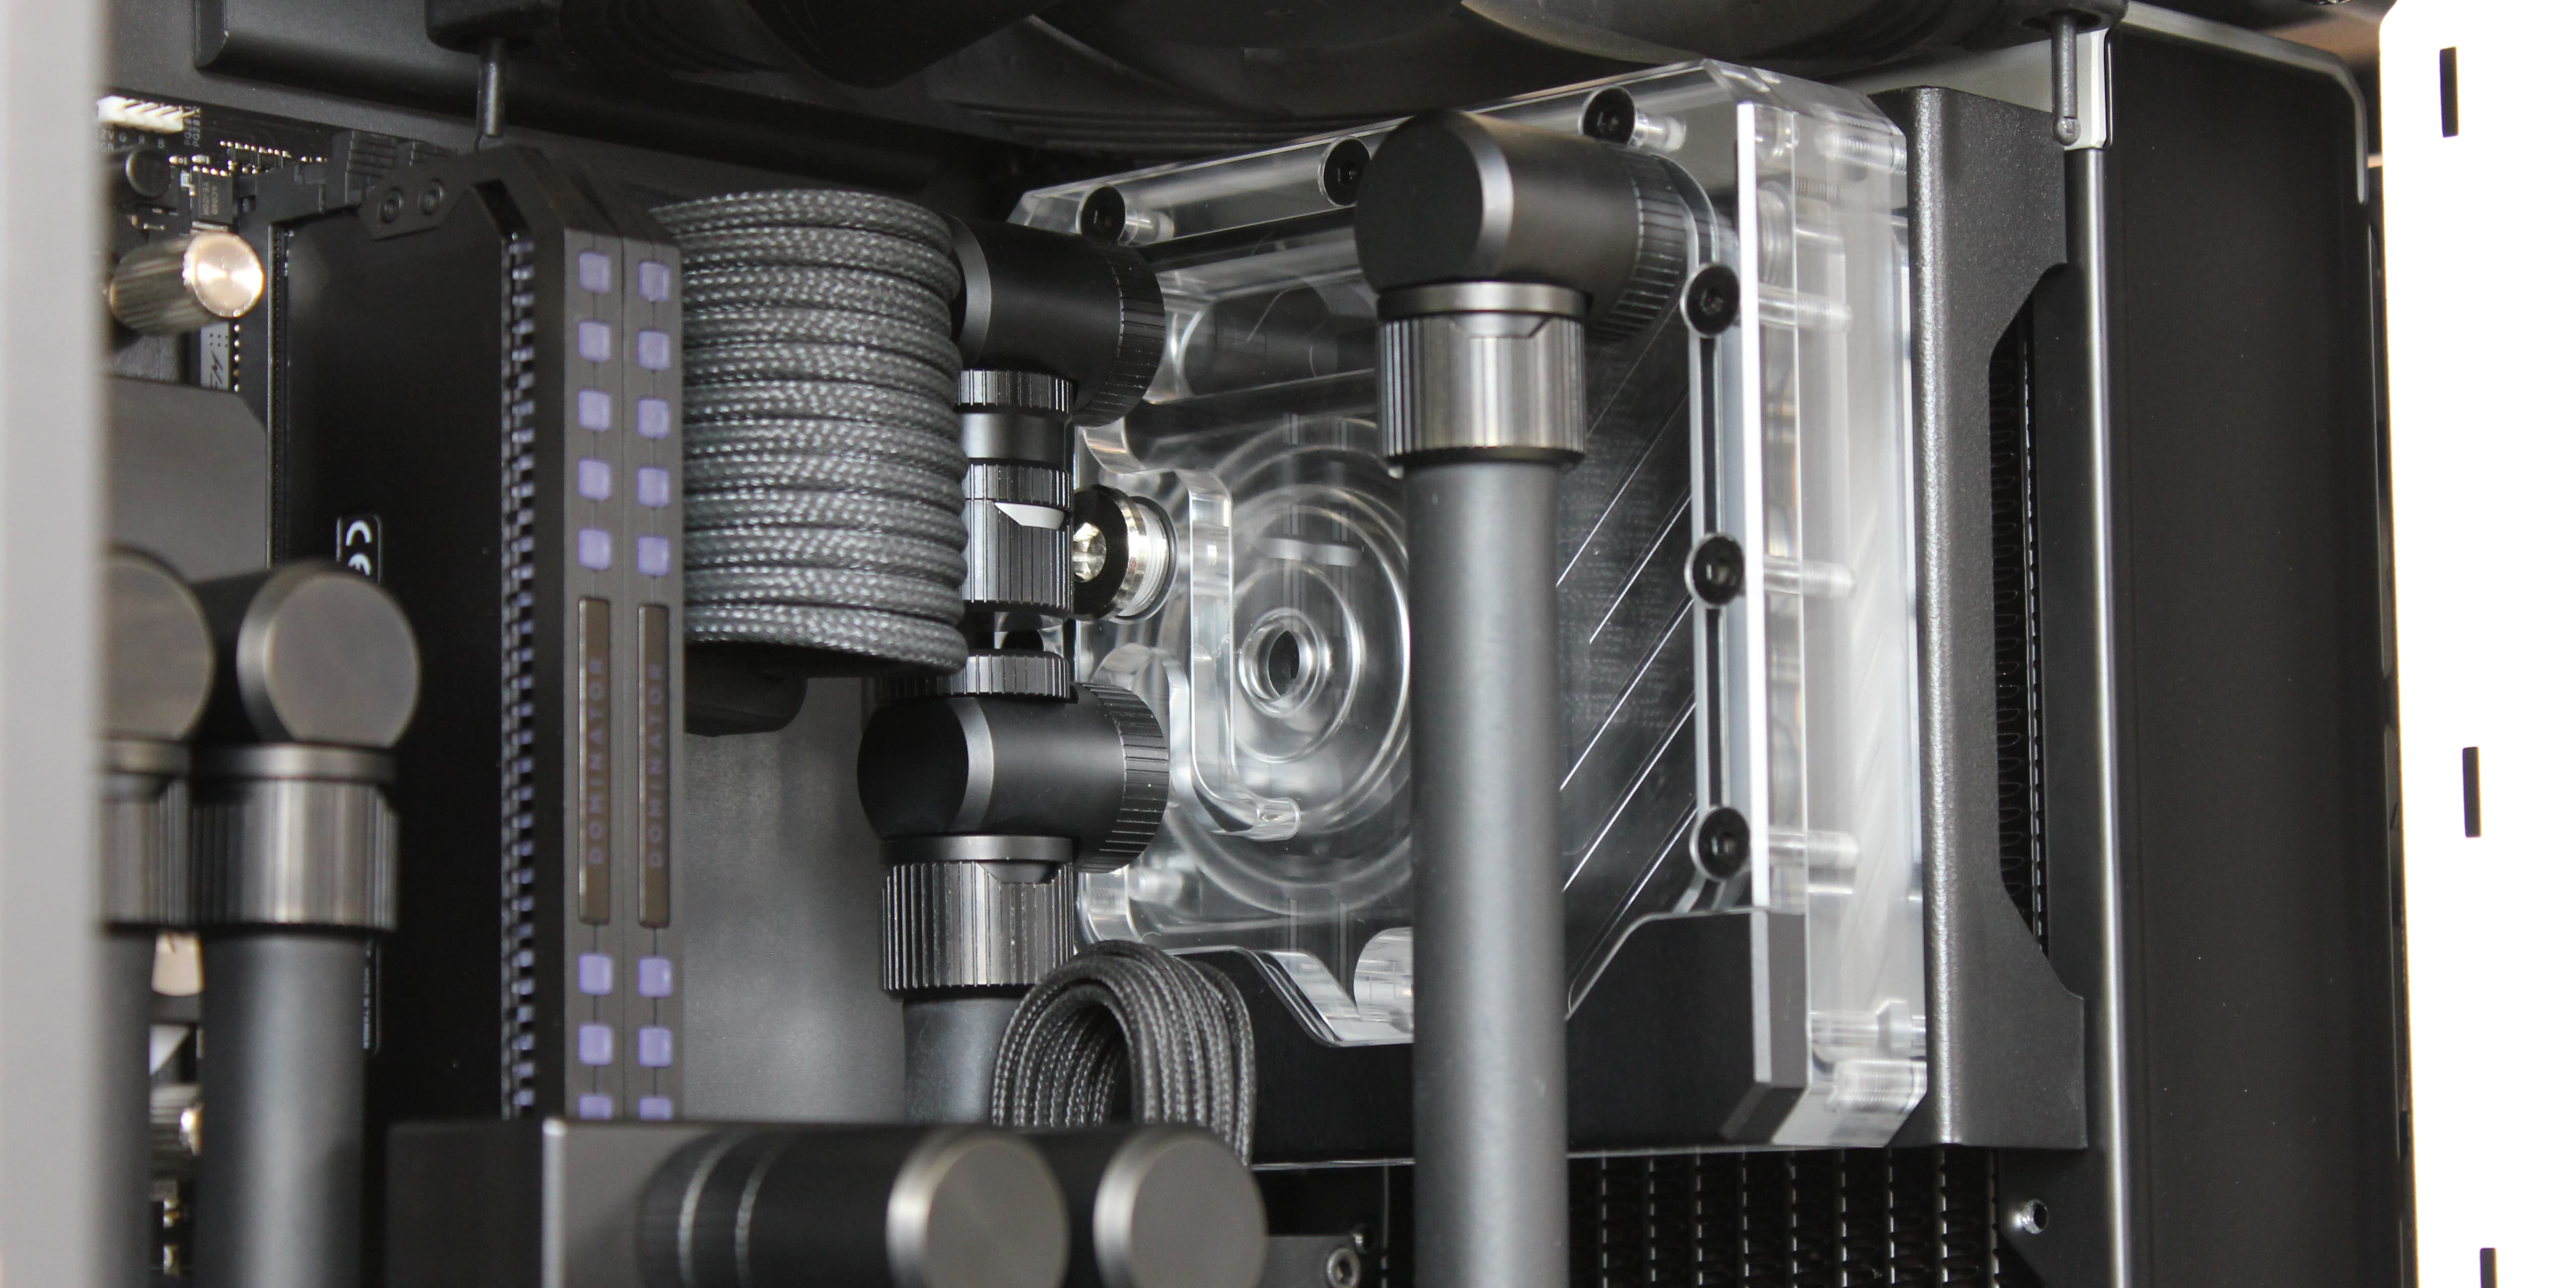
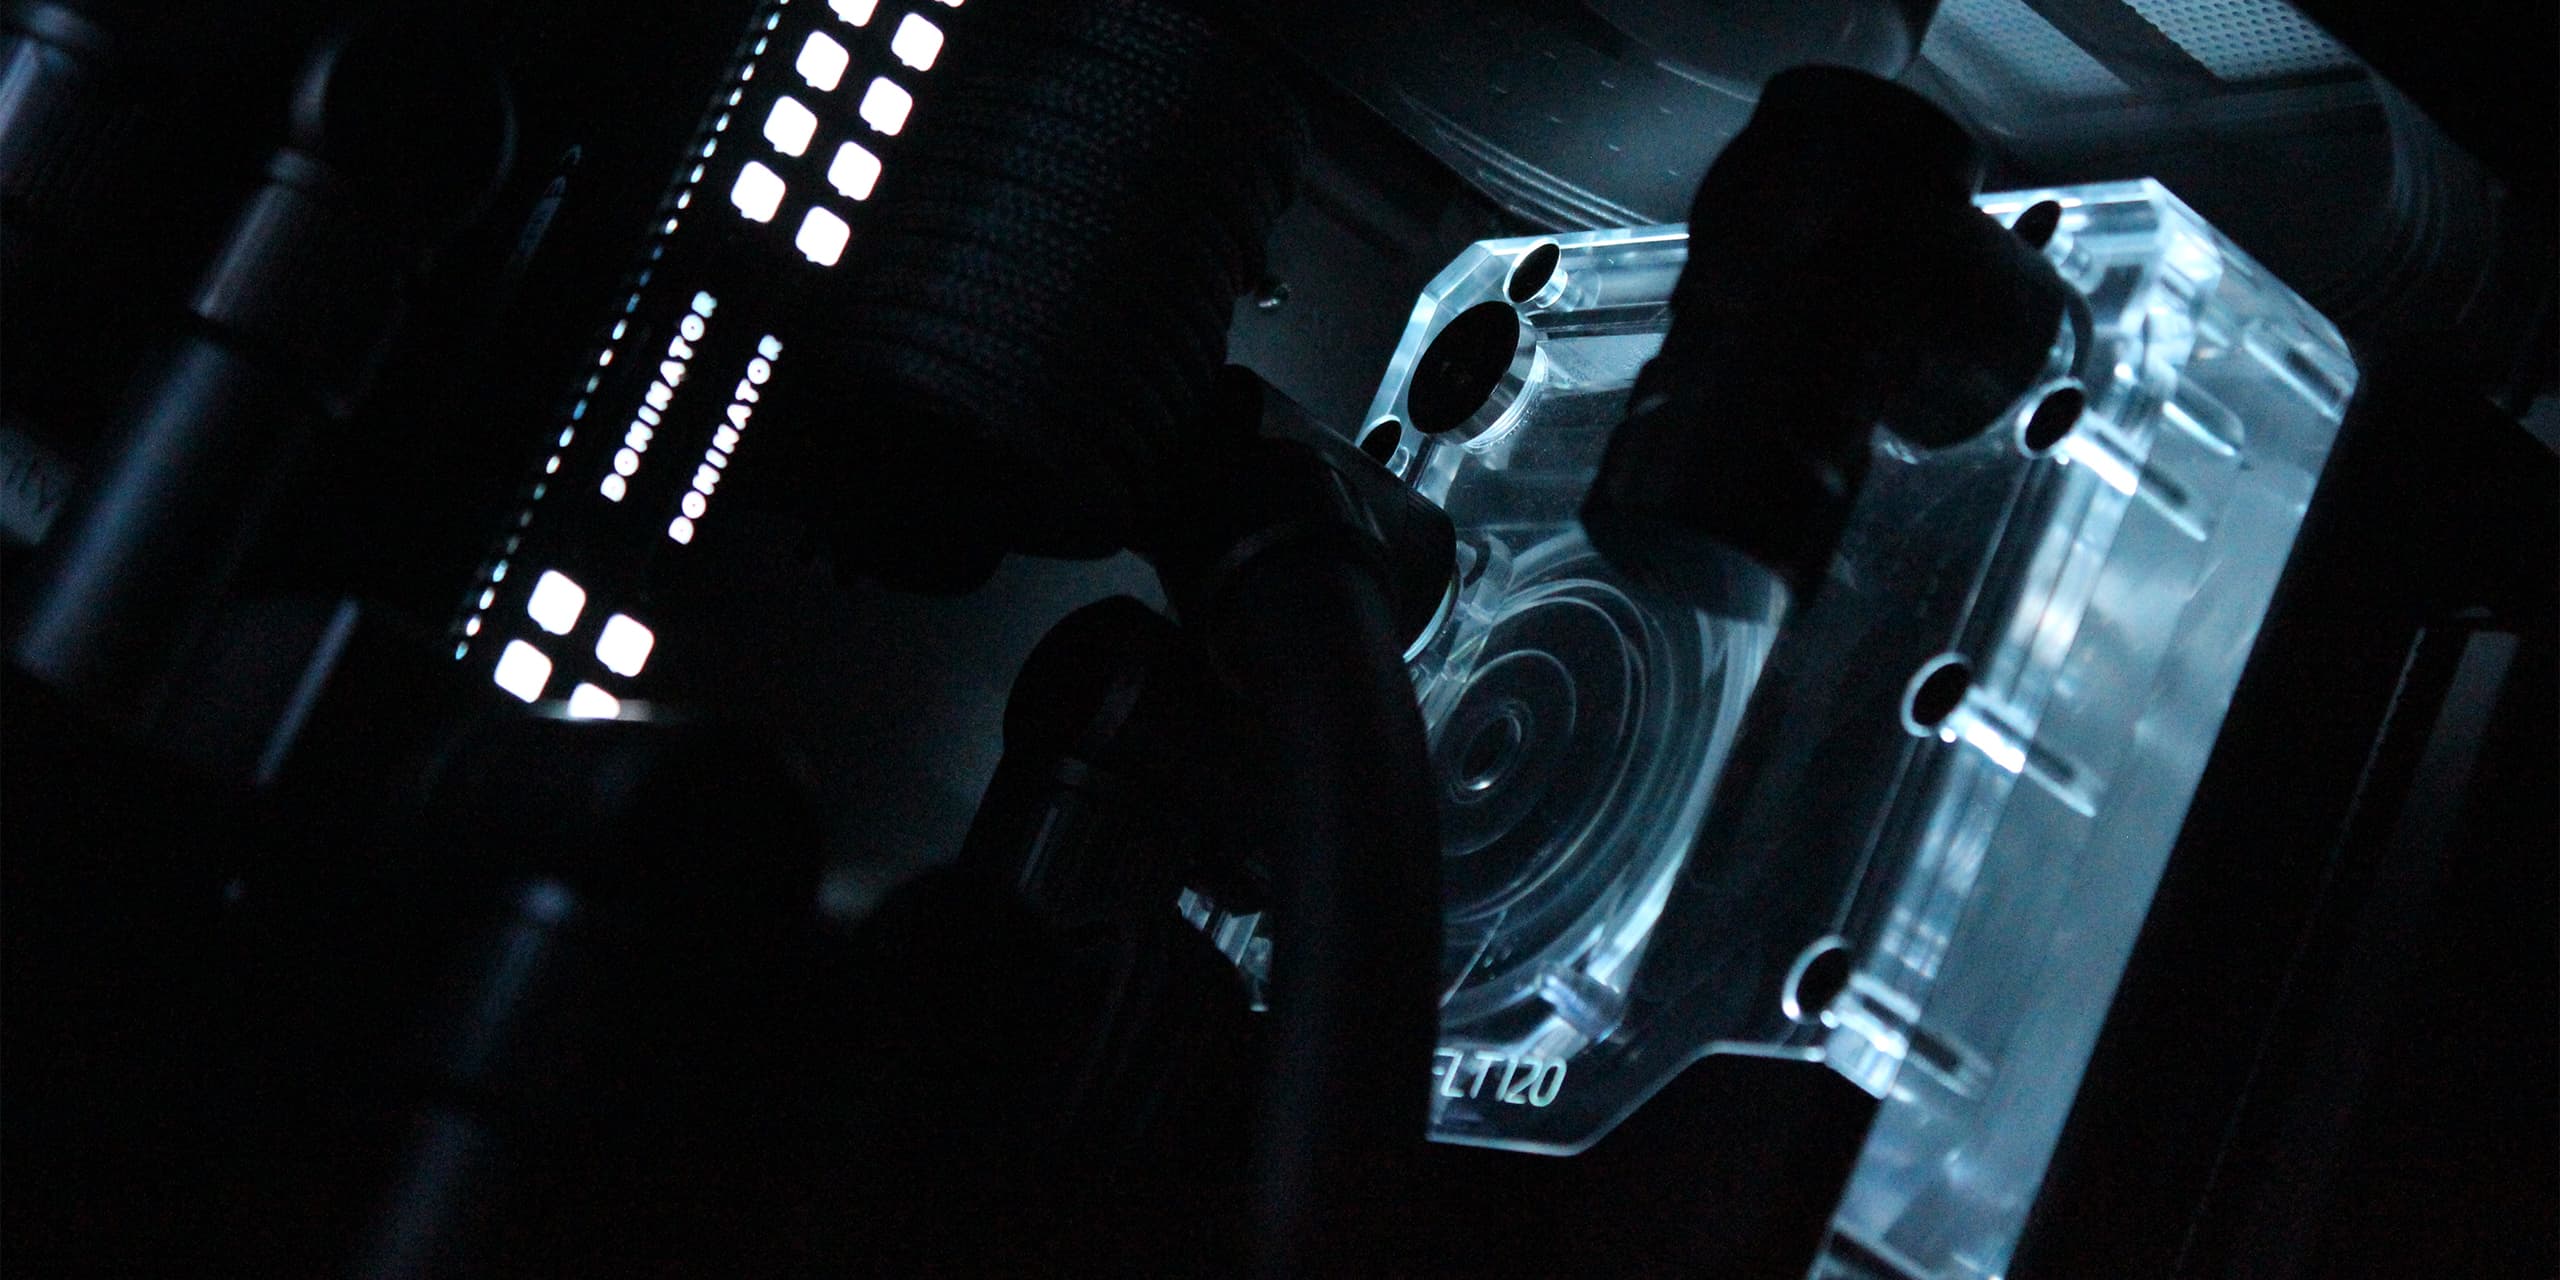
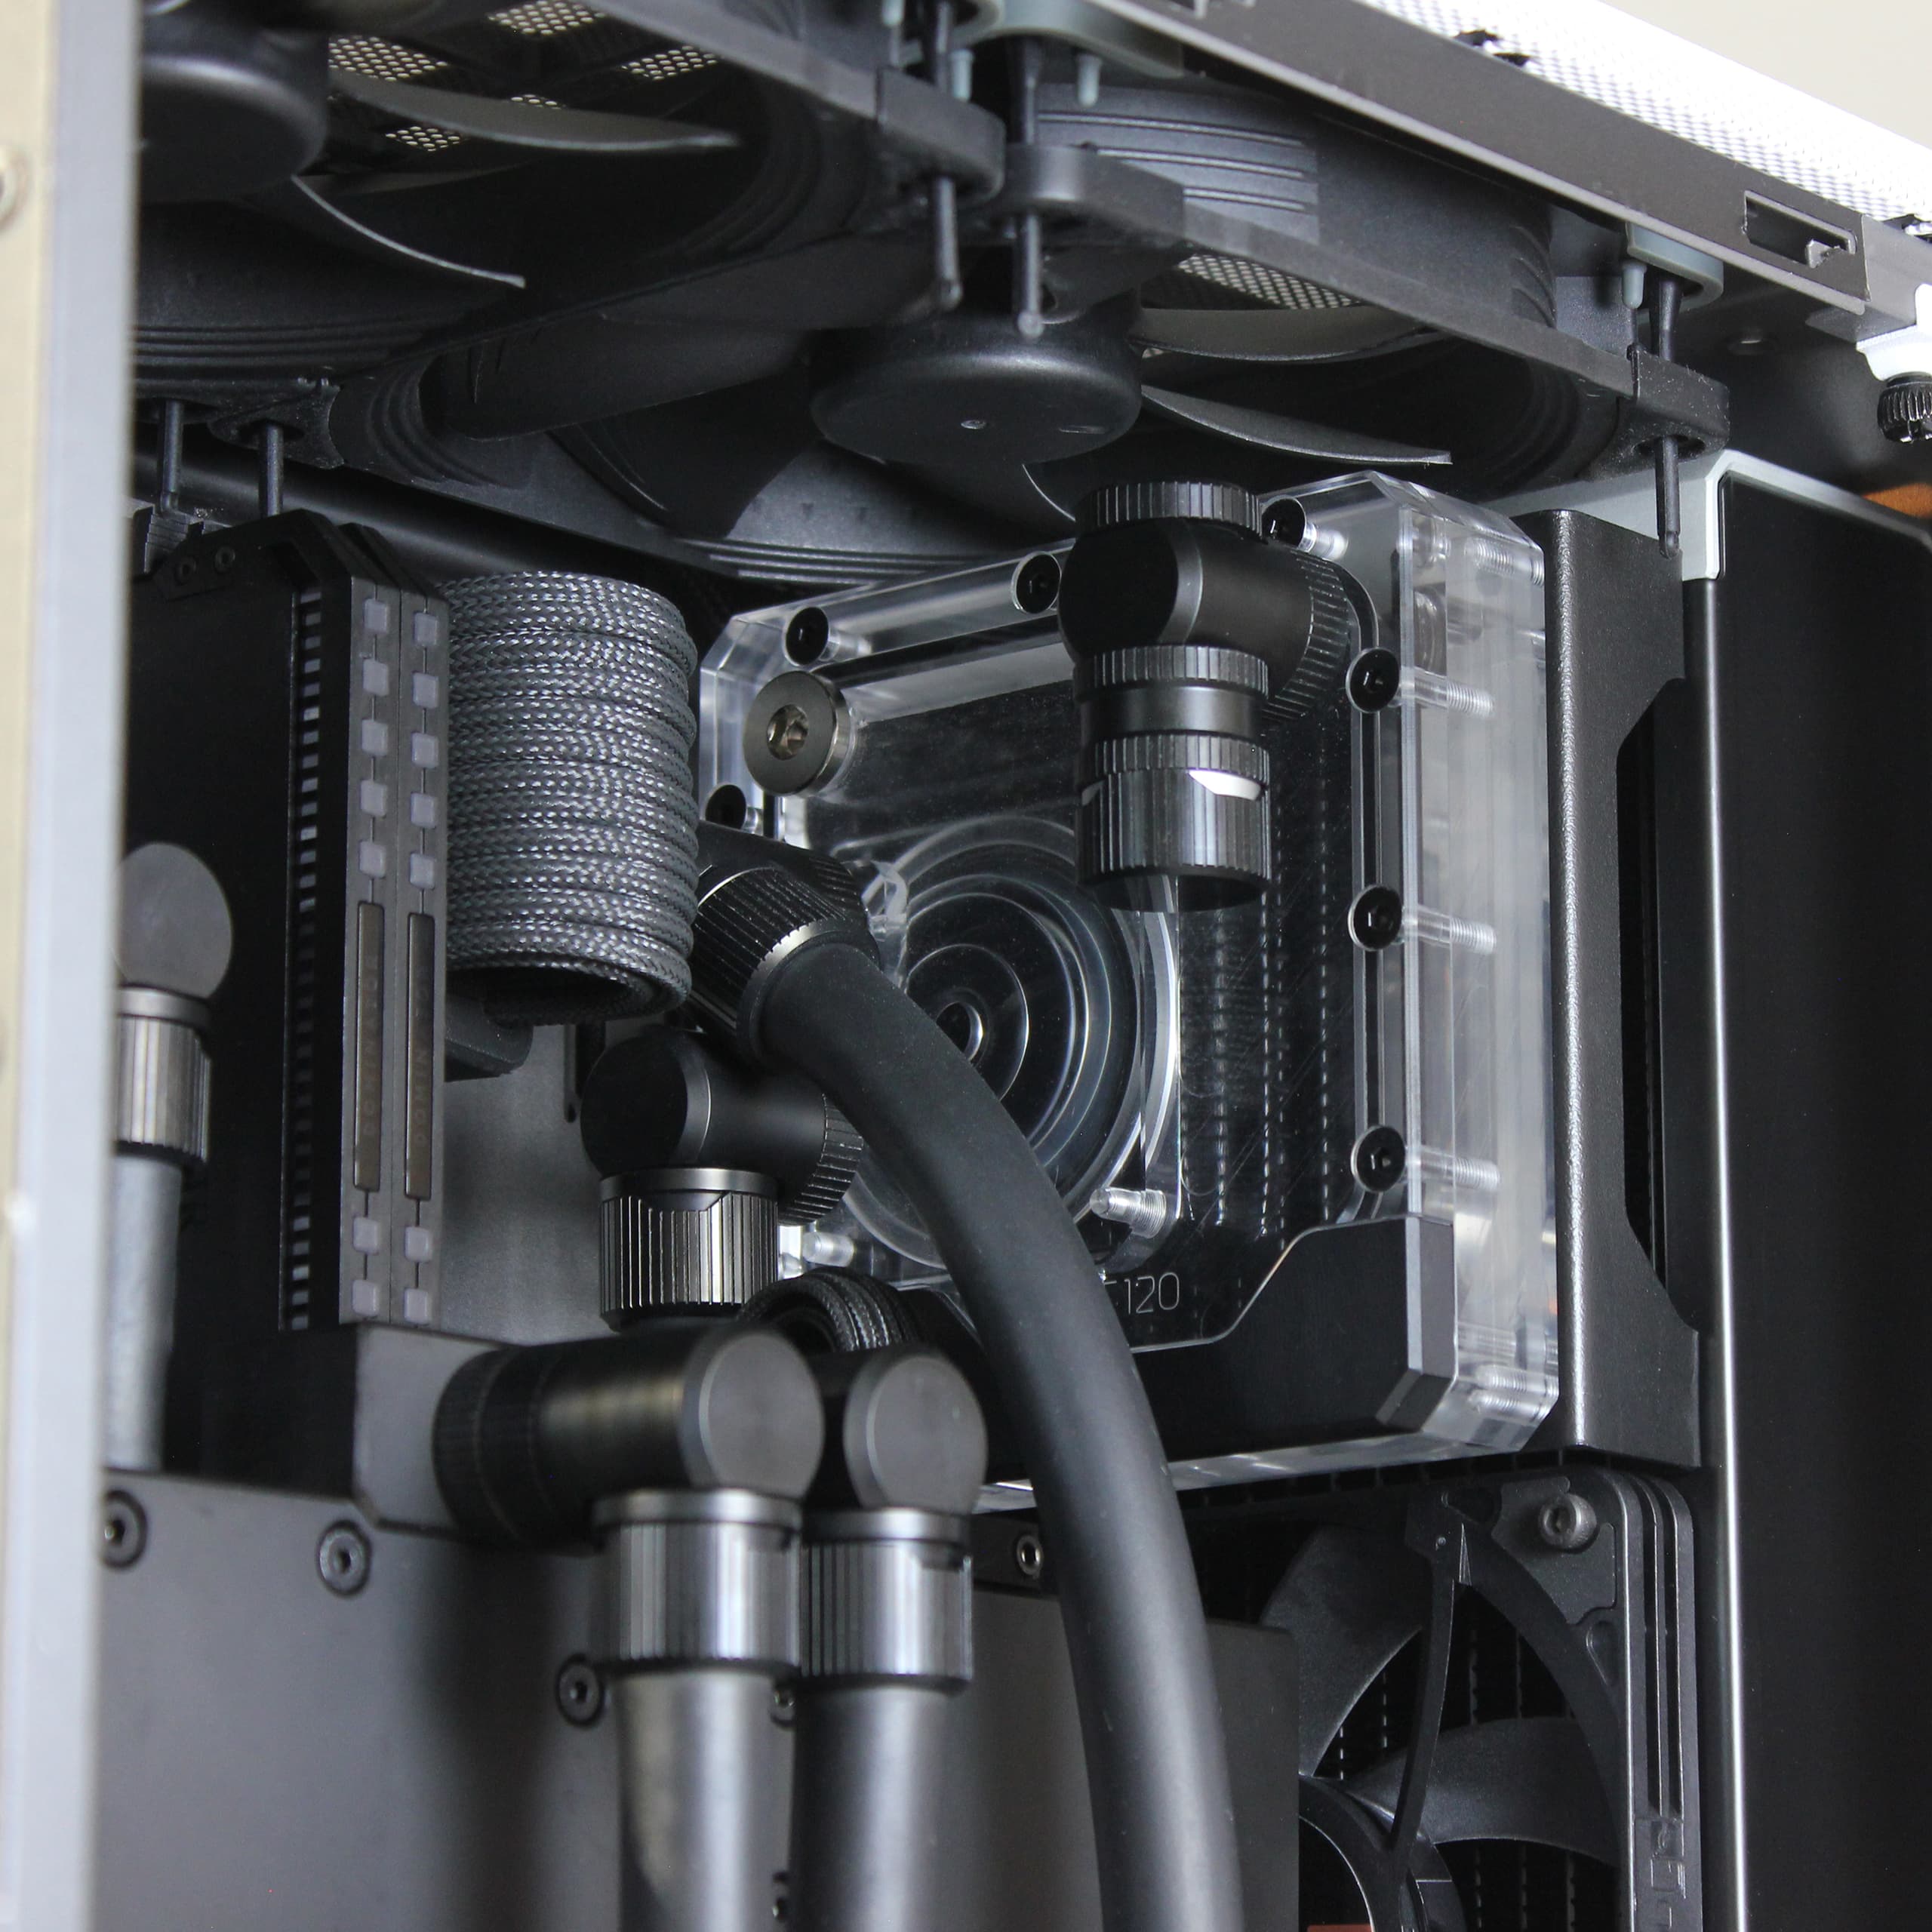
The choice to not install any 3.5" hard drives also leaves plenty of space available in the bottom chamber which is effectively utilized for routing the cooling loop. The massive EK-Surface X360M radiator is fitted in the front of the chassis with its connections positioned at the bottom. The coolant flows from the CPU water block into the radiator (closest in the image) and exits towards the GPU block.
For convenient flushing and draining, an additional EK-Quantum Torque Drain Valve is fitted at the radiator outlet using a 3-way fitting. The valve is fitted pointing downwards which is convenient but requires further modification of the chassis. The rotary 90-degree fittings in combination with the soft rubber tubing is excellent and makes this kind of tube routing a breeze.
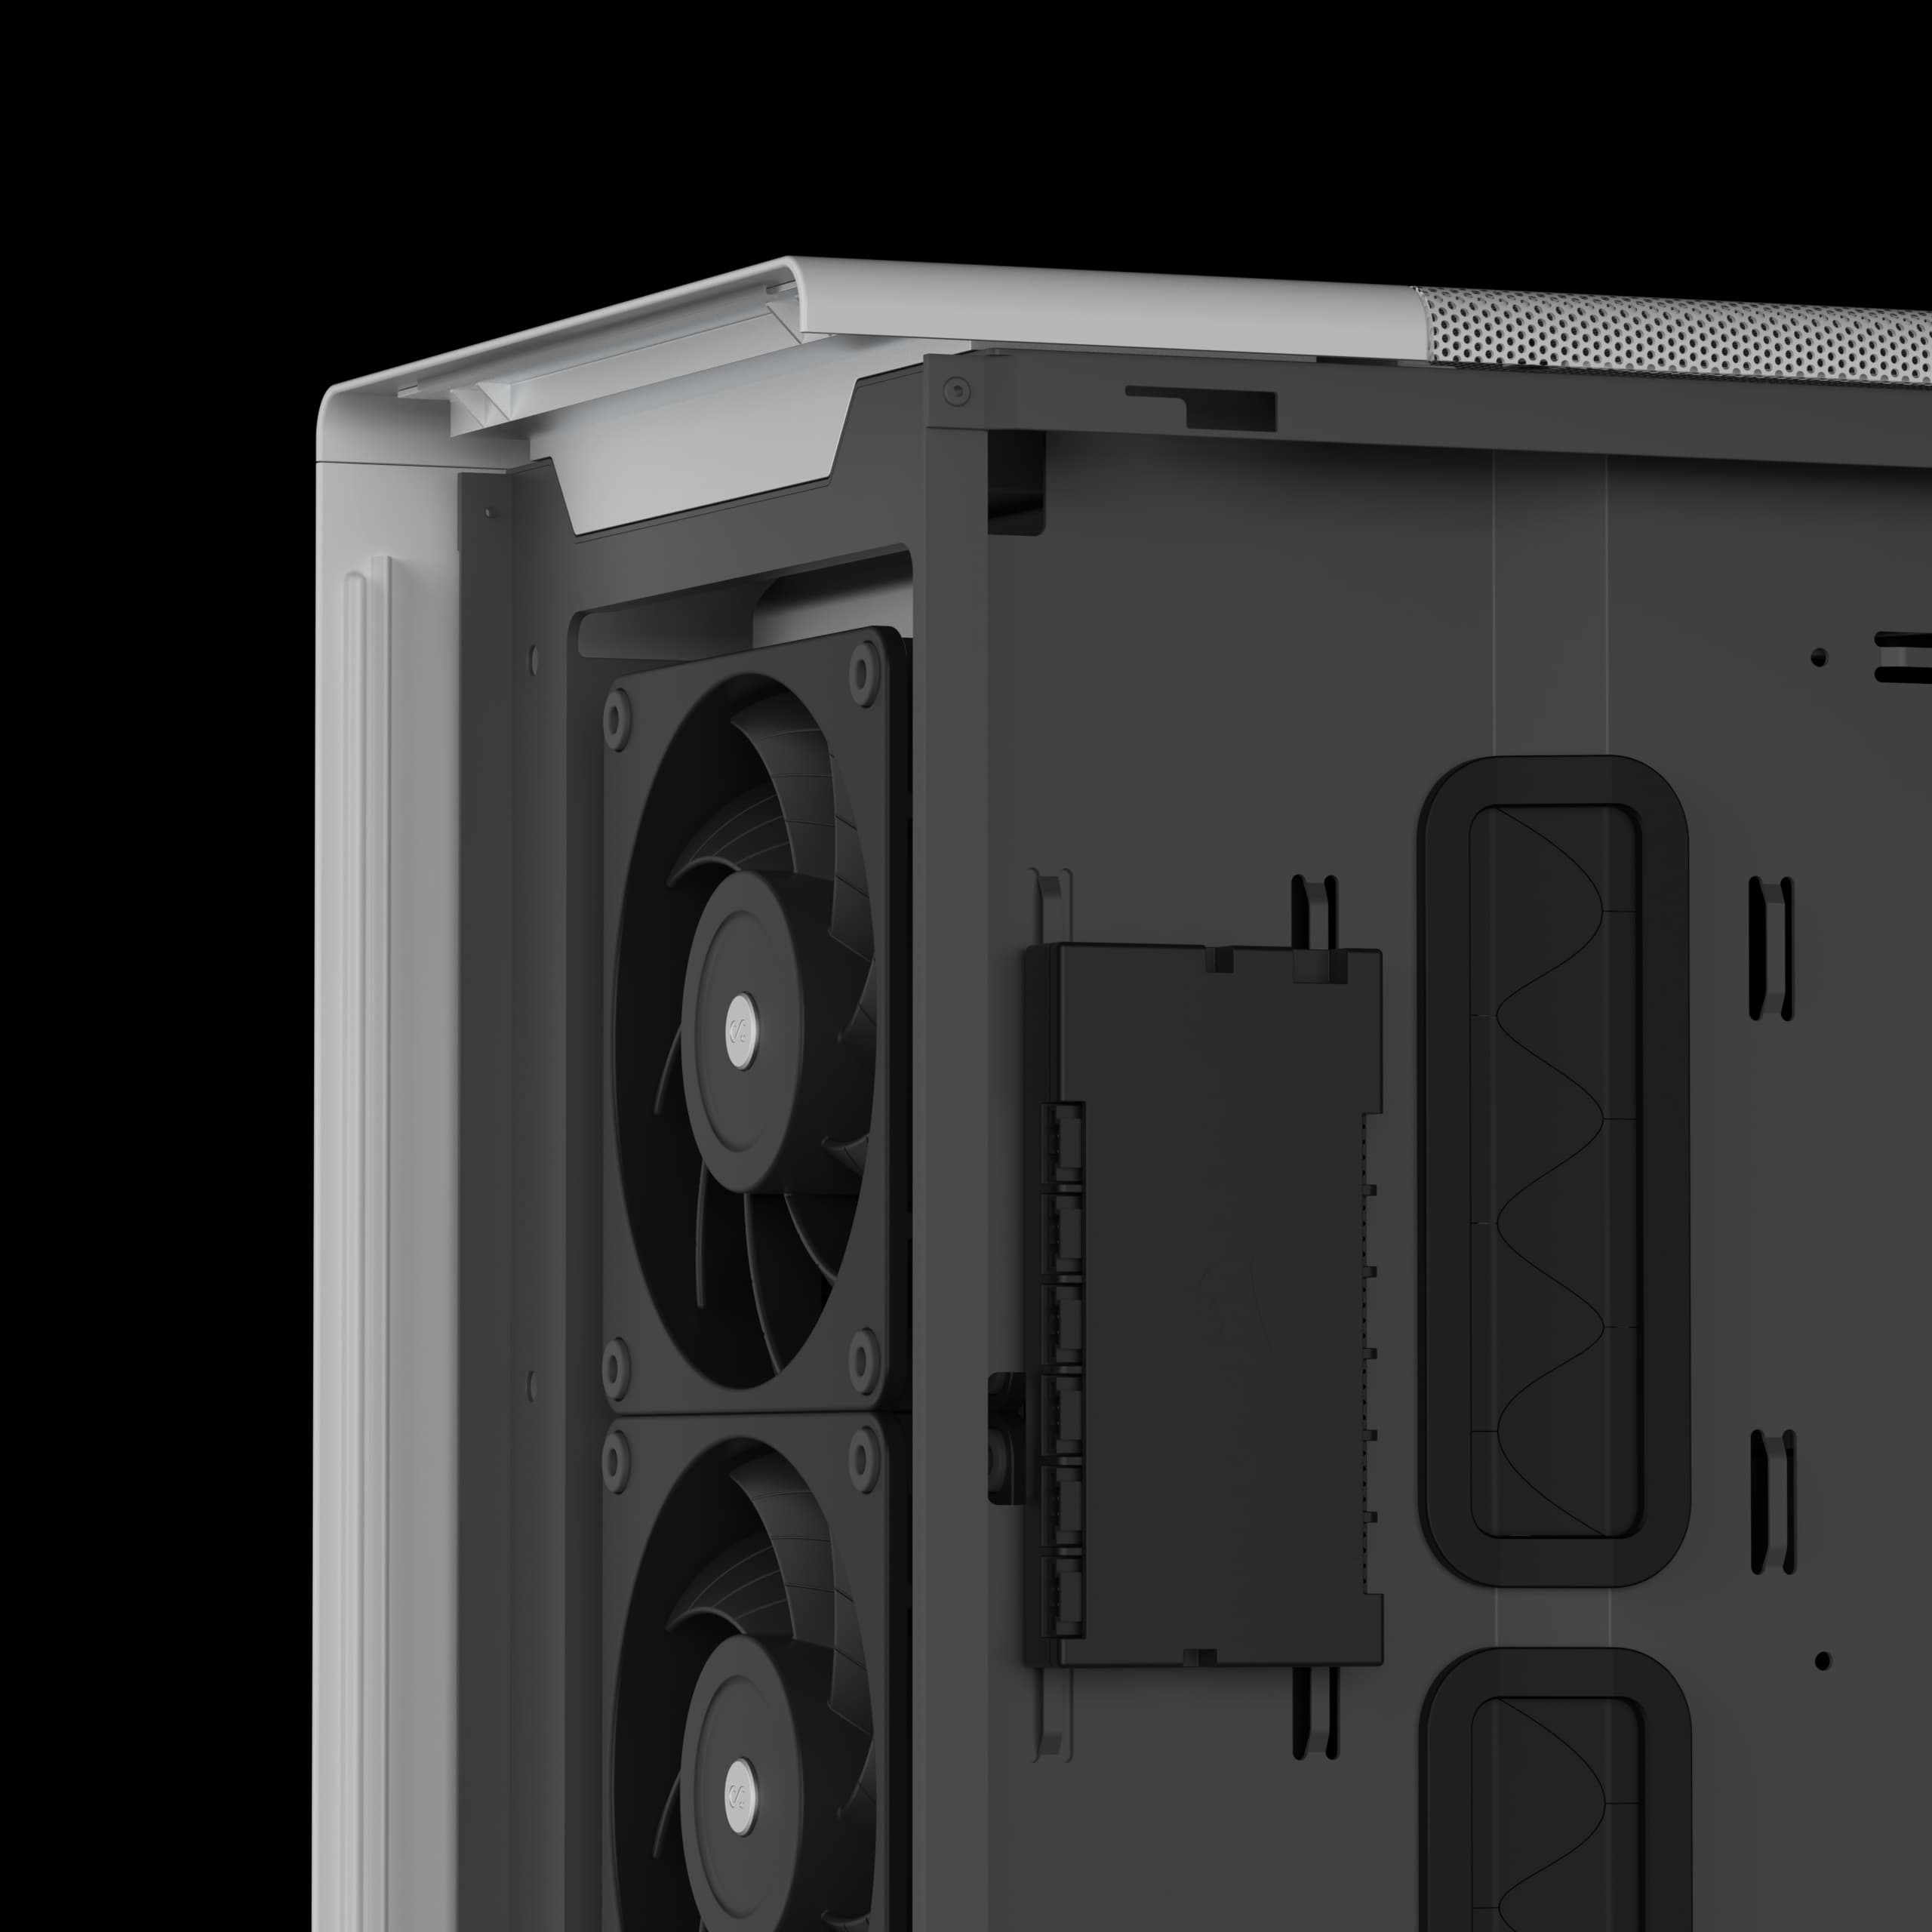
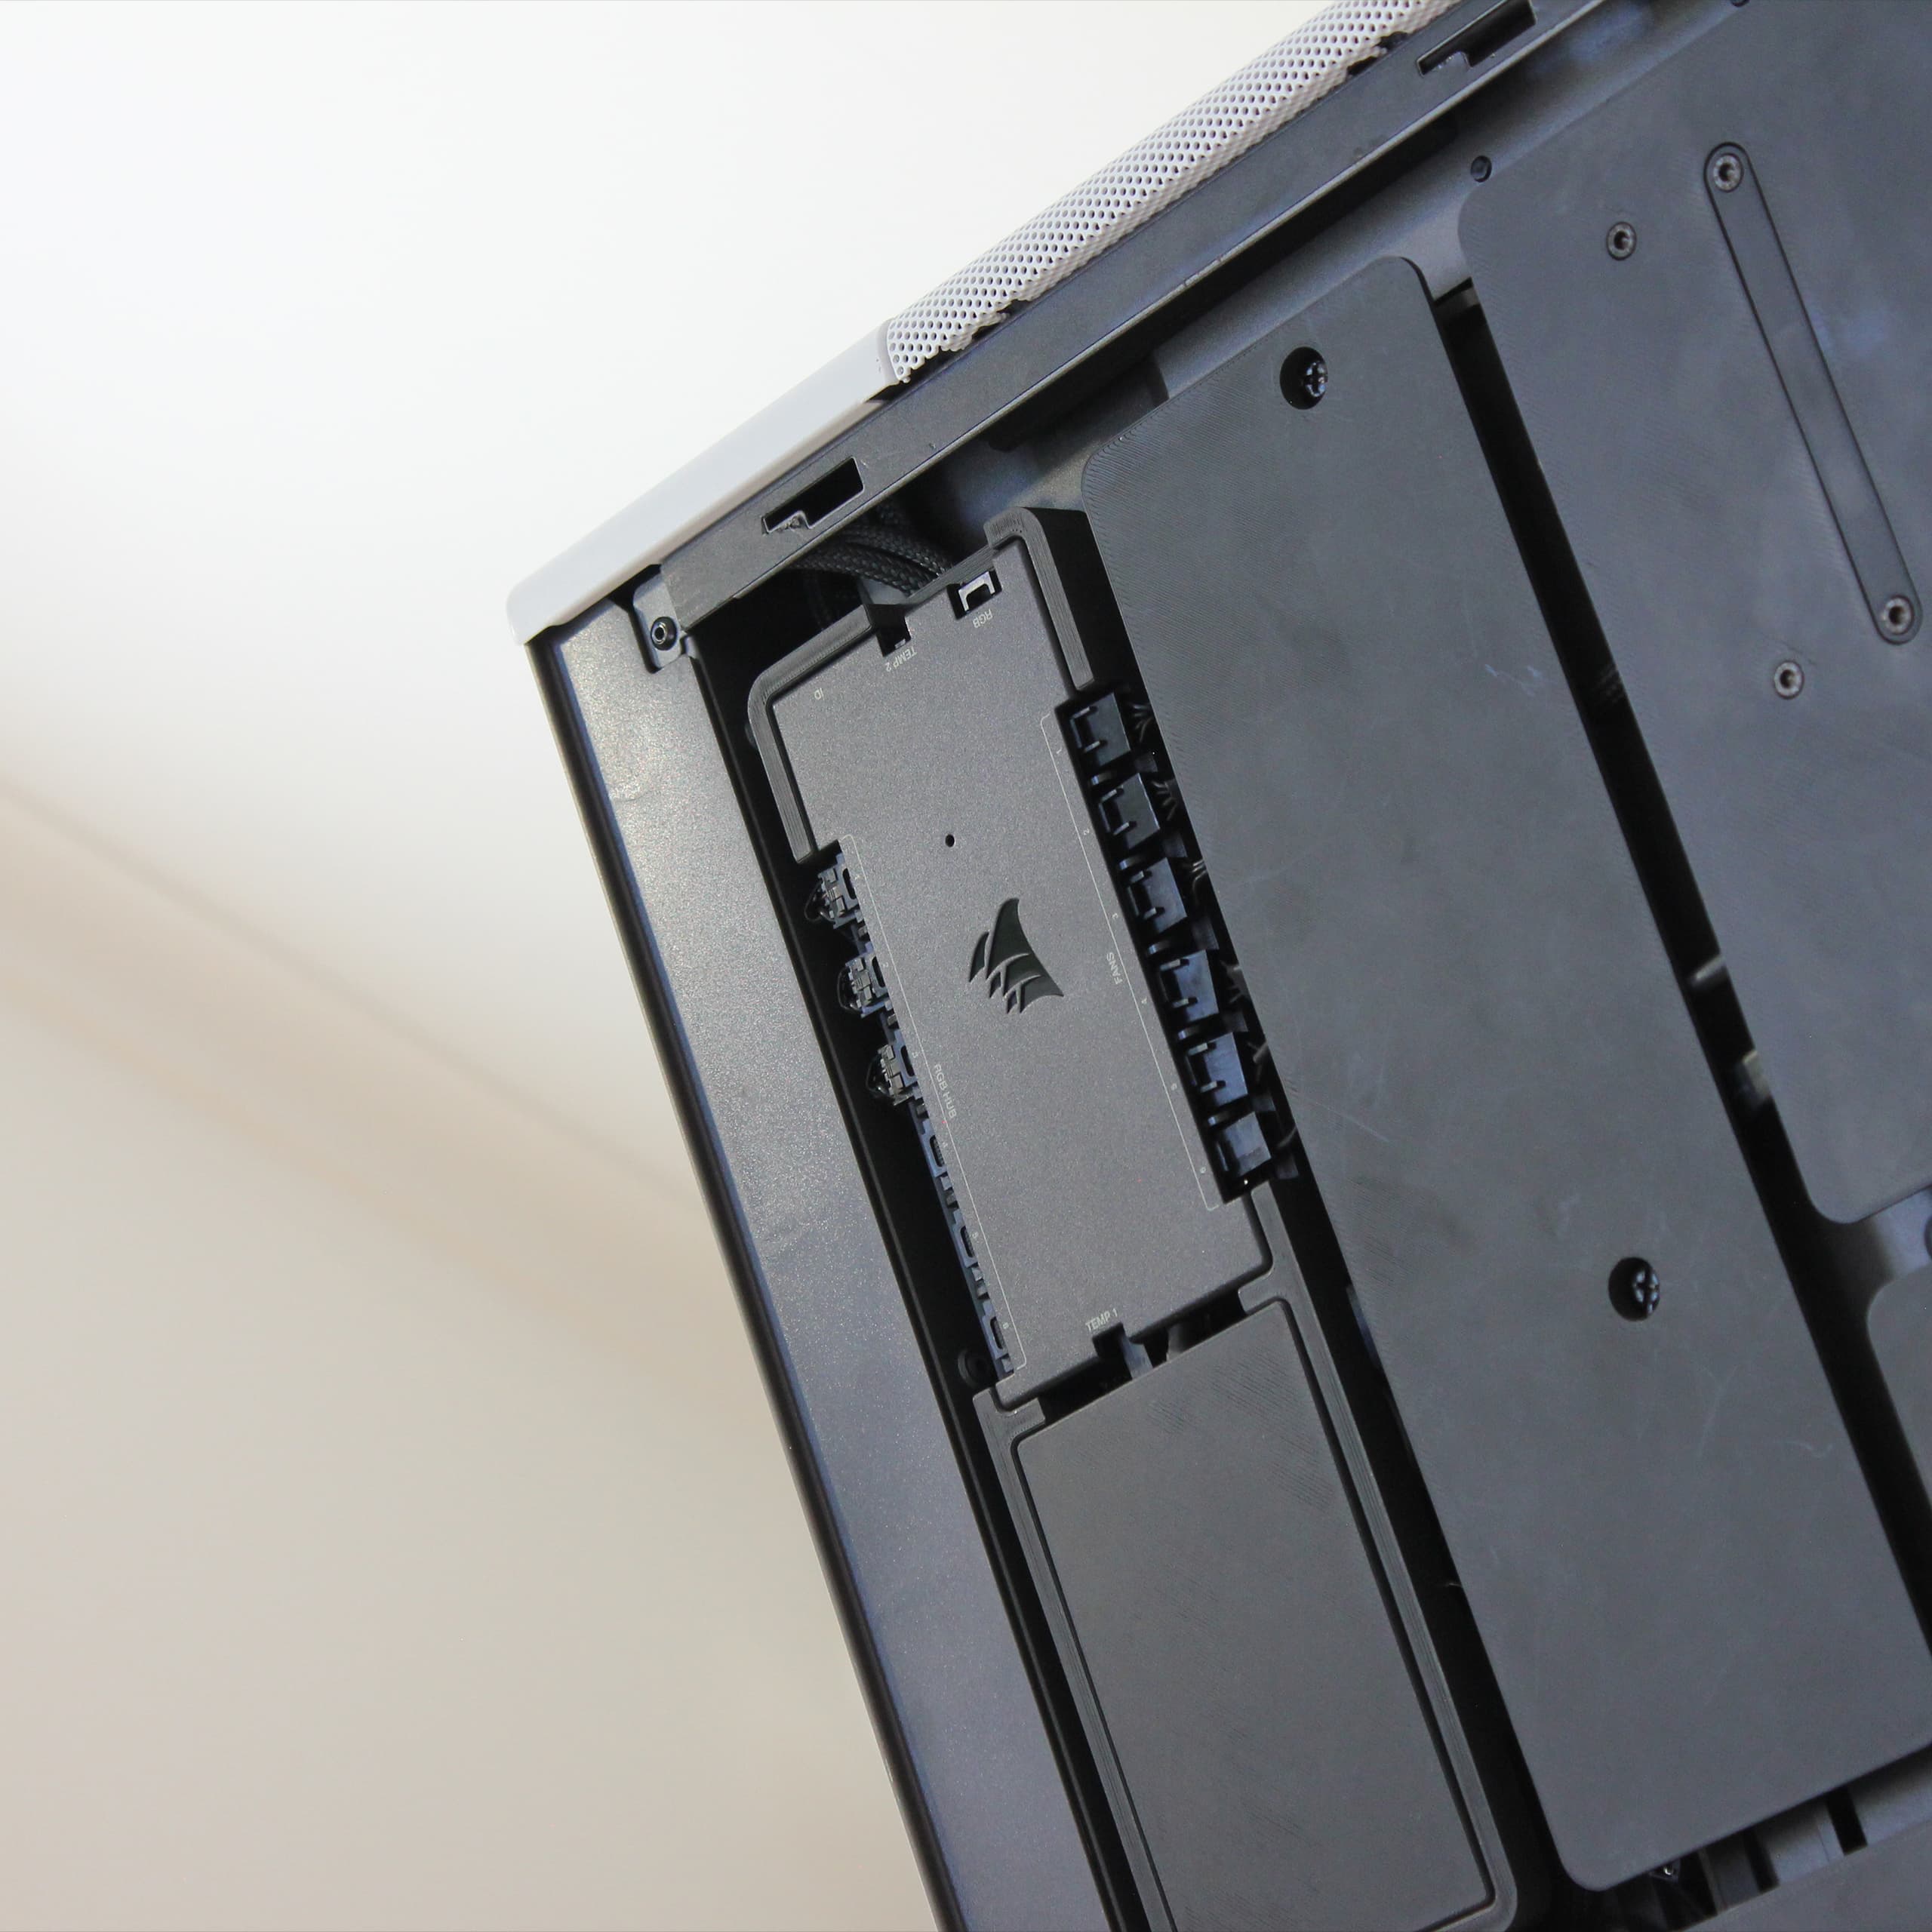
I've always felt that PWM and RGB control is unnecessarily bothersome, which is why I've chosen to implement a PWM and RGB control hub. From what I've read, the Corsair iCUE Commander XT works quite well to control fan curves and lighting. Furthermore, I've been using iCUE for a while for my Corsair headset and so far I haven't experienced any major issues with the application.
This eliminates the need to use PWM and RGB connectors on the motherboard entirely, reducing cable clutter. The hub has 6 PWM headers, 5 of which will be used to connect the fans while the last header will be used for the pump. The RGB headers will control lighting for the reservoir, GPU block, and CPU block, leaving 3 headers unused.
The hub itself connects to the power supply using a SATA power connector, and the motherboard using a USB 2.0 header. This presents a slight issue since the motherboard USB 2.0 header also needs to connect to the chassis front I/O ports. Hopefully, this can be resolved using a Y-splitter.
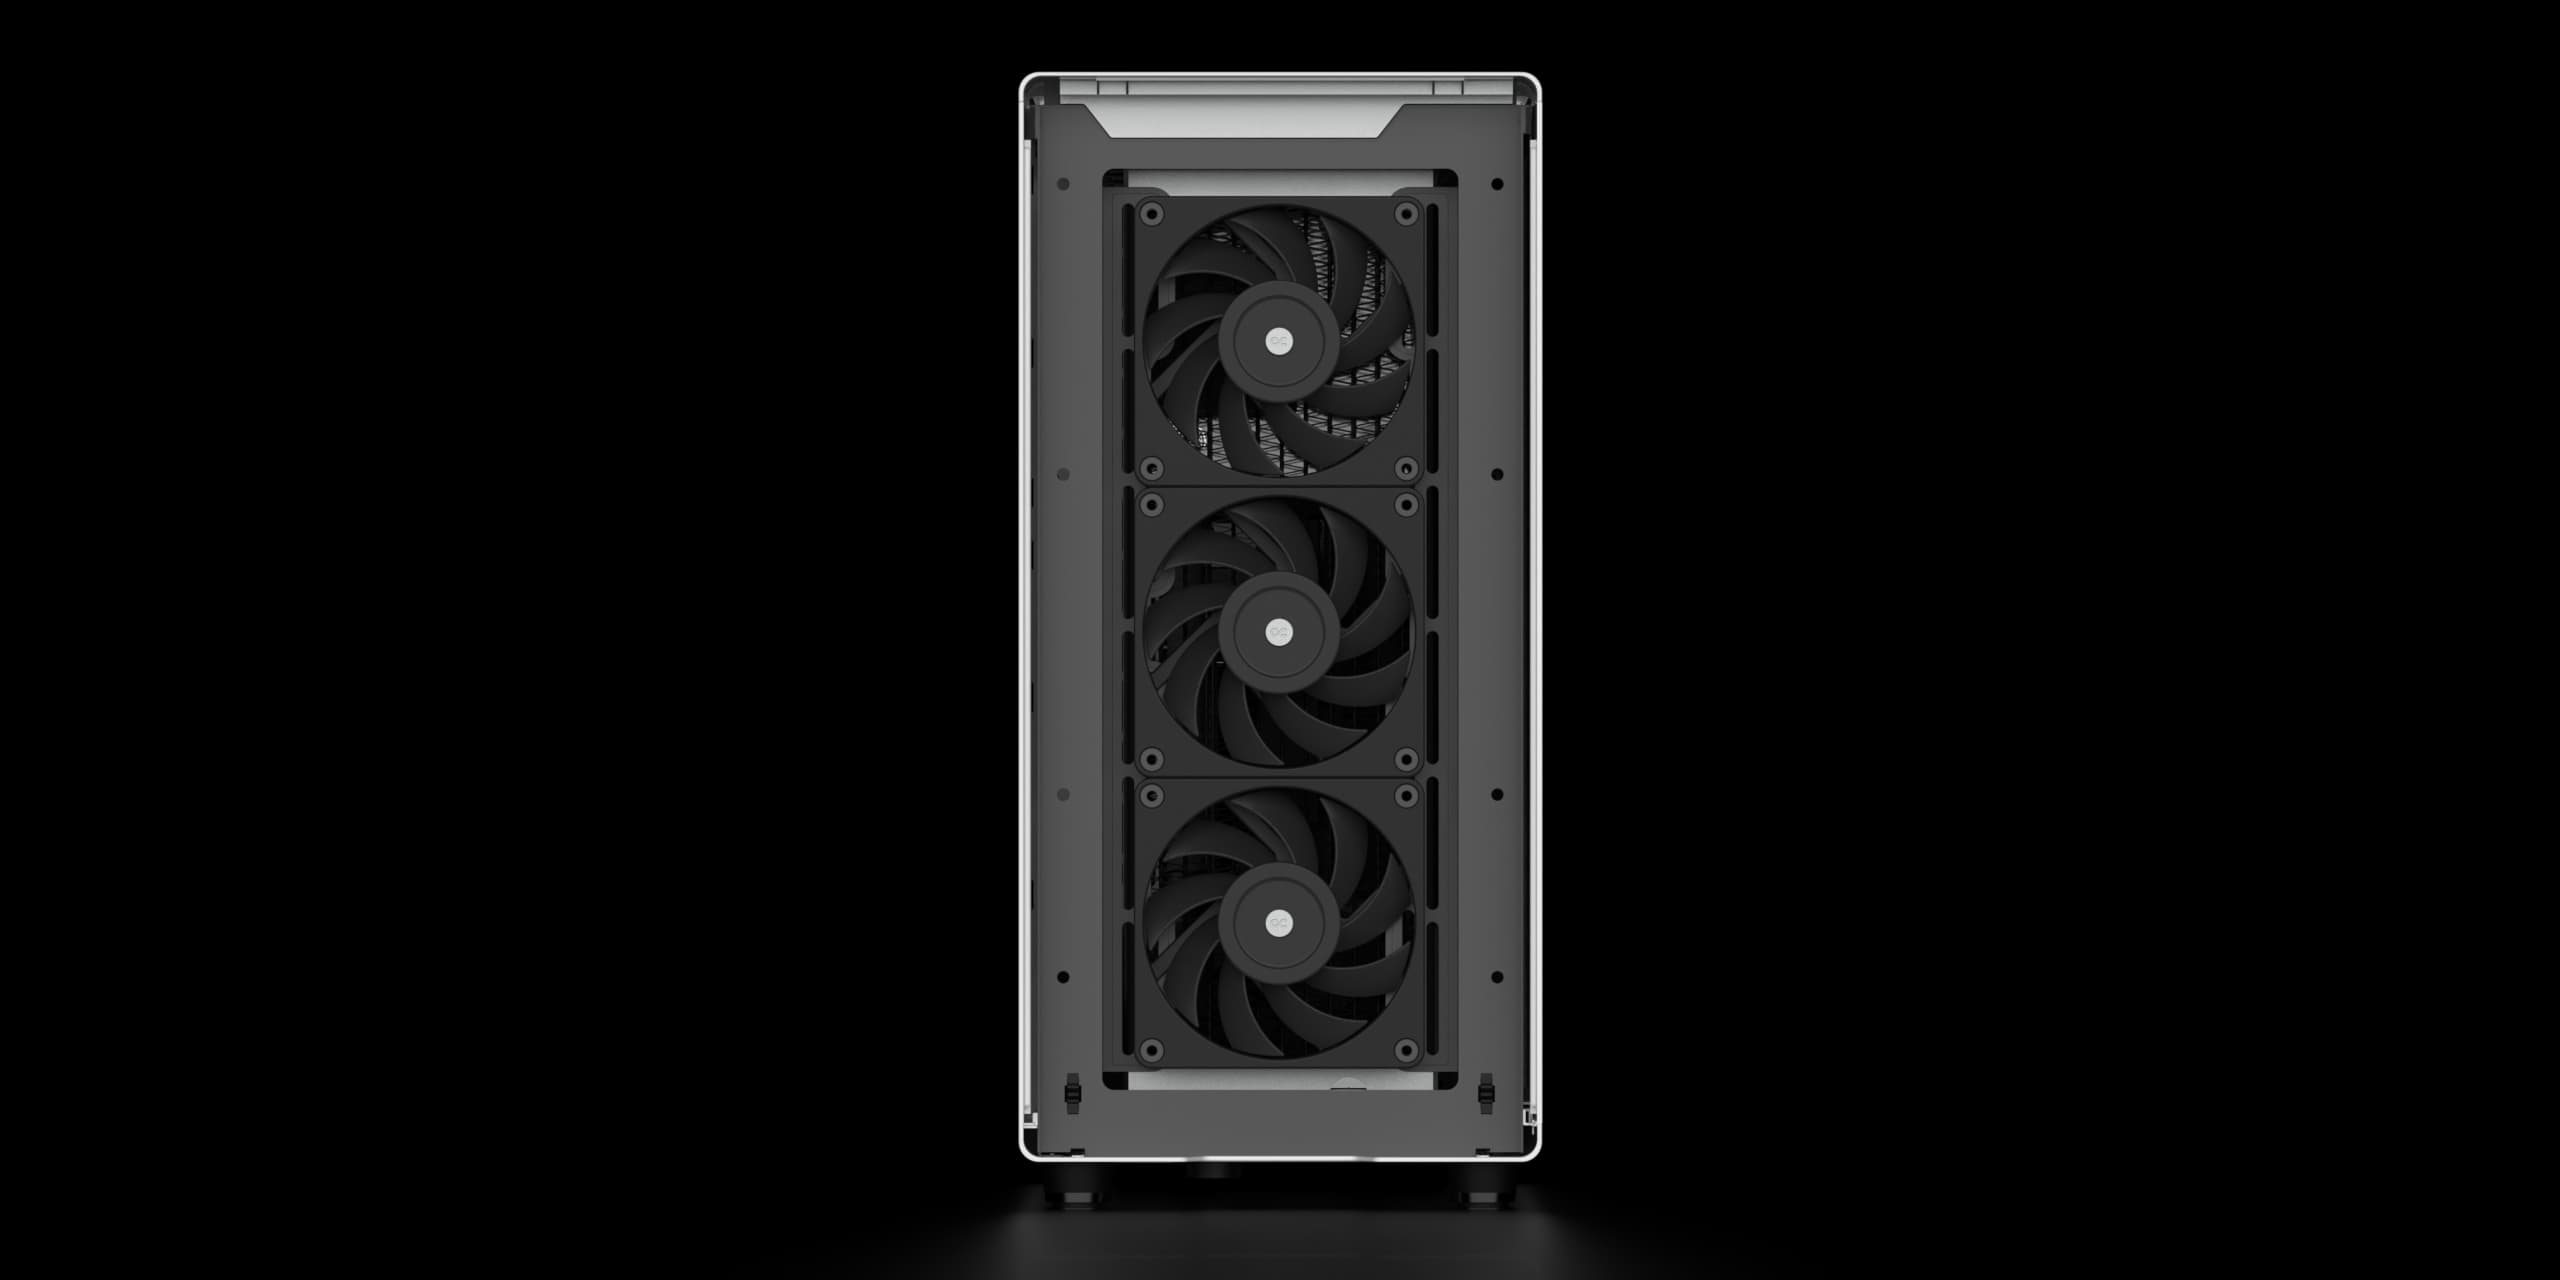
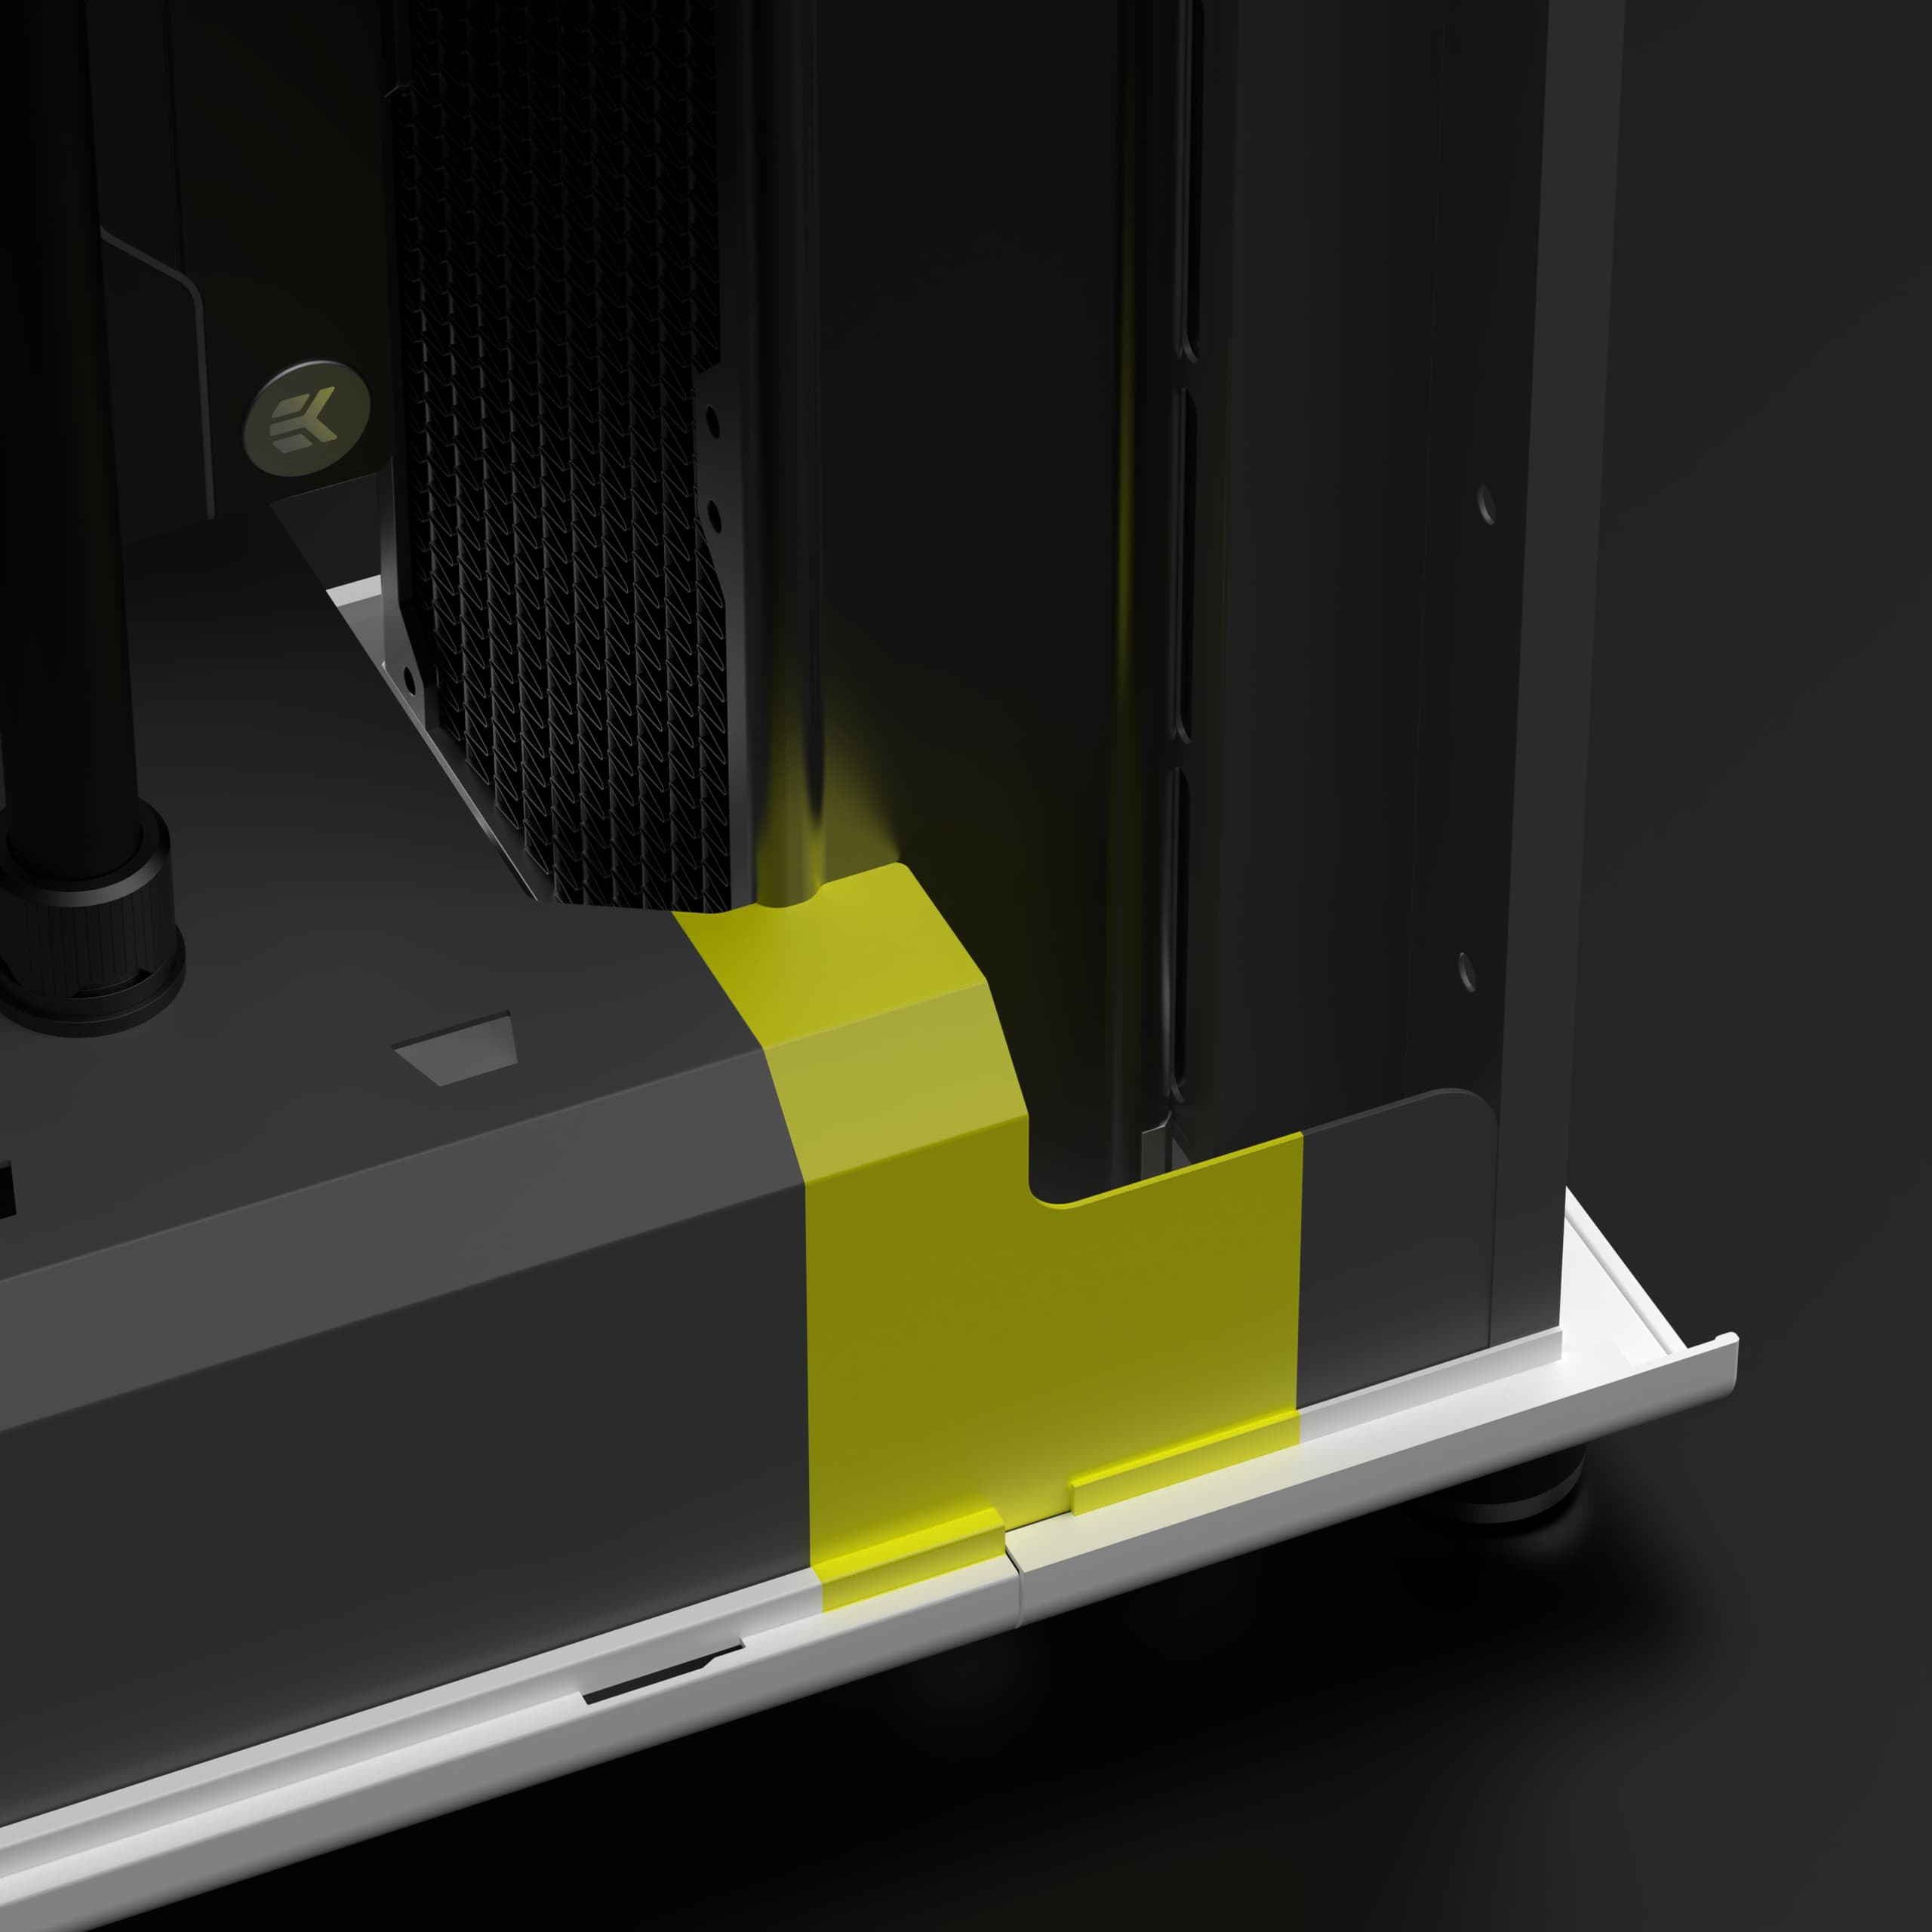
The EK-Surface X360M is a very thick radiator. Most radiators in All-in-one coolers tend to be roughly 25-35mm thick while this model boasts a massive 58mm thickness. This increases cooling capacity drastically due to the greater surface area. As described in the above section, this radiator should be able to match the max. thermal output from the GPU and CPU at roughly 1500 RPM fan speed. However, most applications rarely utilize both the CPU and GPU fully simultaneously which is why there should be plenty of temperature headroom for overclocking.
What this also means is that the radiator won't fit without modifying the chassis, therefore the highlighted area of the chassis will be removed. Even though the interference looks smaller, mounting the radiator becomes tricky which requires a larger chunk of material to be removed. The plan is to insert the radiator through the yellow area. The gap in the chassis will then be covered up using a 3D-printed part.
That's it for this post! I'll be posting log updates continuously as the project progresses, and if you wanna stay up to date keep an eye on my Instagram. Below is a sneak peek at some of the upcoming activities.
Hope you enjoyed the content!
What's Next?
002: Component Selection
April 12, 2025In this post, I’ll break down the component choices for this build. Since this is my daily driver, most parts are carried over from my existing system, while the liquid cooling equipment, along with a few minor components, is entirely new. My goal has been to strike a balance between performance and aesthetics.

01
/ 00Chassis
Processor
Graphics Card
Motherboard
Memory
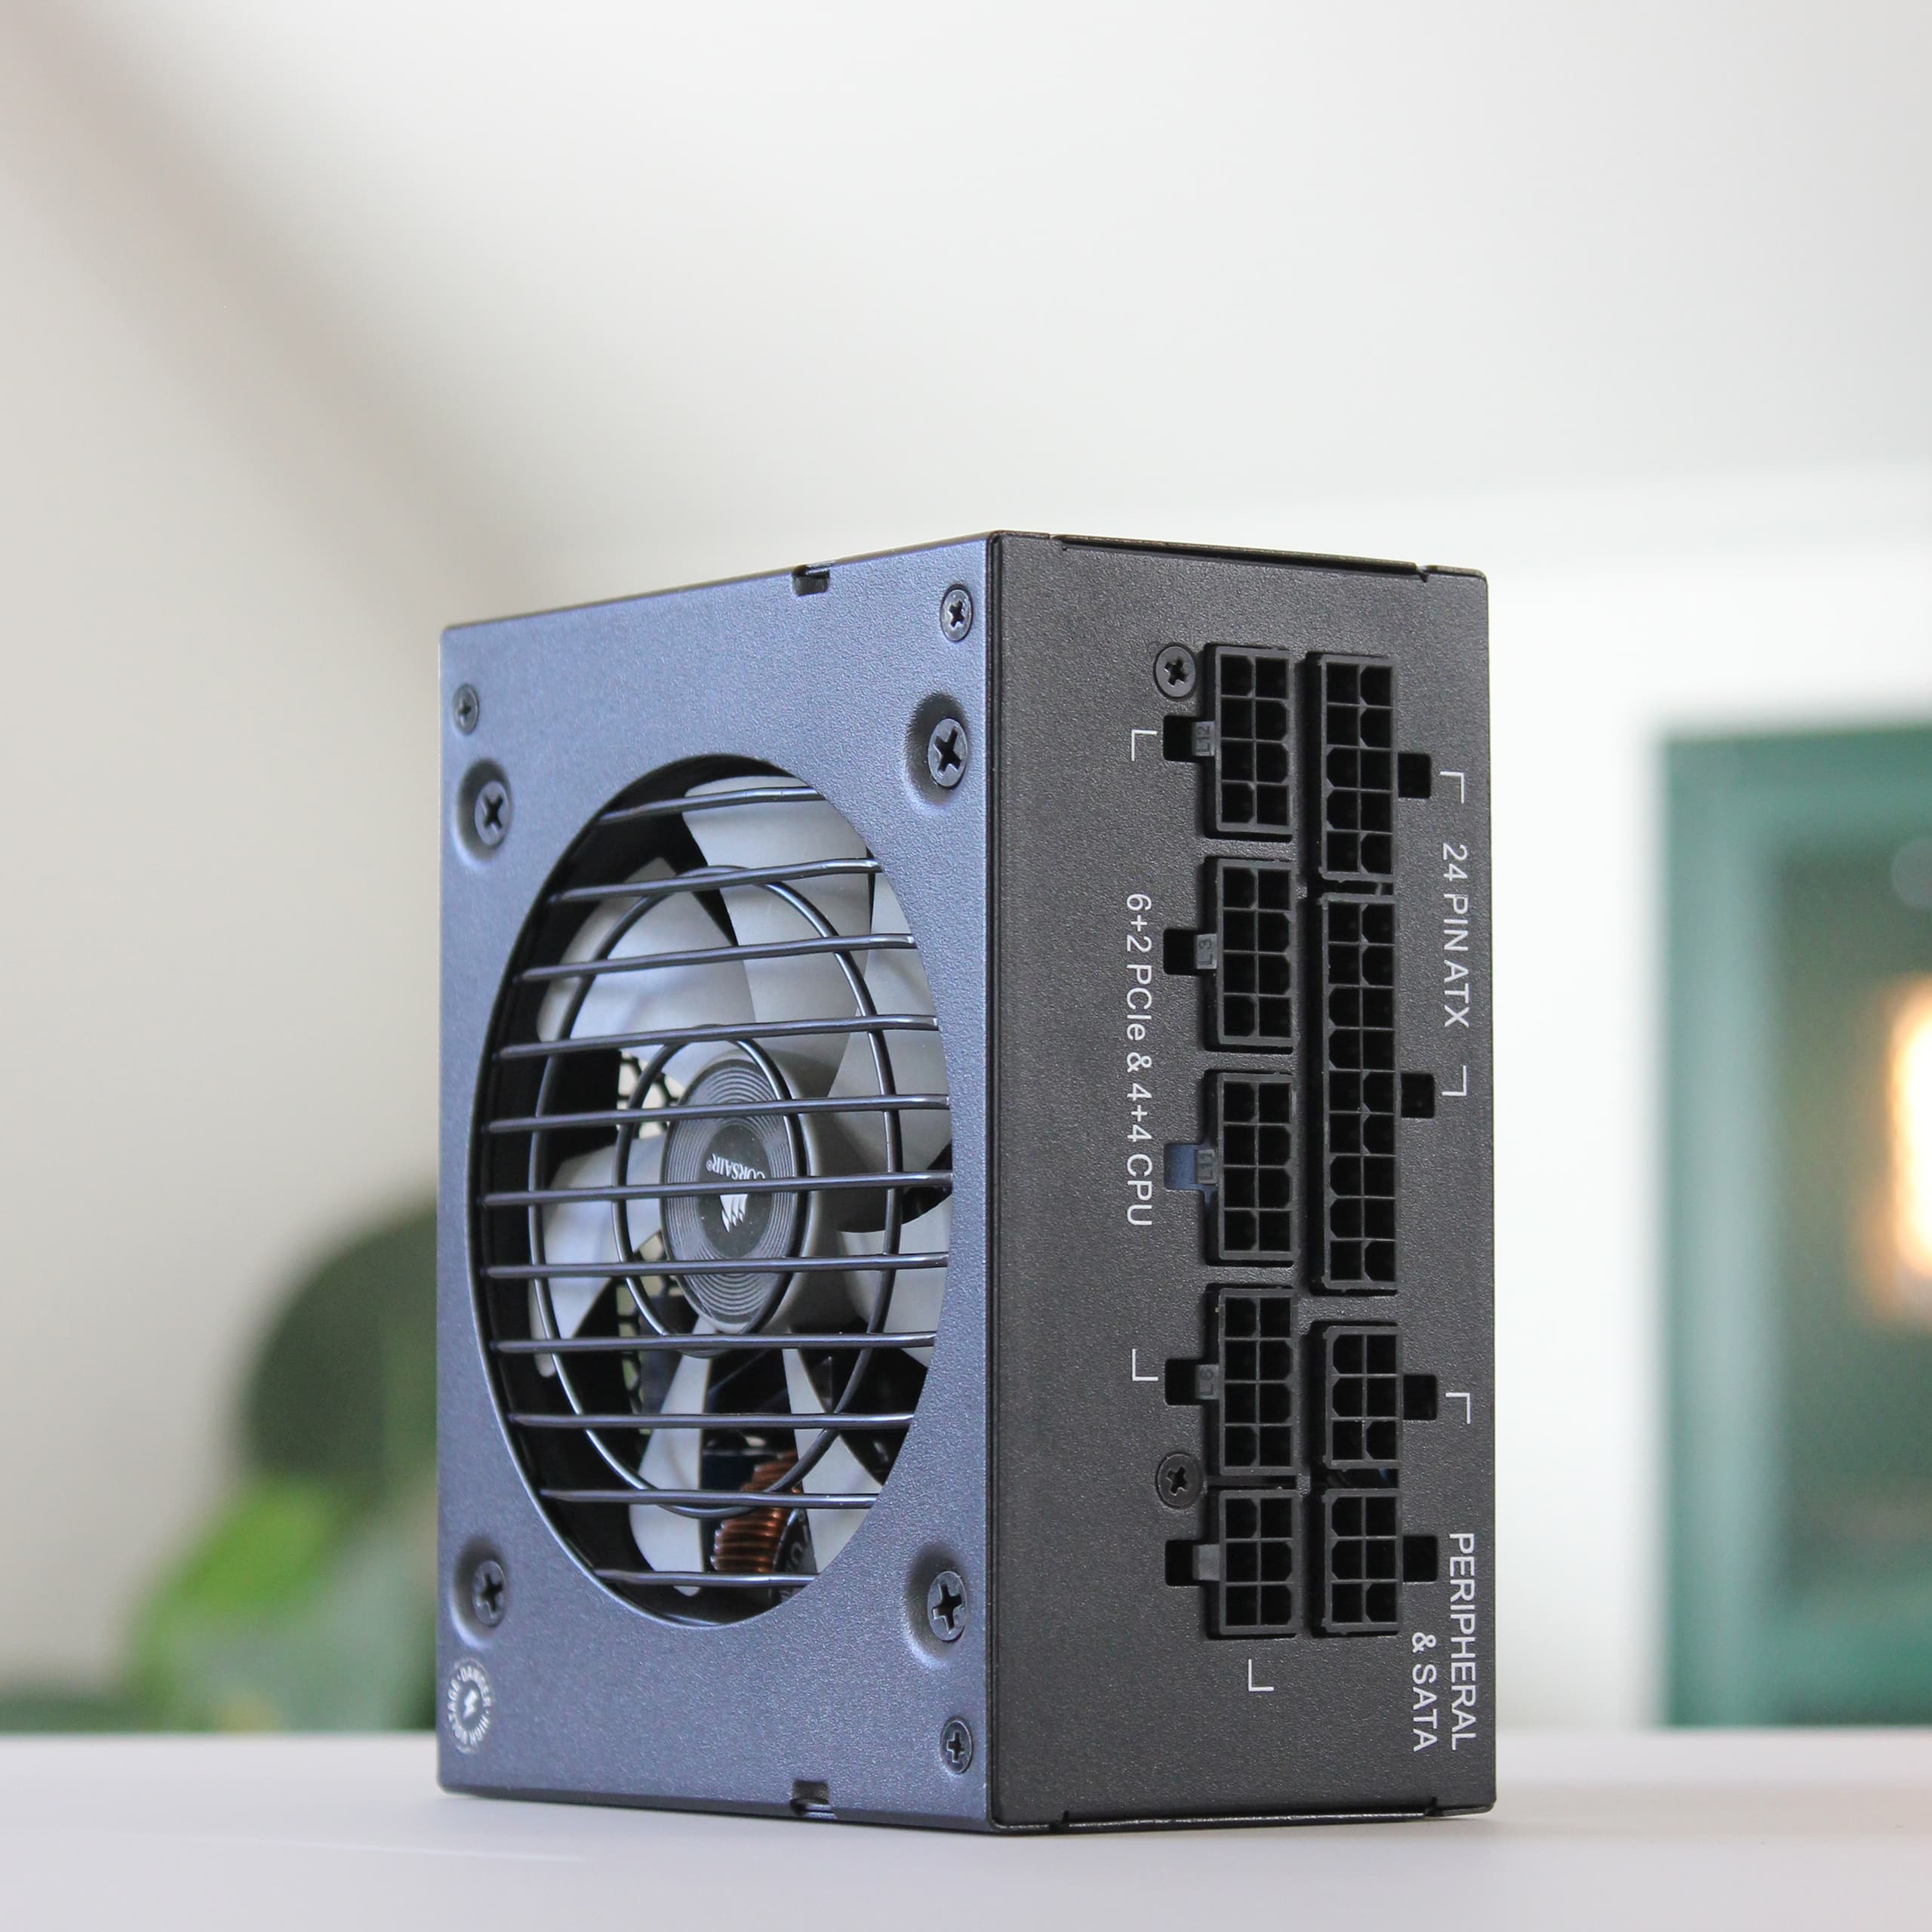
Power Supply
Storage
CPU/GPU Block
Radiator
Reservoir & Pump
Fans
Fittings
Tubing
The Fractal Design North is a remarkable chassis that combines live oak, mesh, and contrasting light/dark elements to embody a true Scandinavian aesthetic. Its 45-liter volume places it squarely in the mid-sized ATX tower category—a noticeable size reduction from my previous chassis, the Corsair Carbide Air 540, which had a massive 63-liter capacity.
Over the past decade, mesh has seen a resurgence, particularly in small form factor chassis where cooling is limited. Personally, I appreciate its return for both performance and visual reasons. On the North, the mesh provides a striking contrast in texture when paired with the smooth white panels.
Besides the visual appeal, the North offers a few functional features that I think are great. A full-size magnetic dust filter is fitted at the front, which is easily accessible thanks to the snap-fit front panel. It also has a sliding top panel for easy access to the top fans, and a dust-filter for the power supply intake at the bottom of the chassis.
Design, Performance, Accessibility
The AMD Ryzen 7 5700X3D is a late upgrade for the build, replacing my current Ryzen 9 3900X. AMD’s X3D CPUs are known for their outstanding performance, particularly in gaming. While I initially aimed to get a 5800X3D, availability in Sweden was an issue. Fortunately, I managed to pick up a 5700X3D on sale, which offers nearly identical performance.
I opted against newer CPUs like the 9800X3D or 7800X3D because I wanted to retain my current motherboard, which has an AM4 socket.
Cost, Compatibility, Performance
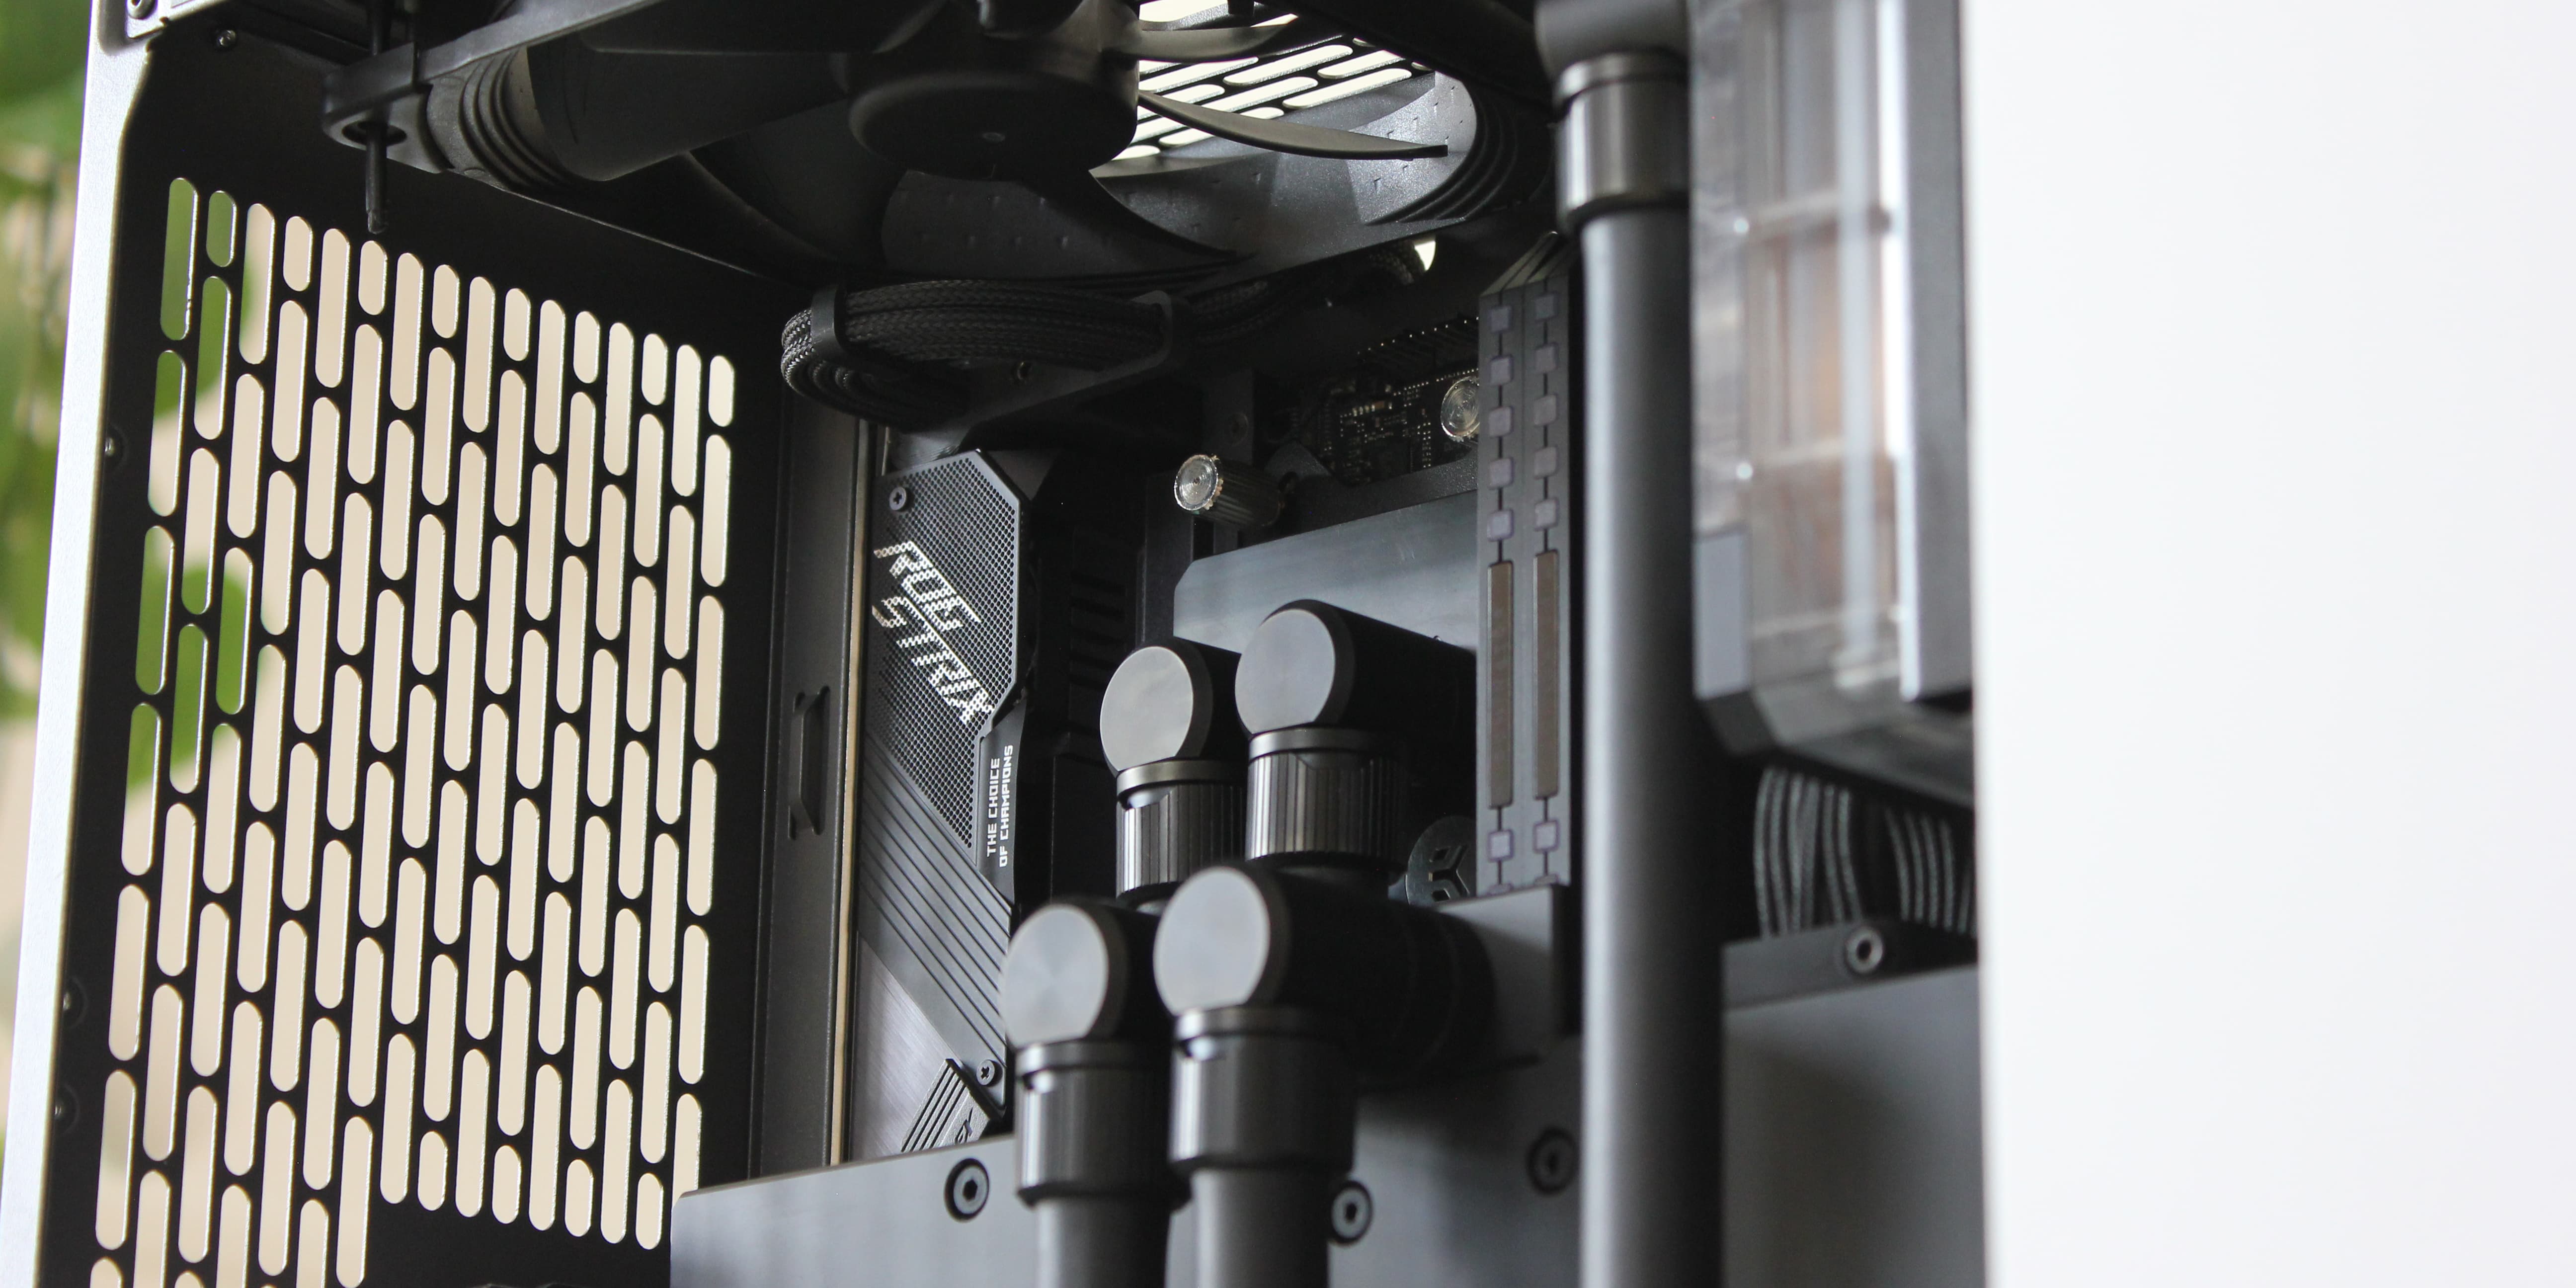
The ASUS TUF RTX 4080 is another late upgrade to my build. I ran into issues with my RTX 2080 Ti last year when the memory started artifacting, and within a week, the card became practically unusable. I had hoped to receive a replacement card from EVGA under warranty, but the 3-year period had expired 7 months earlier. Apparently, this was a common issue with the 2000-series RTX cards, most likely caused by subpar memory chips.
Due to EK not offering water blocks for the RTX 4070, I was left with two options: the RTX 4080 and the RTX 4090. Considering the RTX 4090’s exorbitant price, the RTX 4080 became the clear (though still costly) choice.
I chose the ASUS TUF version because of the water block’s sizing. While EK produces blocks for various brands, the ASUS and Gigabyte cards had the smallest blocks. Among Swedish retailers, the ASUS card was the more affordable option. Looking back, I should have researched the power target limitations of these cards, as the ASUS Strix version would have been better suitable for overclocking. Nevertheless, I'm satisfied with my choice.
Performance, Compatibility, Cost
The ASUS ROG Strix X570-I Gaming is a mini-ITX motherboard with an AM4 socket, and it’s been part of my setup for quite a while. I'm using an ITX motherboard in this build because I originally planned a small form factor system in a custom chassis. You can read more about this concept here.
I selected this board because of its great connectivity and internal layout. It includes two M.2 slots, which is essential for me, as I’m not using any 2.5" SSDs or 3.5" HDDs. The connector placements for the 8-pin, 24-pin, 4-pin PWM, and 3-pin RGB are convenient and make cable management much easier. It also has built-in Wi-Fi, Bluetooth, and 8 USB ports.
In terms of design, I prefer this board over other X570 ITX options, even though there is a bit too much branding for my taste.
Layout, Connectivity, Design
The Corsair Dominator Platinum RGB was chosen purely for their aesthetics, and while I’m generally not a fan of RGB lighting, I do think that well-placed LEDs can add a nice touch to the system. Even though I can choose any color, I usually stick with static white because it keeps things clean and understated.
This 32GB kit offers a 3466MHz frequency and CL16 timings, making it a great fit for the 5700X3D. A modest overclock to 3600MHz should be optimal, matching the FCLK frequency of the CPU.
One potential challenge is the height of these modules, which might interfere with the graphics card. Based on my calculations, there is a ~6mm of interference with the GPU block’s backplate. Addressing this will be tricky, as there are limits to how much the vertical GPU bracket can be offset. I’ll share more updates on this as I test-fit the components.
Design, Performance
The Corsair SF750 is a 750W small form factor power supply with a 80+ Platinum efficiency rating, and while choosing an SFX power supply for a chassis that supports full-sized power supplies might seem unusual, there’s a practical reason behind it. This particular SFX unit was originally purchased for a different project, so it ended up being an inherited component for this build. In hindsight, this turned out to be a fortunate choice because I later realized that an ATX power supply wouldn’t work with the layout of my cooling loop.
The pass-through fittings in this build make it impossible to use a standard ATX power supply without causing interference in the bottom chamber. Even with an SFX unit, the space will be tight. I’m confident that my measurements will hold up, but it’ll be interesting to see if everything fits as expected.
Size
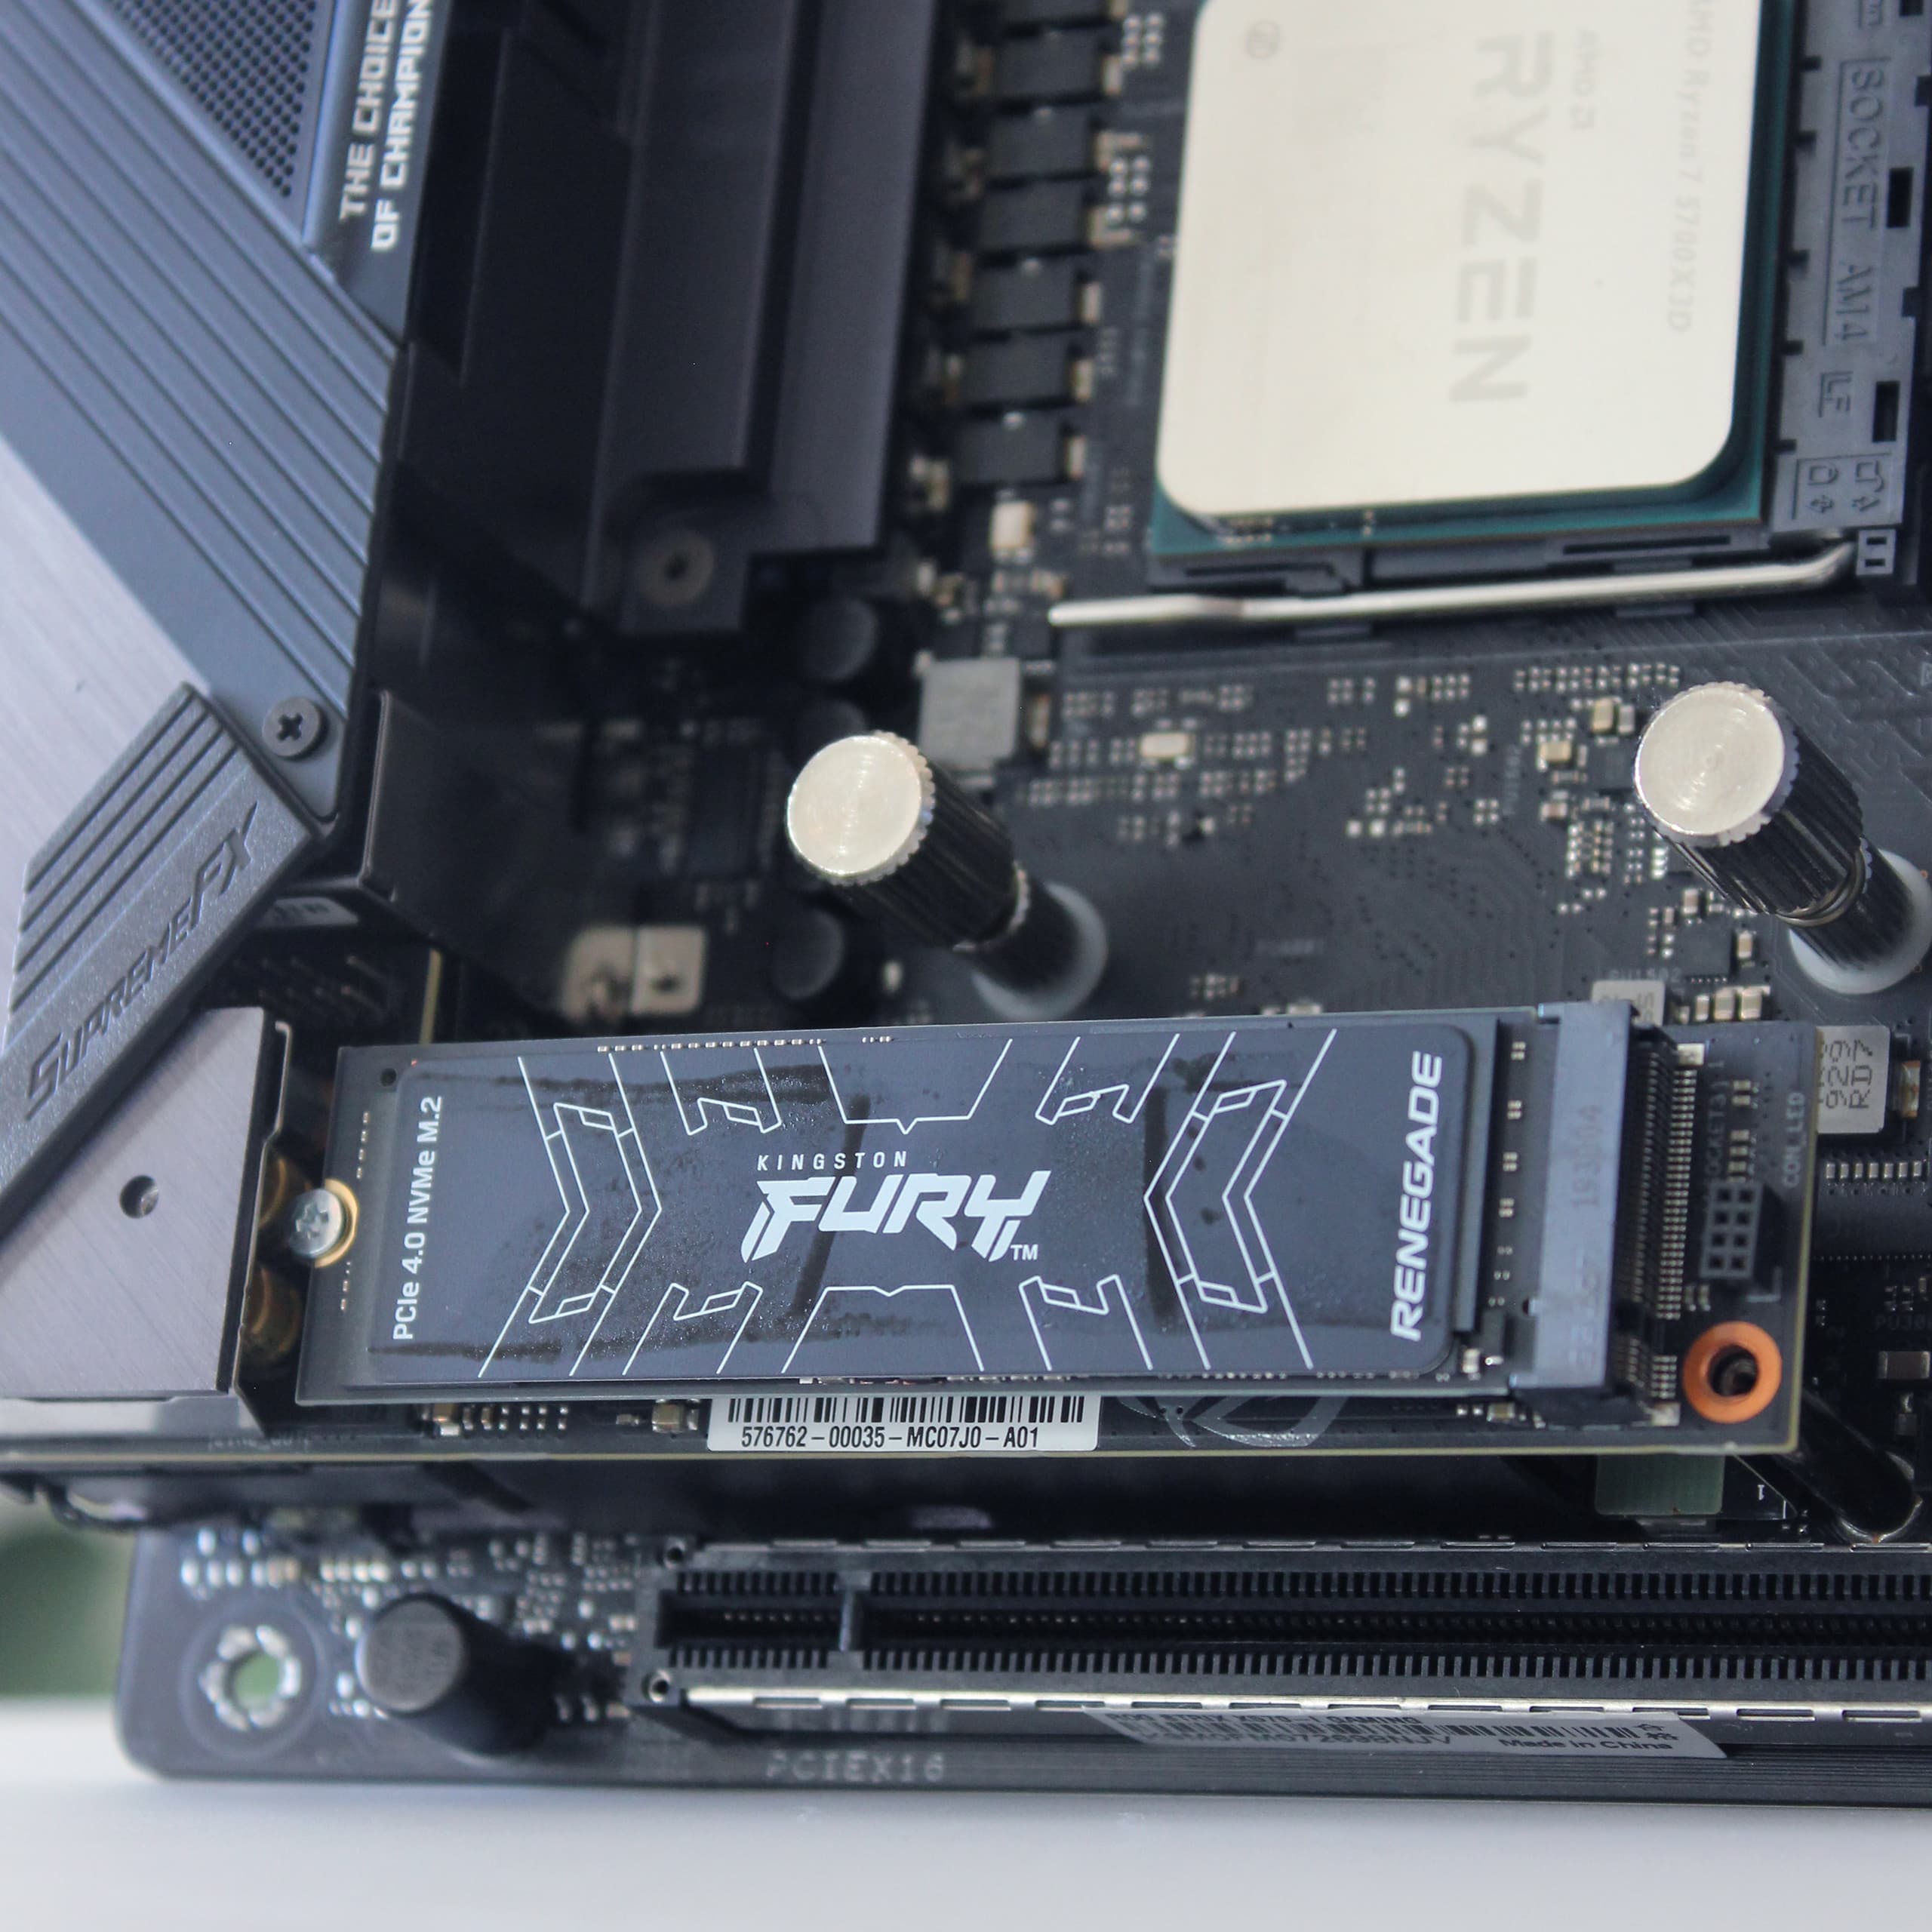
For me, the choice of storage was straightforward. M.2 SSDs offer incredible speed, and unlike traditional 2.5" SSDs or 3.5" HDDs, they eliminate the need for cables—a feature that I feel outweighs the added cost. I didn’t go with a PCIe 5.0 SSD because my motherboard doesn’t support it, and I find the price unjustified for the small performance improvements.
Carried over from my current setup is the Samsung 970 Evo Plus 1TB, a 3rd Gen. PCIe NVMe drive with a 3400/2500 MB/s read/write speed. The recent addition is the Kingstong Fury Renegade, a 4th Gen. PCIe NVMe drive with a 7300/7000 MB/s read/write speed. The Kingston drive is installed into the front-facing slot which is passively cooled by an integrated heatspreader. The Samsung drive is installed on the opposing side of the motherboard (which only supports 3rd Gen. PCIe) and is equipped with an EK heatsink.
I opted for the Kingston drive due to its expected lifespan of 2000 TBW which is relatively long compared to other SSDs on the market.
Size, Performance, Reliability
I think the EK-Quantum series CPU and GPU blocks look incredible. While the transparent variants are striking, I chose the understated black acetate finish with integrated RGB lighting. I’ve always preferred a less is more approach, and I think that liquid-cooled systems can easily become over-saturated with detail since there's a lot of visual elements.
When I bought the CPU block, the Magnitude and Velocity2 series weren’t available, which is why I’m using a 1st-generation block. If I were buying one today, I’d likely go for the full nickel Velocity2 block. I also have the option of replacing the RGB-enabled milky white bottom section of the current block with a nickel-plated part, though I’m still undecided on which one I should use.
Design, Quality
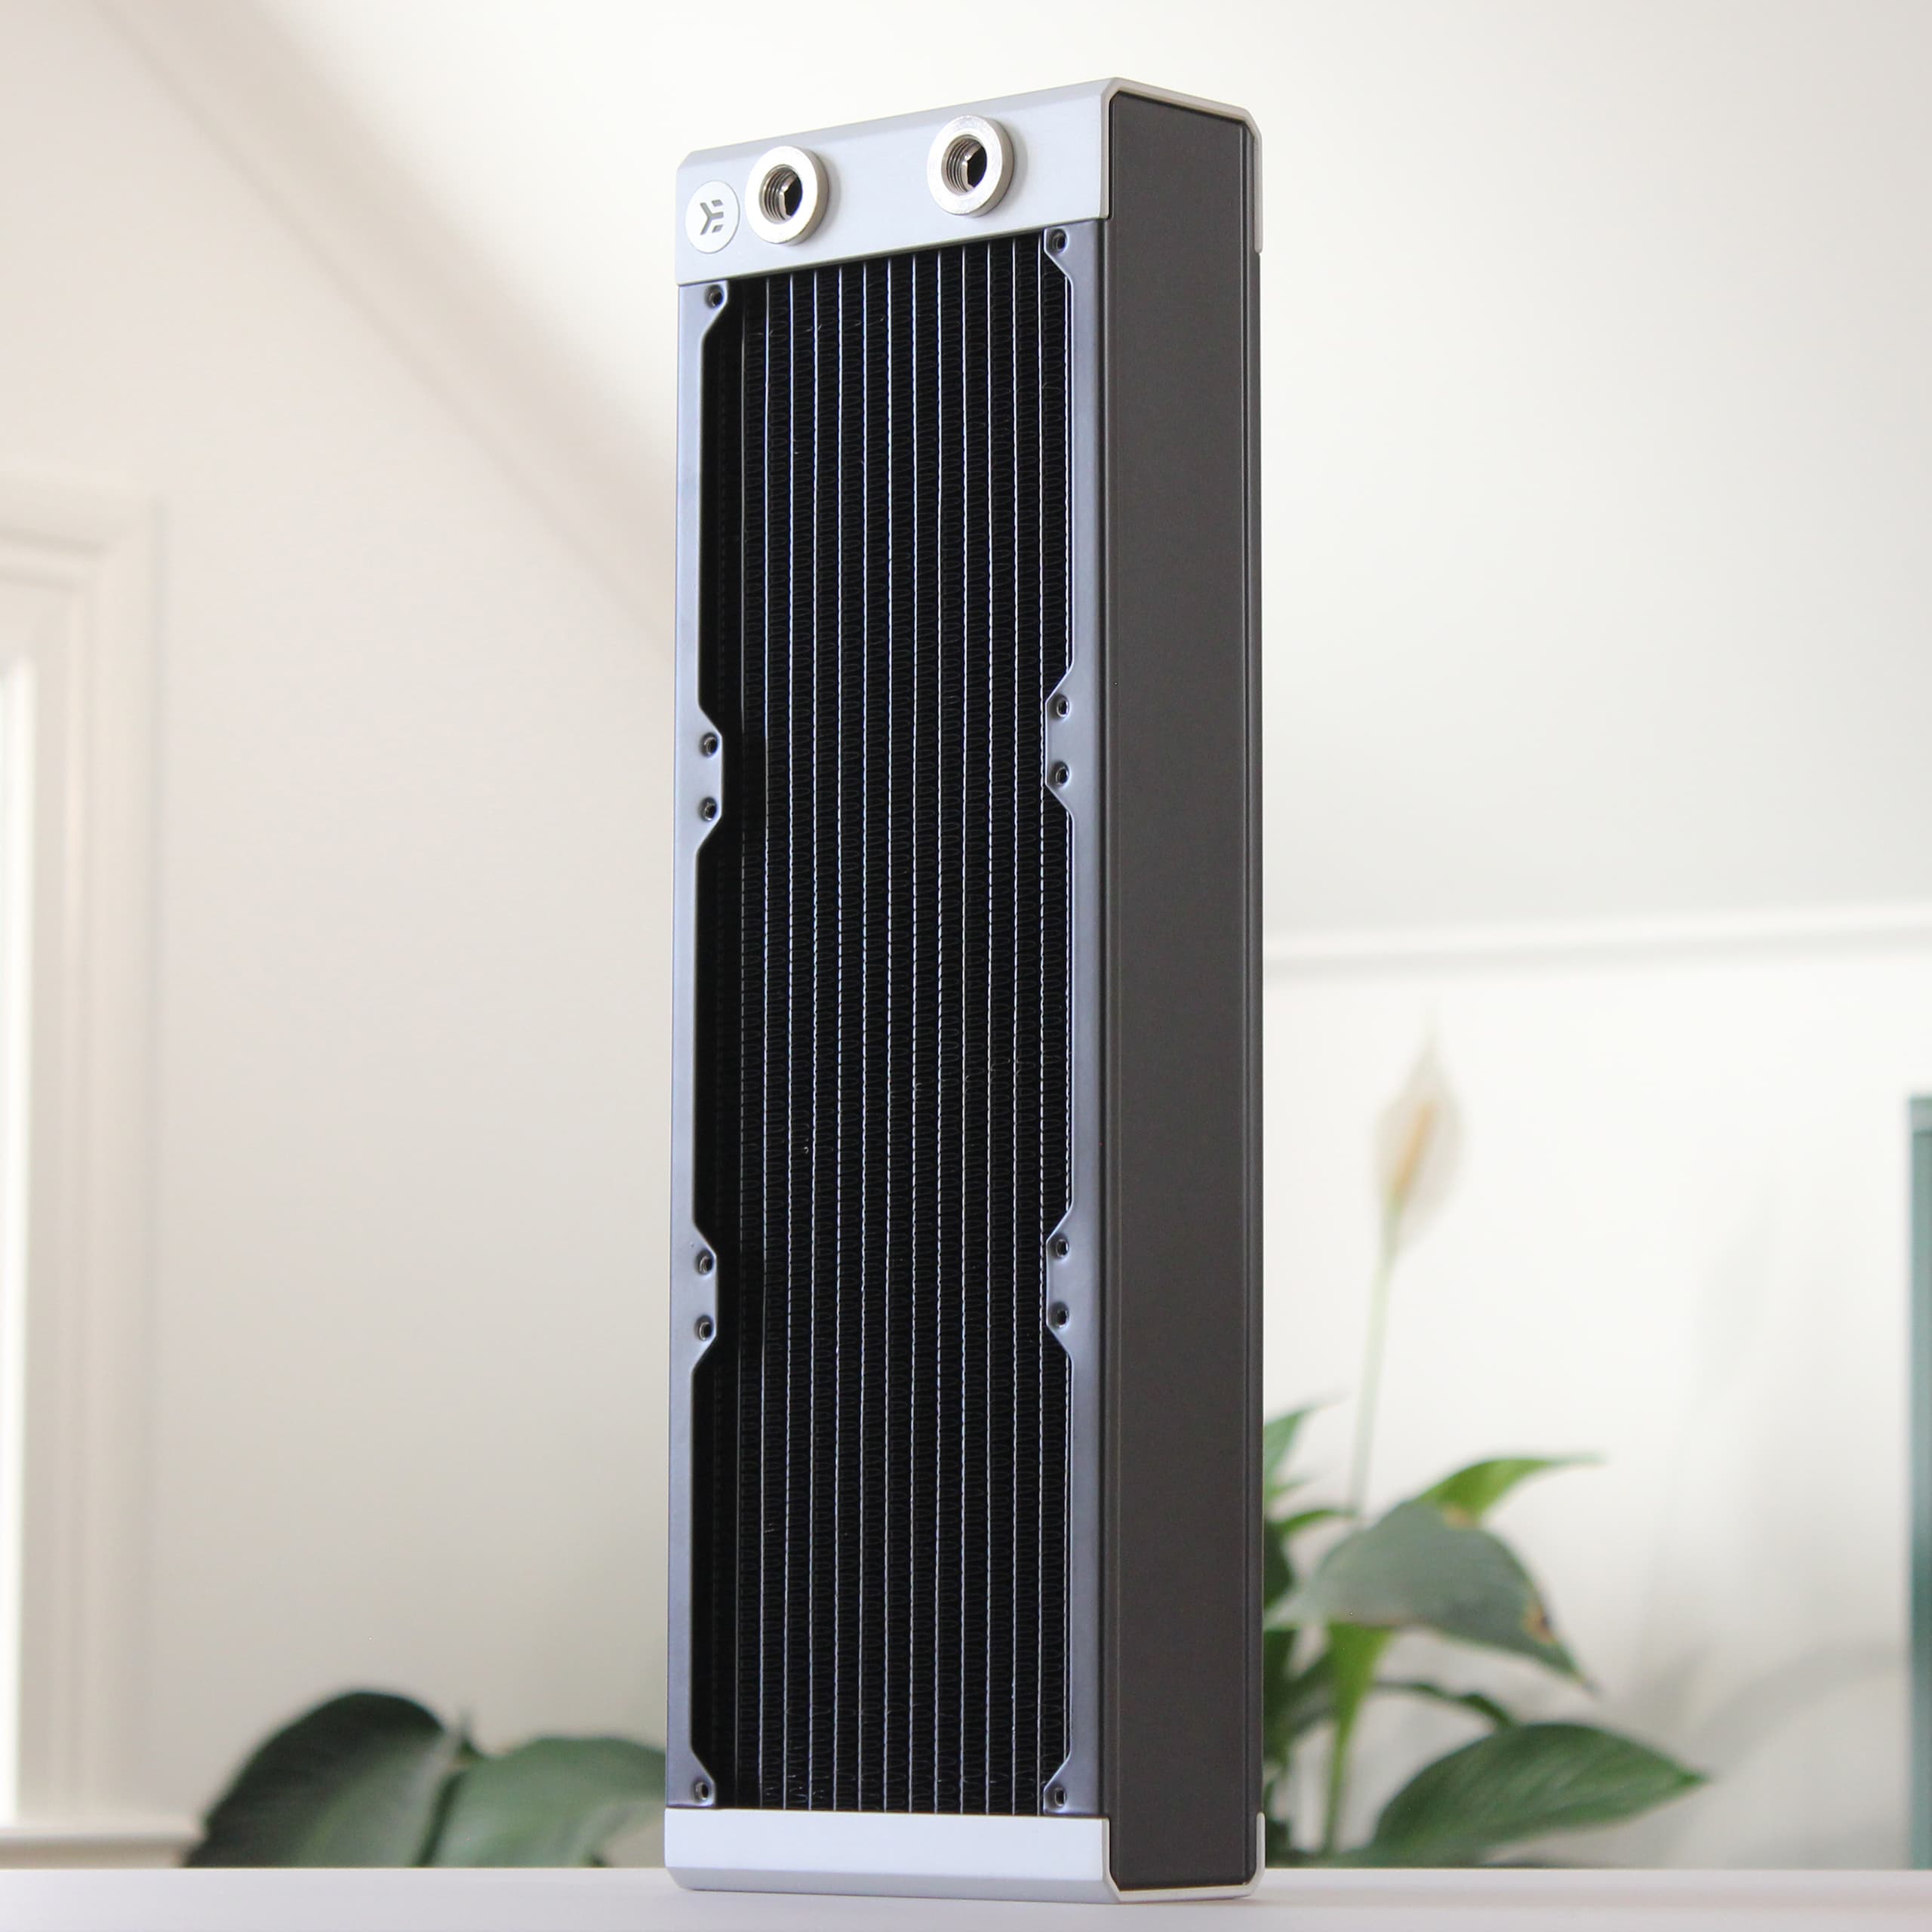
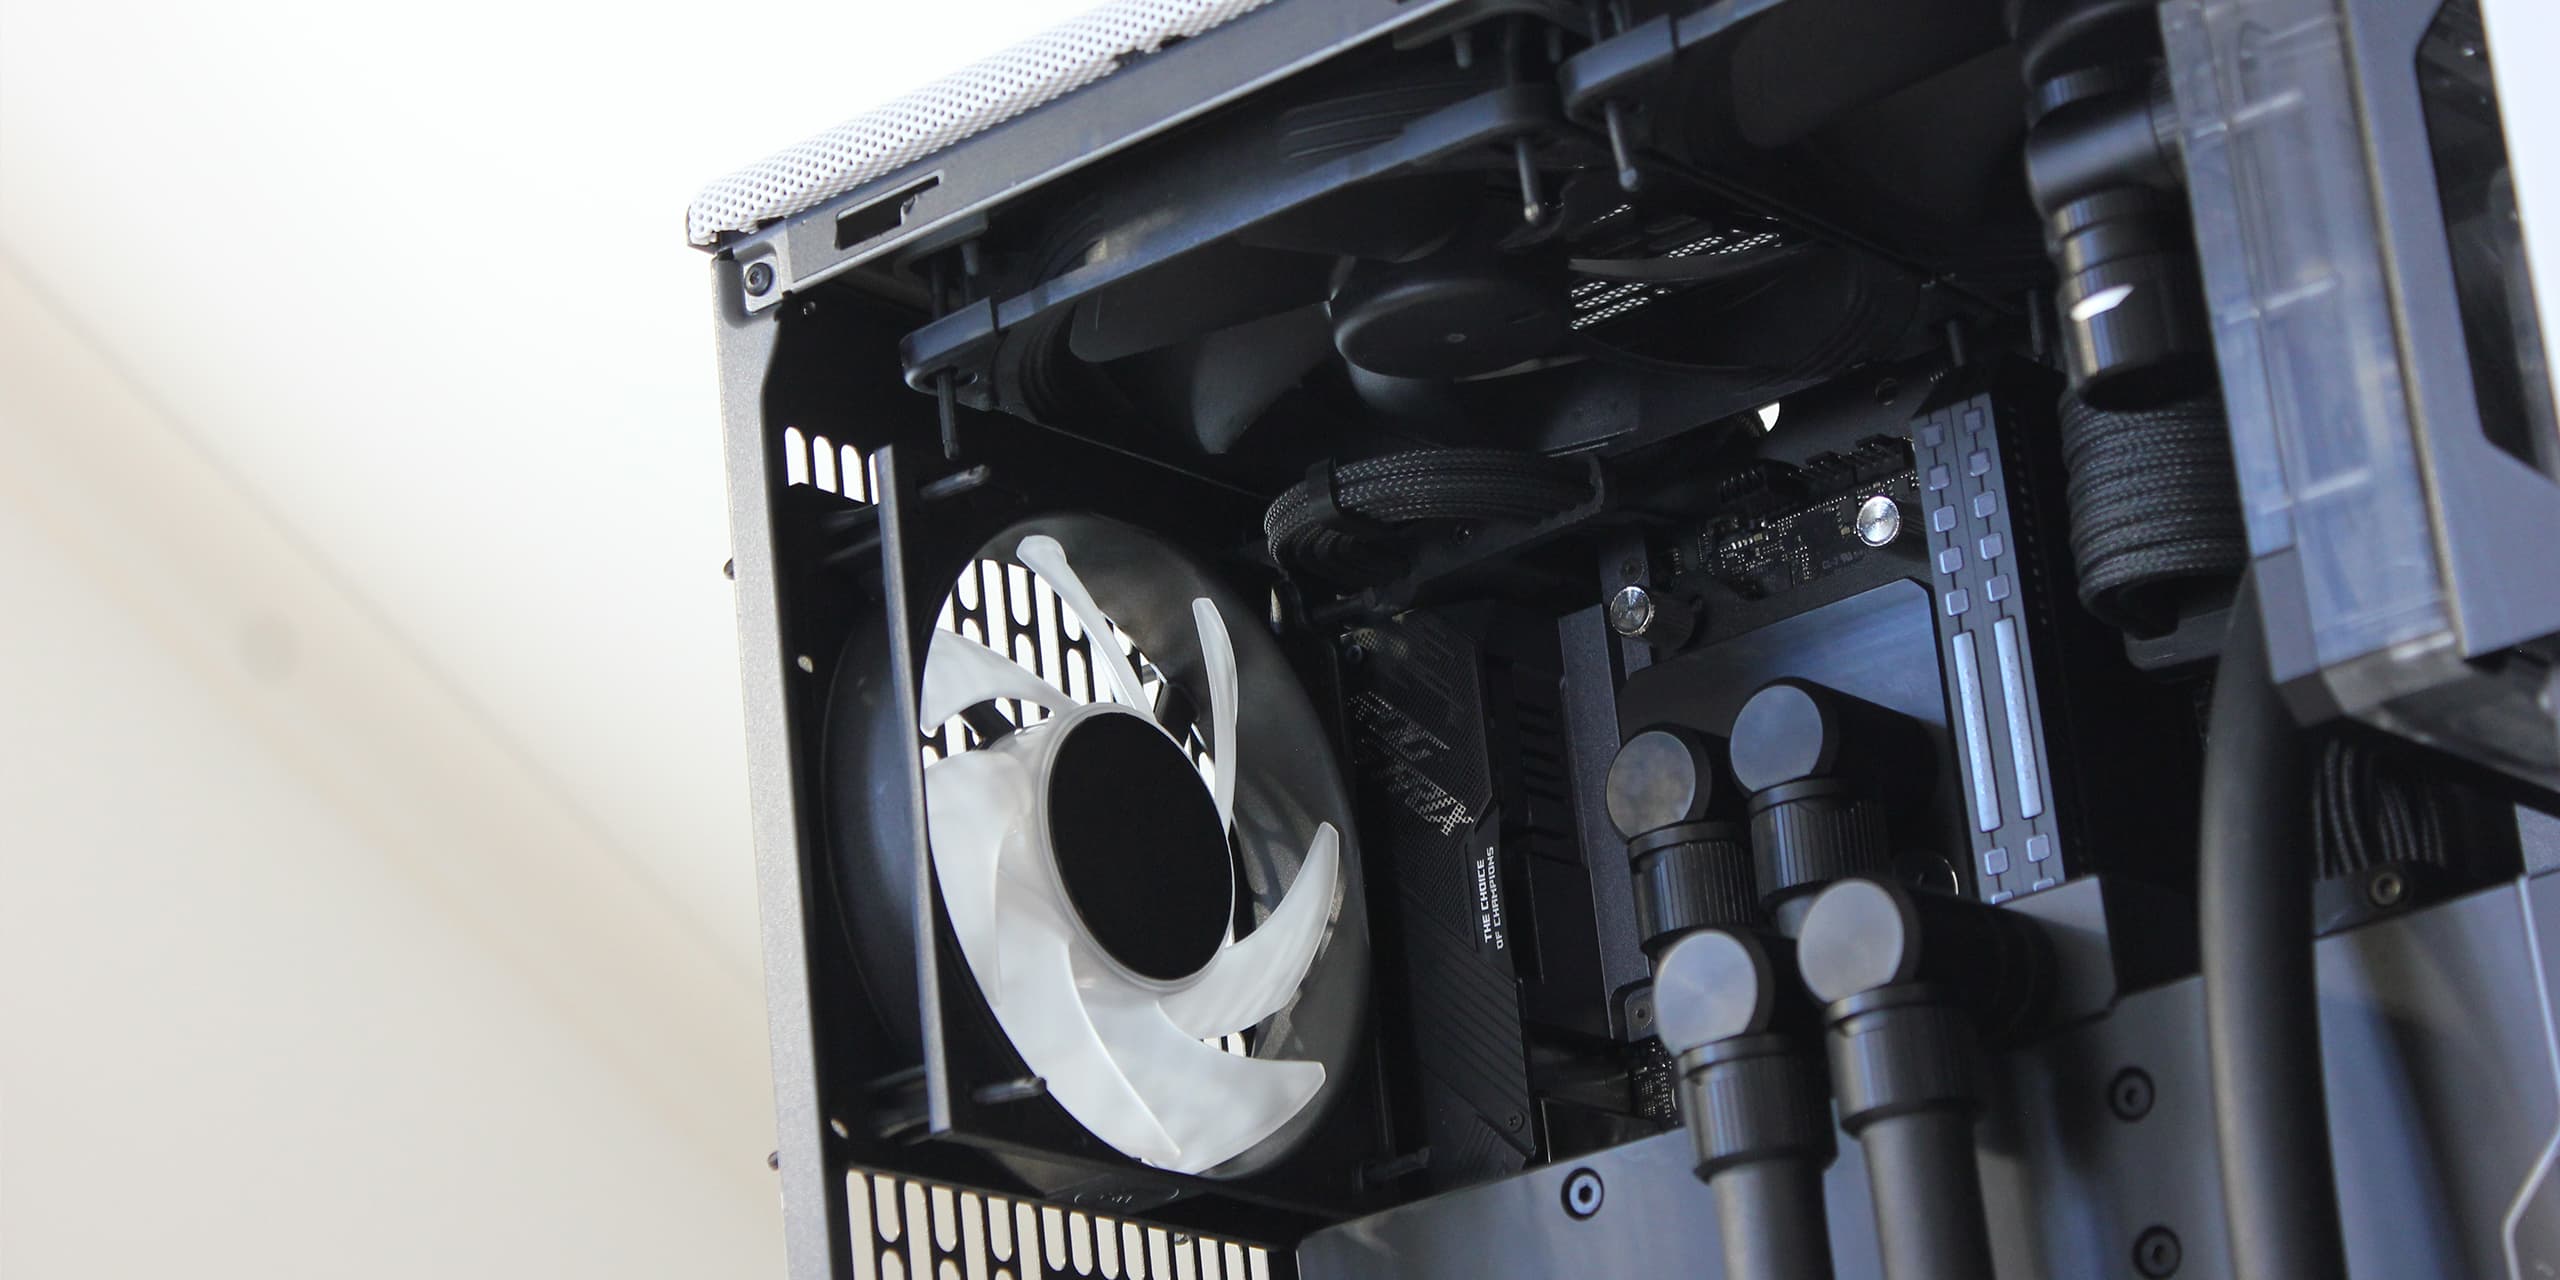
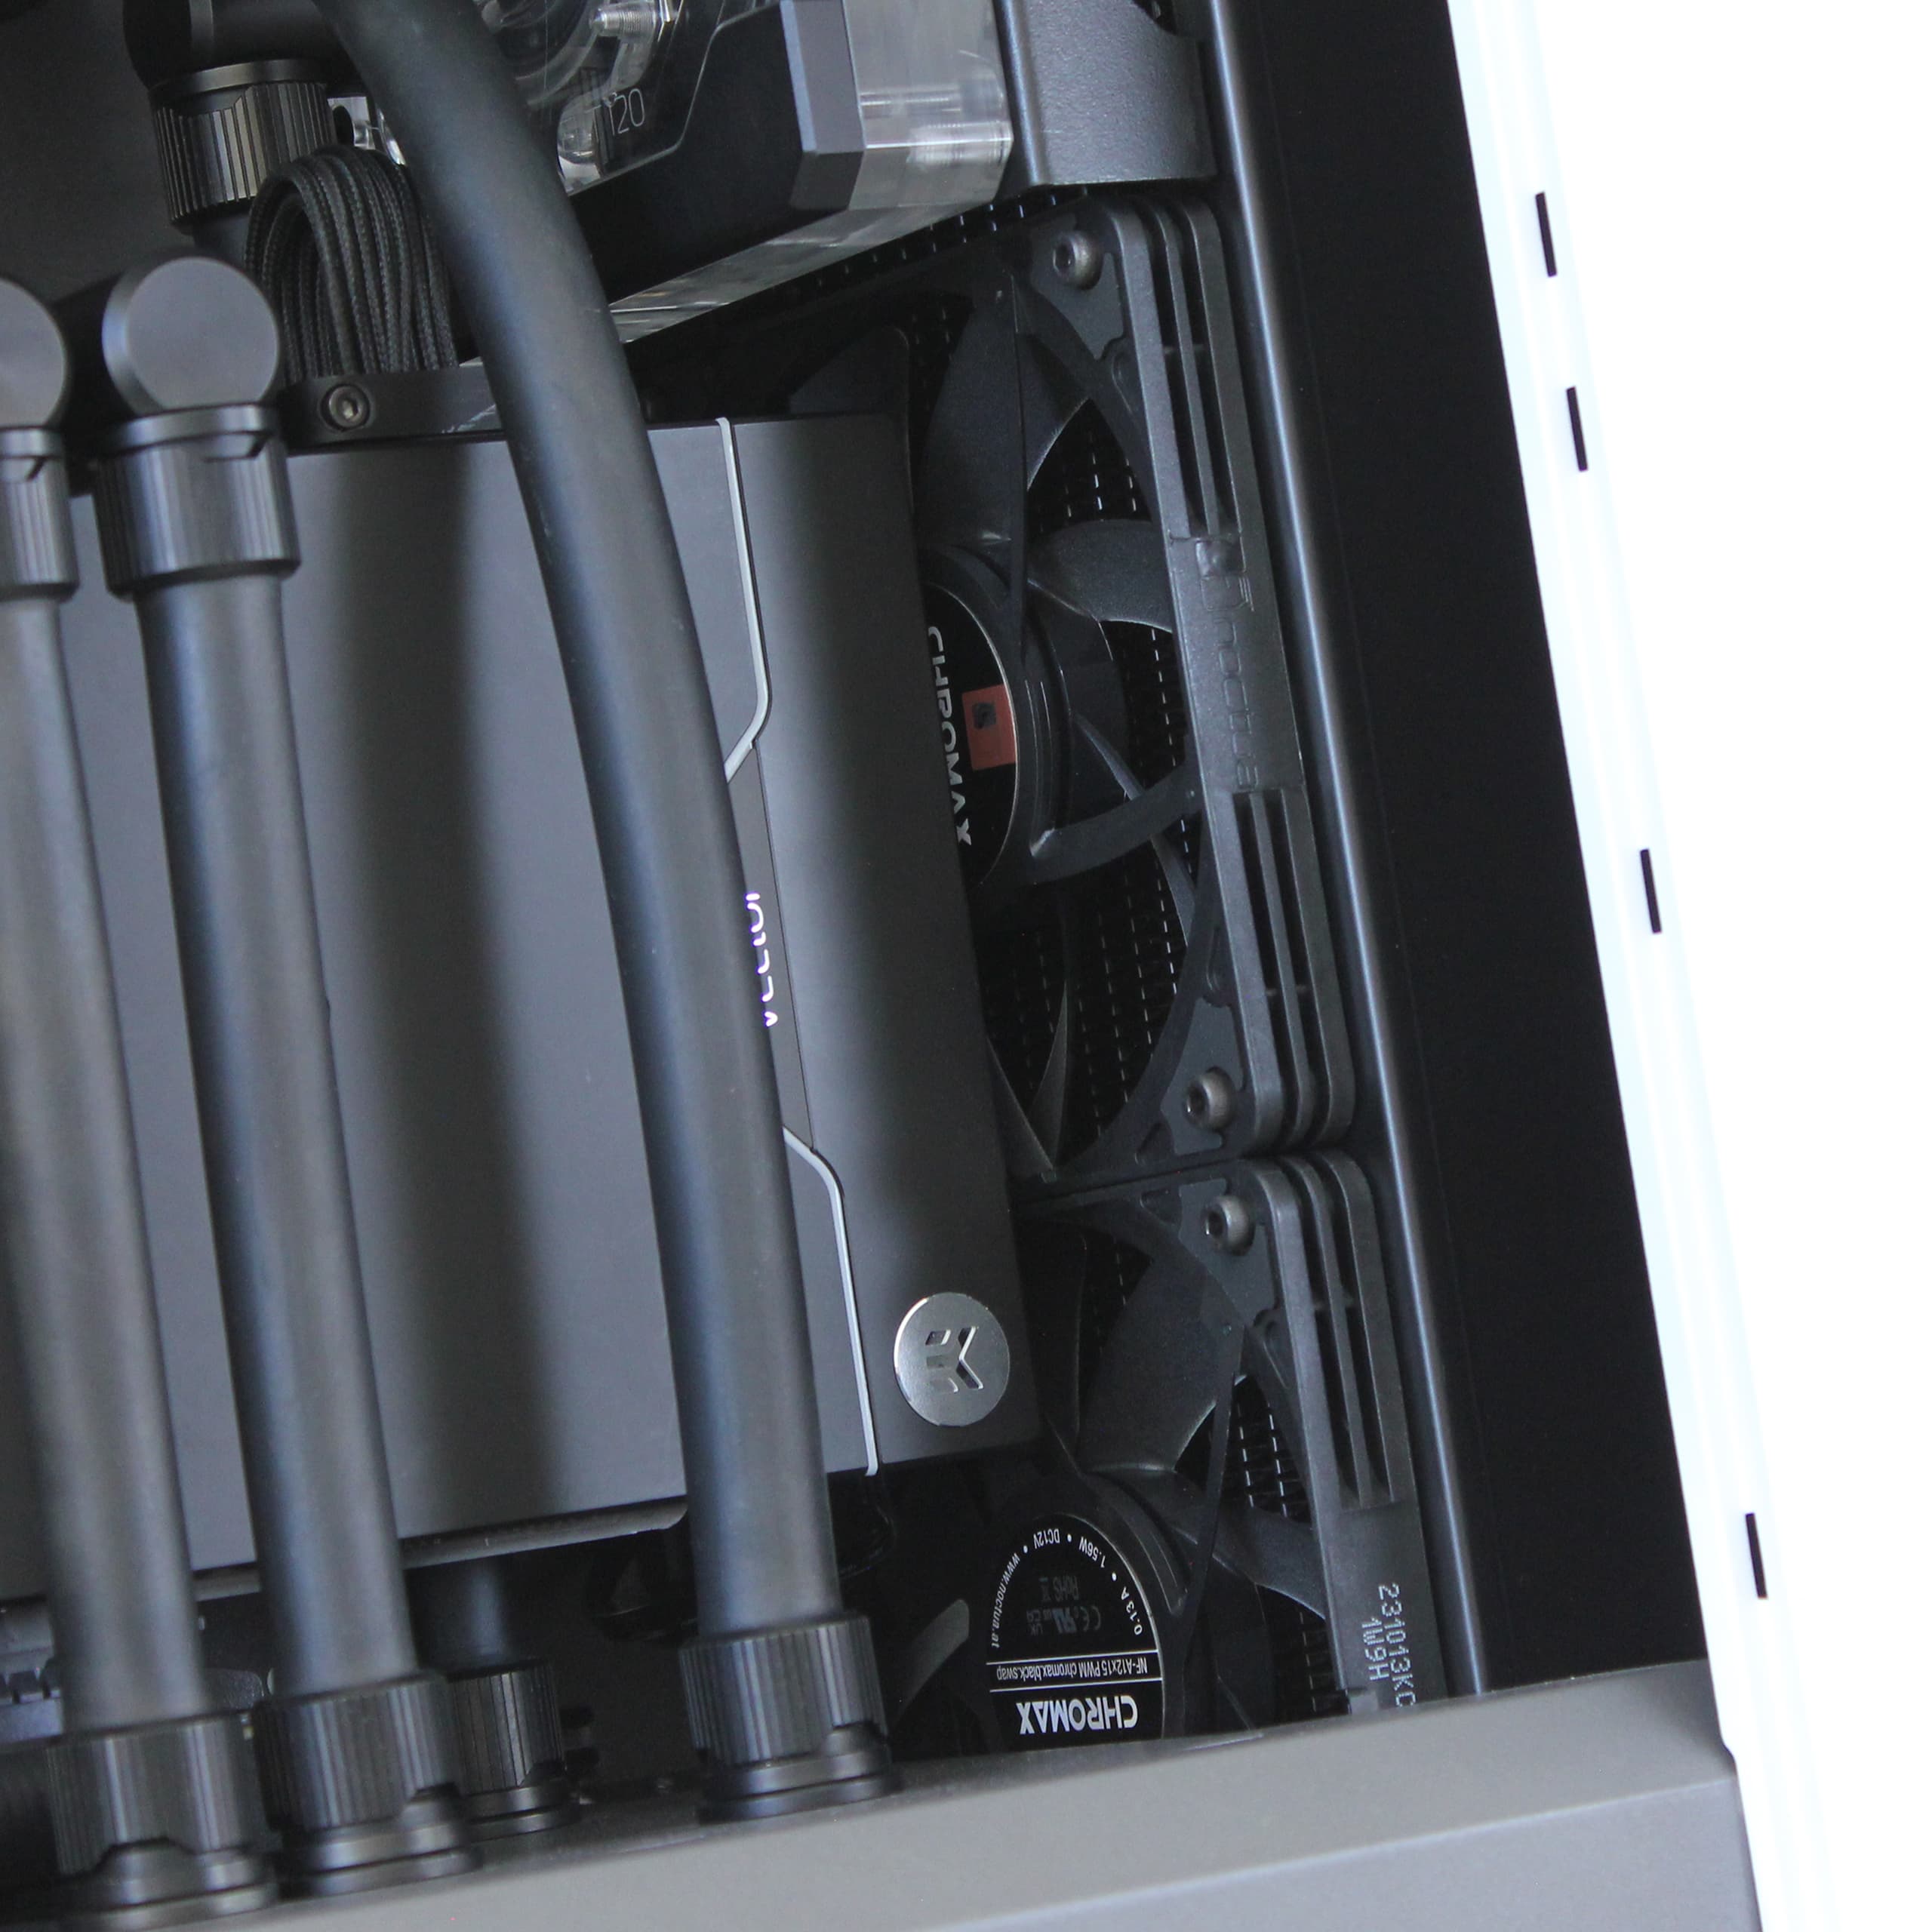
I've opted for a single radiator setup in this build, which is why I've chosen to use the EK-Quantum Surface X360M. It's the thickest radiator EK offers, boasting a thickness of 58mm. While the North chassis can accommodate the full height of the radiator, it doesn’t allow for its full thickness, requiring some small adjustments to the chassis, as outlined in the previous post. The radiator also acts as the mounting point for the reservoir, and since it fills the entire height of the chassis I can hide the inlet and outlet at the bottom for a cleaner main chamber.
Based on my measurements, there will be just under 25mm of clearance between the radiator and the GPU block. This rules out the possibility of adding two additional fans in a pull configuration. Nonetheless, I’m confident the cooling performance will be more than adequate for this system.
Performance, Quality
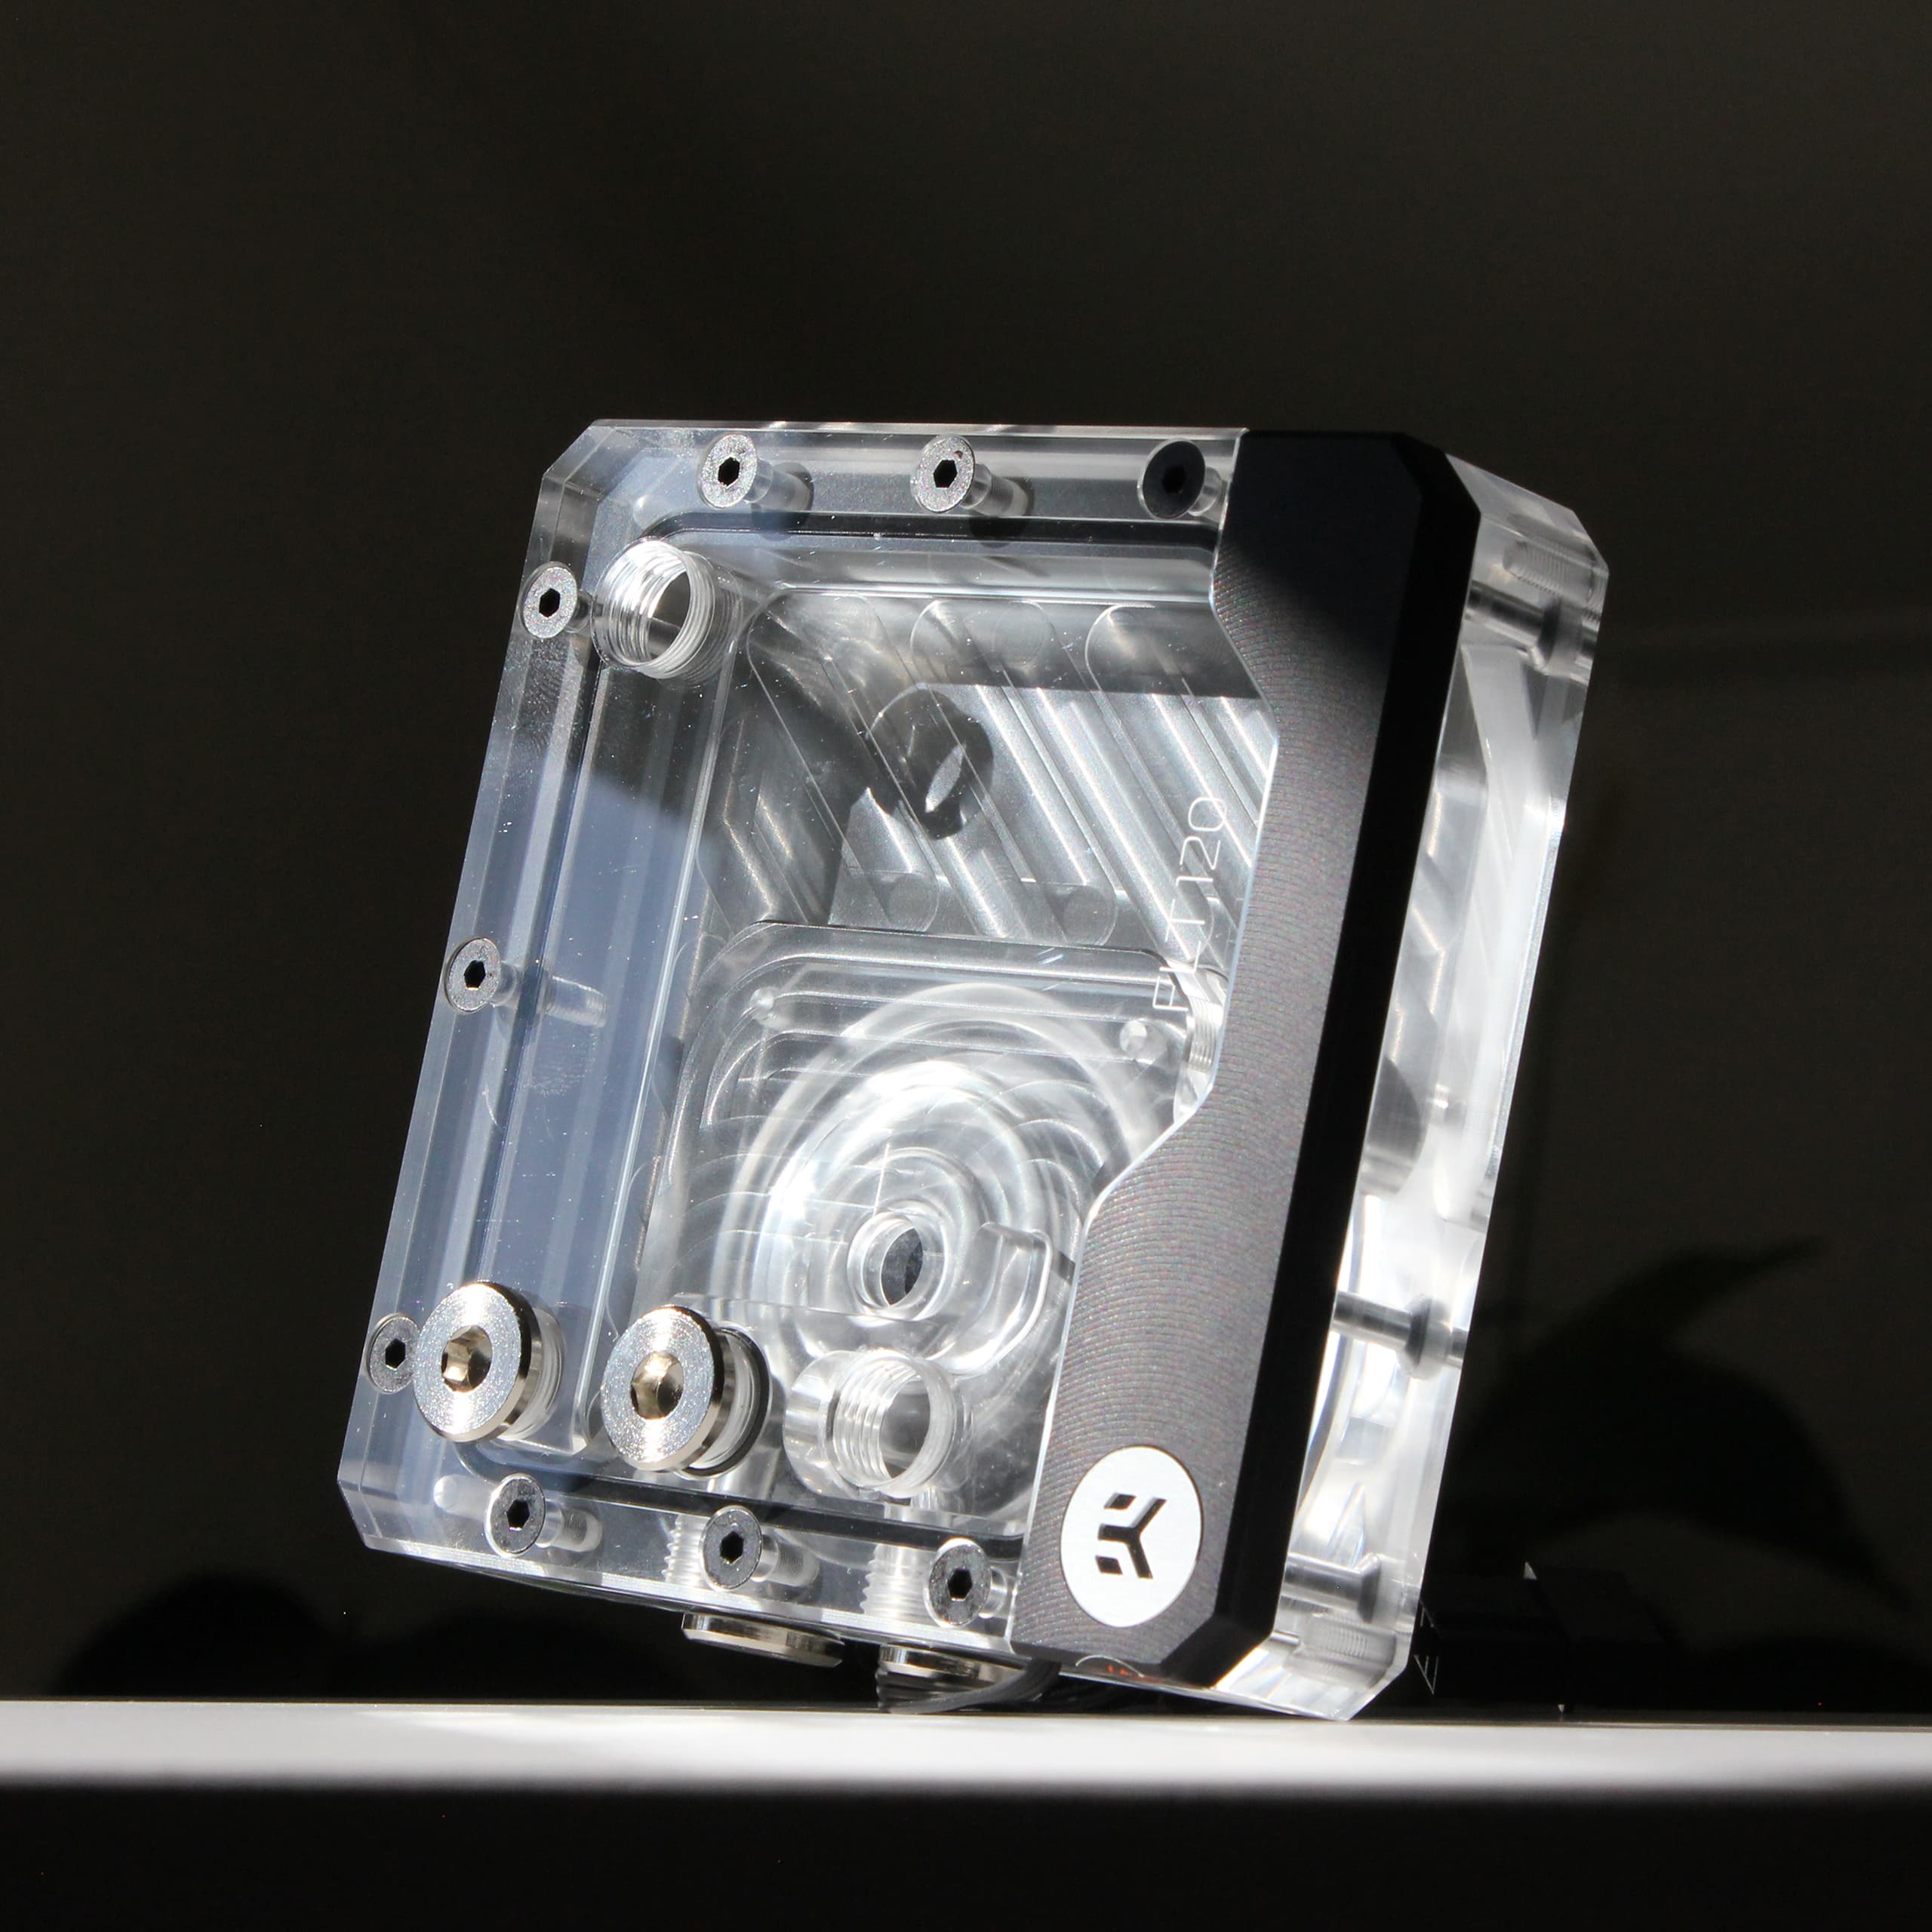
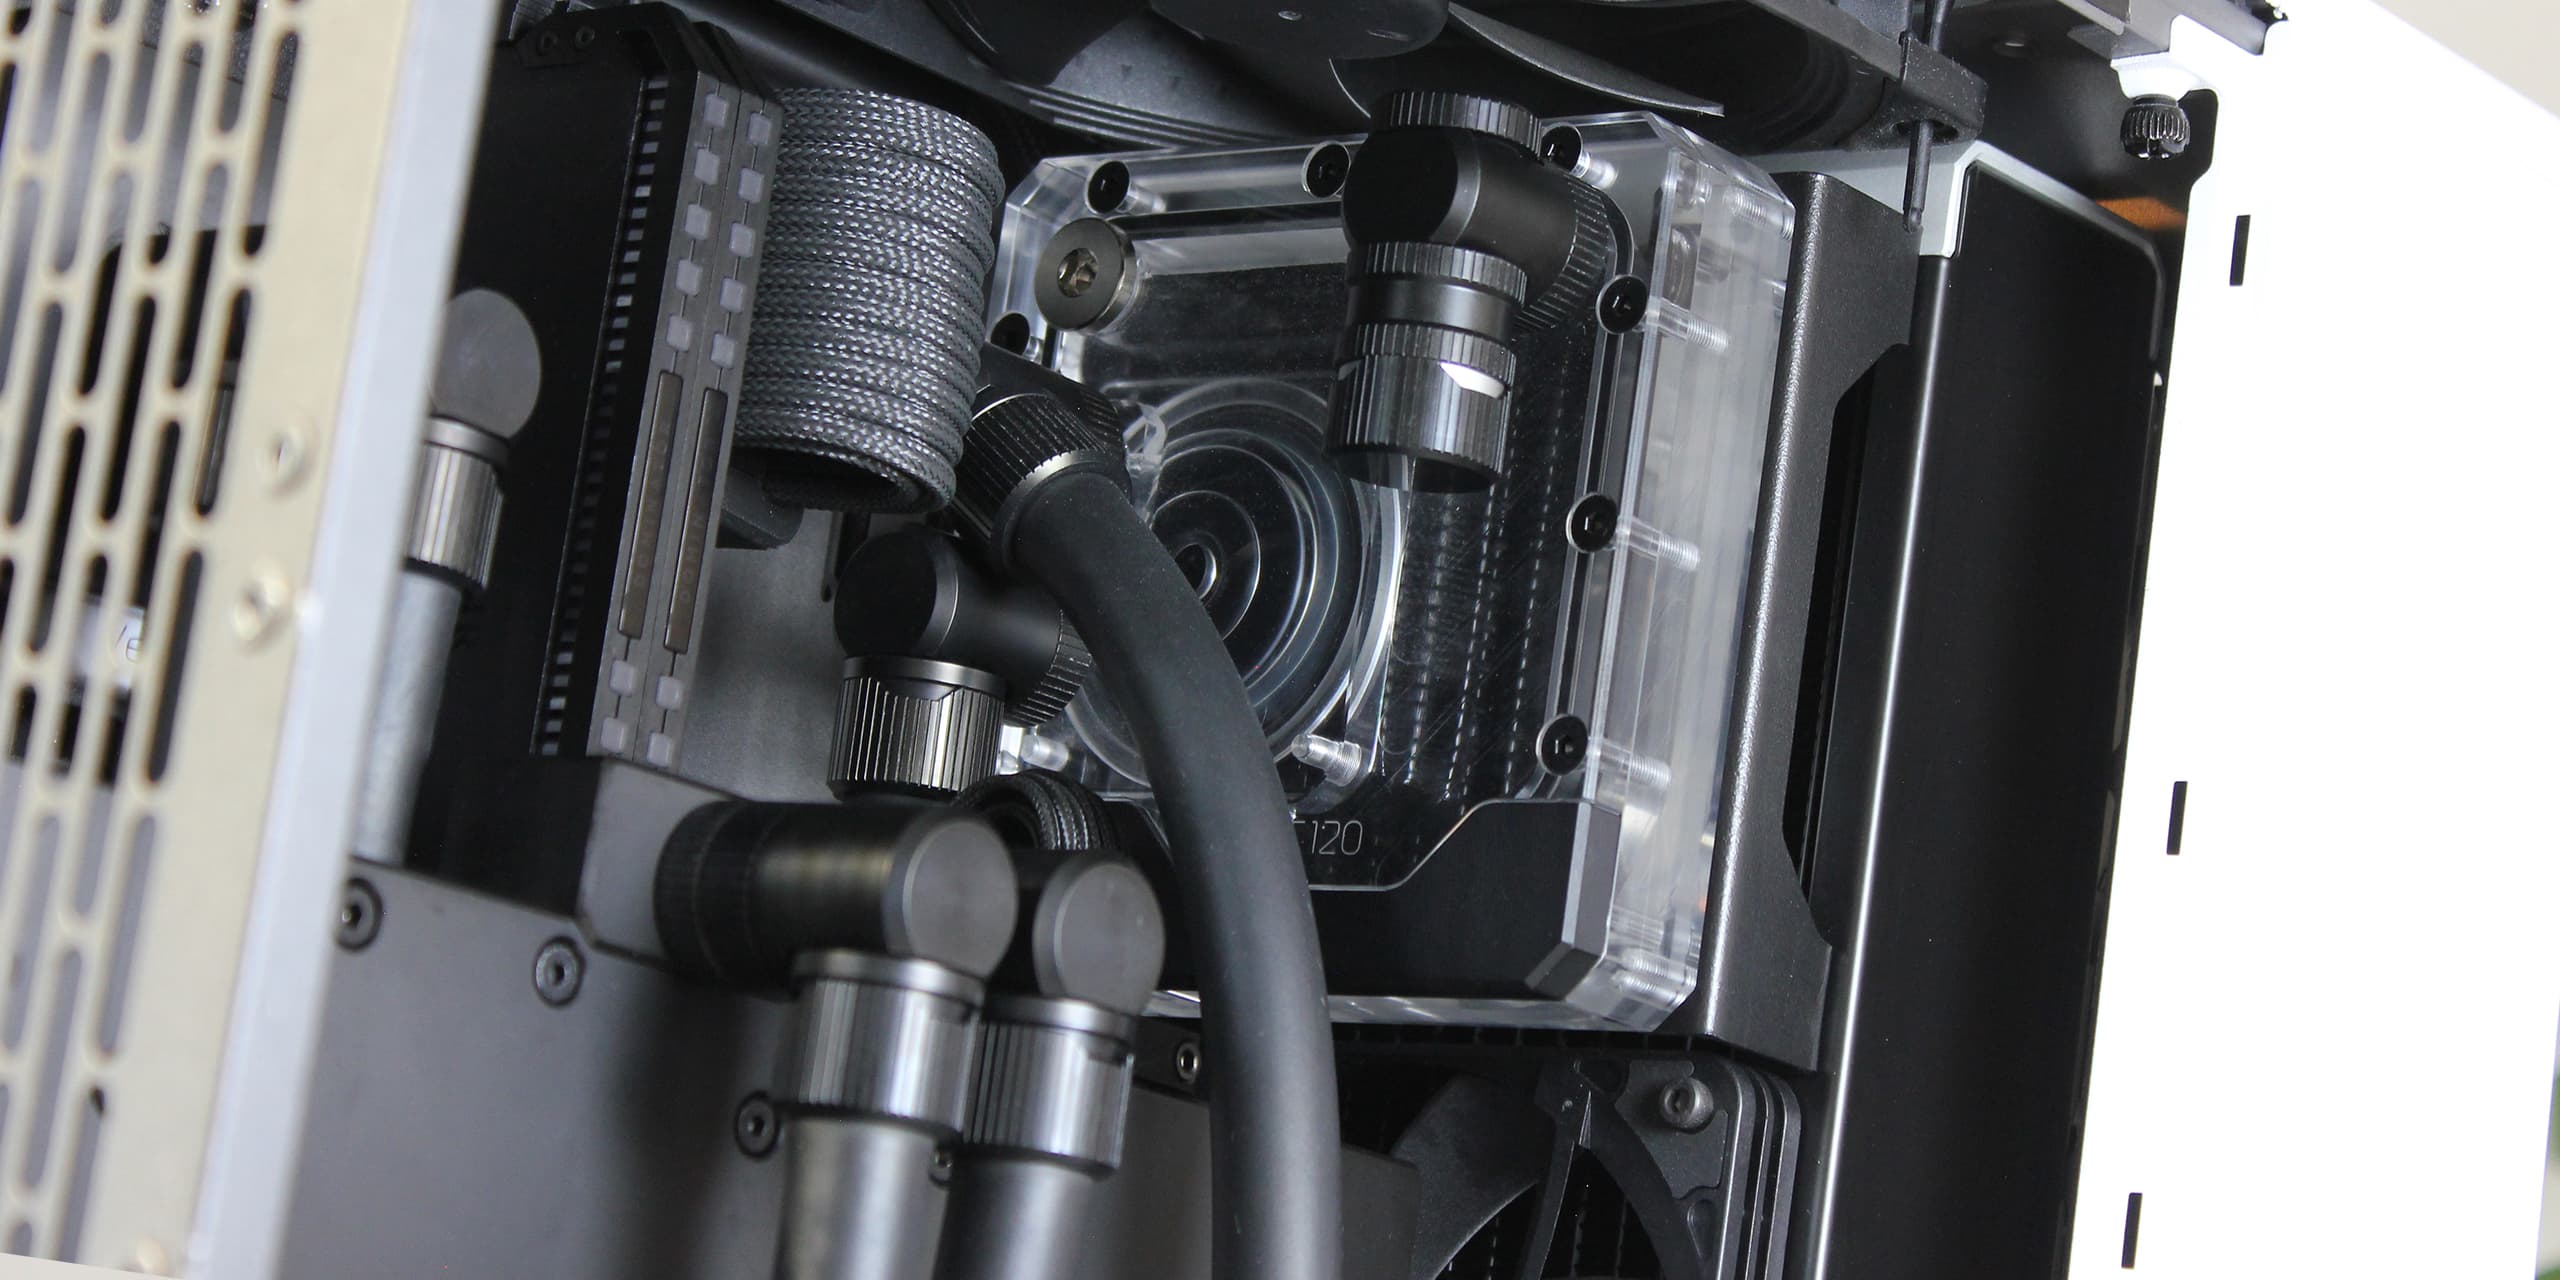
EK's flat reservoirs caught my eye as soon as they were revealed. Their more compact and practical design is a big improvement over the traditional cylindrical ones, maximizing space efficiency—a critical aspect in PC building.
This particular flat reservoir was quite hard to find, but I was fortunate enough to grab the last one in stock from a Swedish retailer. It supports both D5 and DDC pumps, and in this build, I’ll be using an Alphacool DDC310. While the D5 pump is compatible with the build, I opted for the DDC pump because its size-advantage. The EK-Quantum Kinetic FLT120 D5/DDC Body also features integrated RGB, which I think will add a nice glow.
Reliability is paramount when choosing a pump, and I want to minimize the risk for malfunctions or premature failure. Alphacool sources their pumps from Laing, which I’ve heard are known for their quality. The Alphacool Laing DDC310 comes with a heatspreader top that should get plenty of airflow from the front intake, further minimizing the risk of failure.
Desing, Size, Reliability
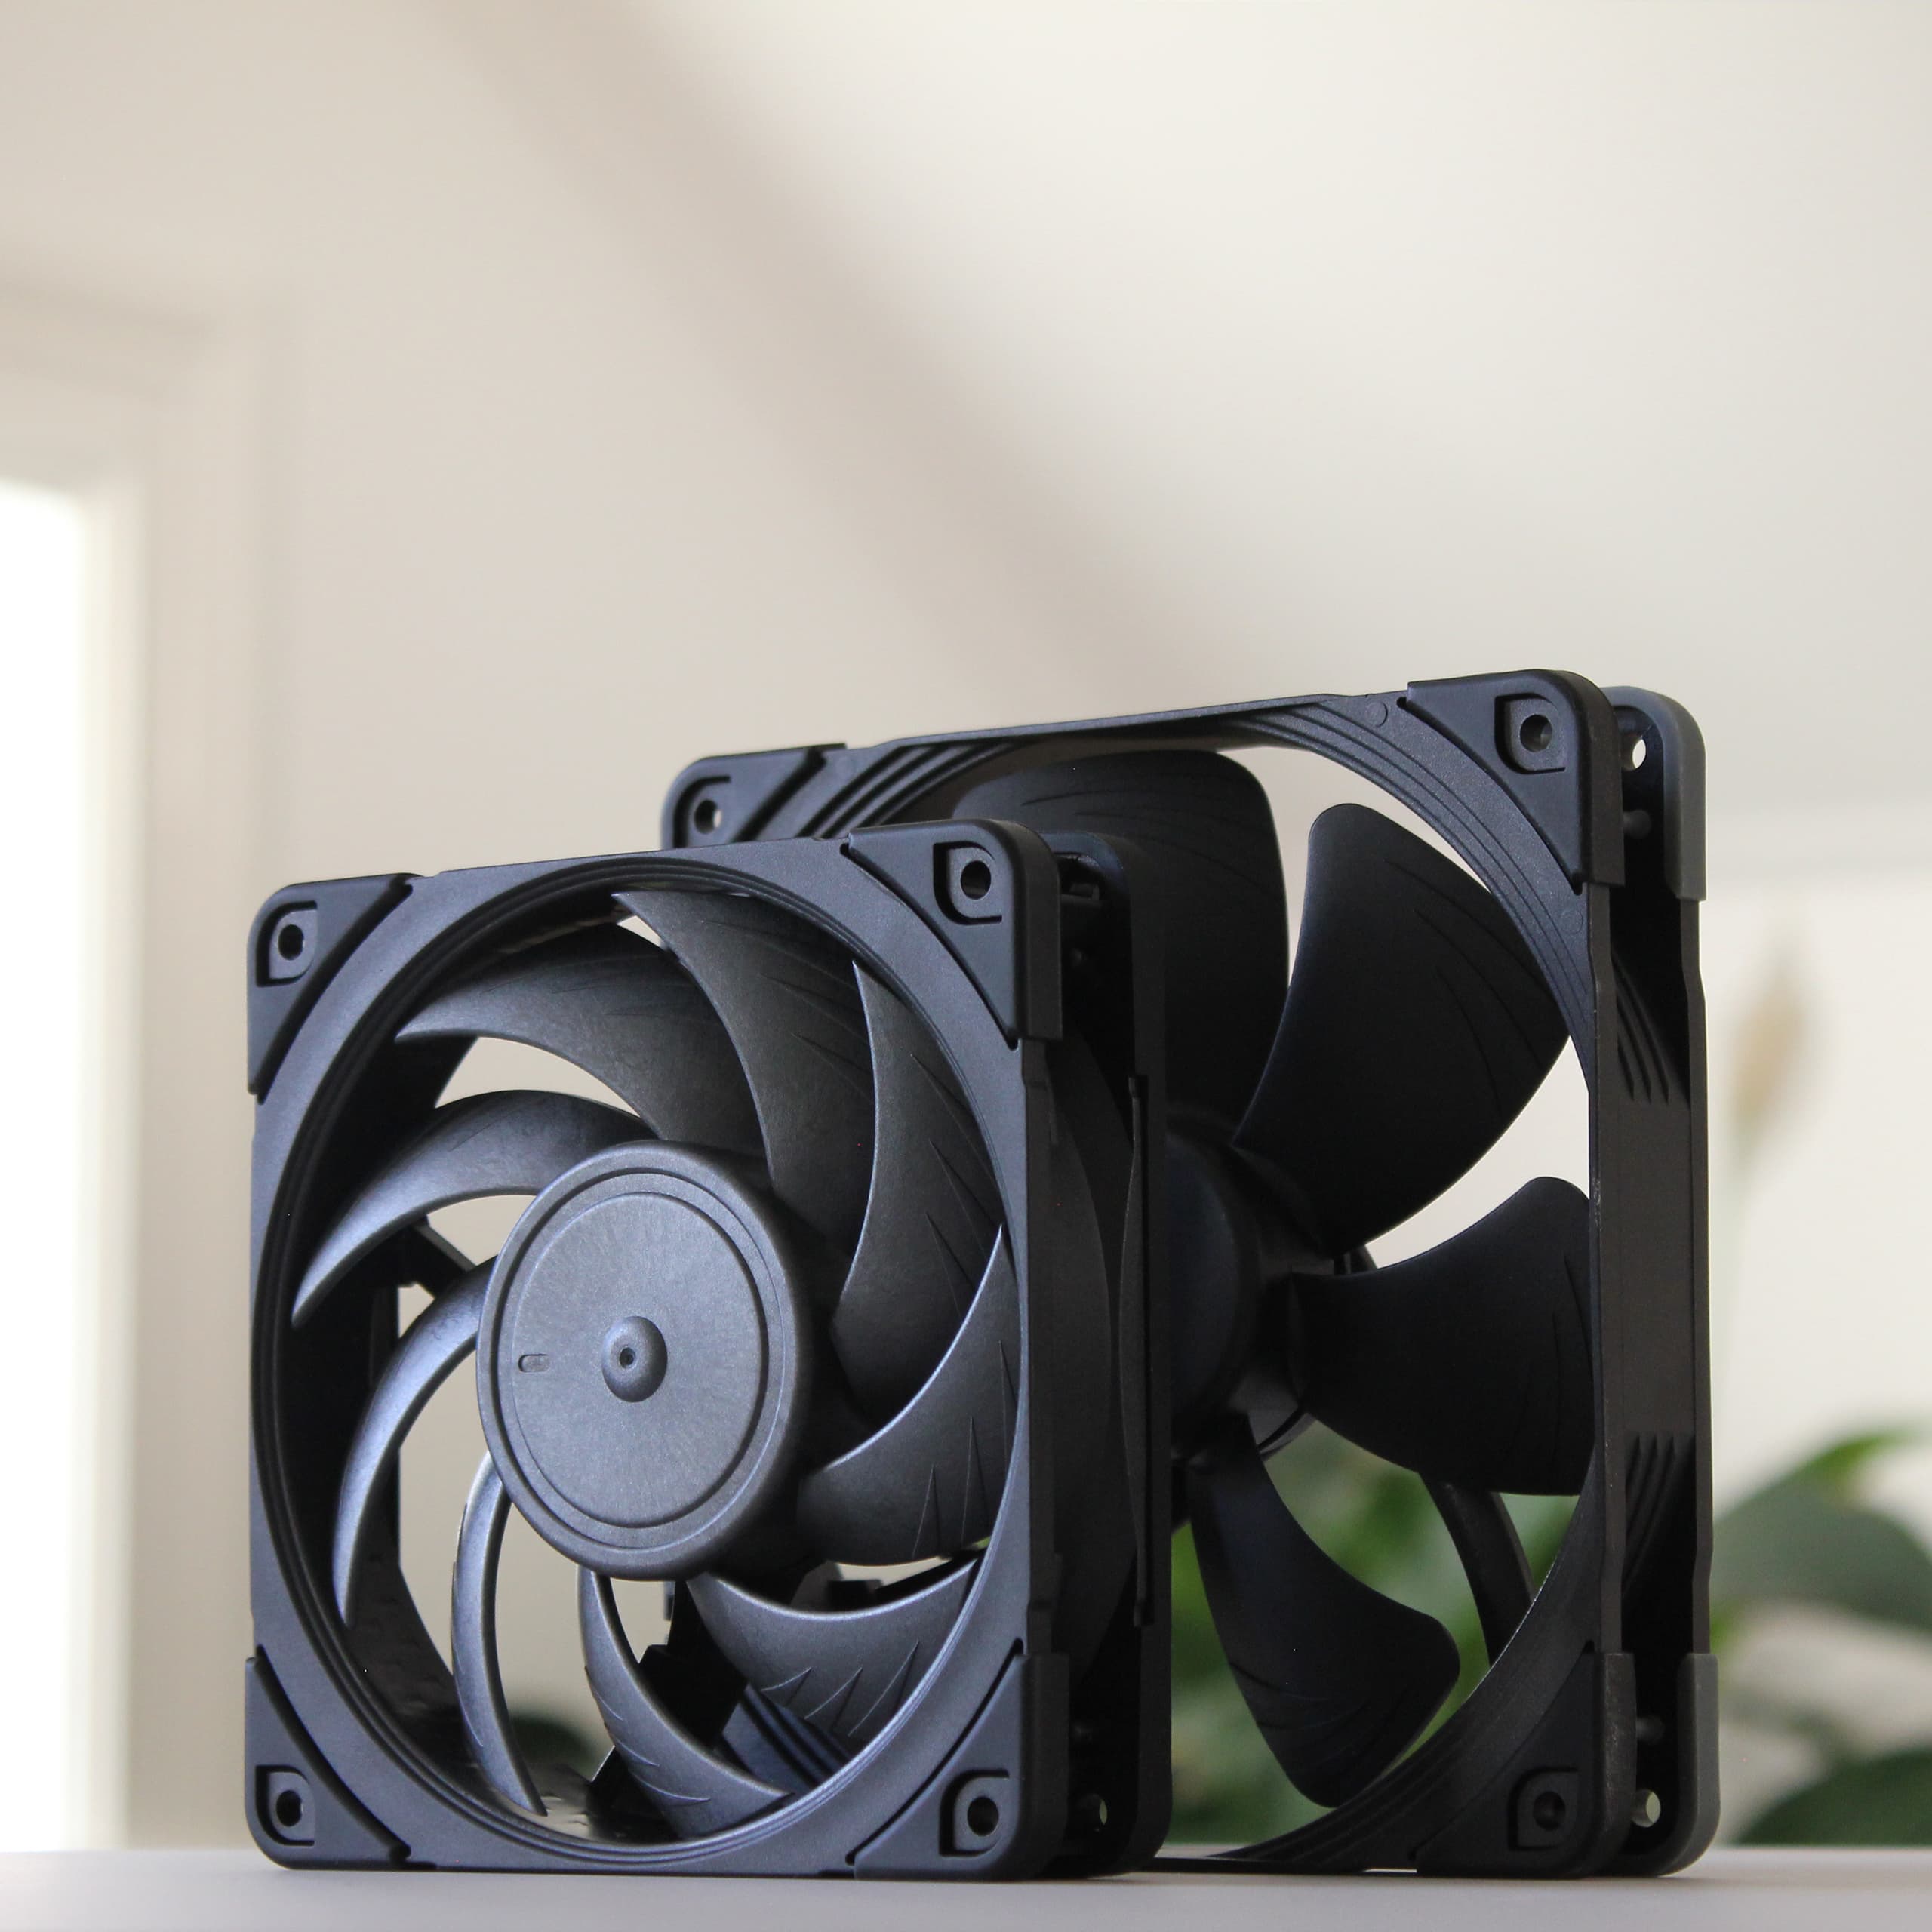
The fans I'm using for this build are Noctua’s NF-A12x25 and NF-A14 fans, which are known for their excellent noise-to-performance ratio. While there are other options like the Arctic P12/P14, Nidec Typhoon, Phanteks T30, and Corsair RS120, their performance is still comparatively worse. The only exception being the thicker 30mm fans which are fairly similar. Regardless, the North only supports standard thickness fans in the front.
The last thing I want to see in this build is beige and brown (no offense, Noctua), which is why I opted for the Chromax versions in all black. The only downside is the price — one A12x25 Chromax fan costs around 35 EUR, while a five-pack of Arctic P12s is only 25 EUR. Noctua, you're great, but you're not that great!
Noise, Performance
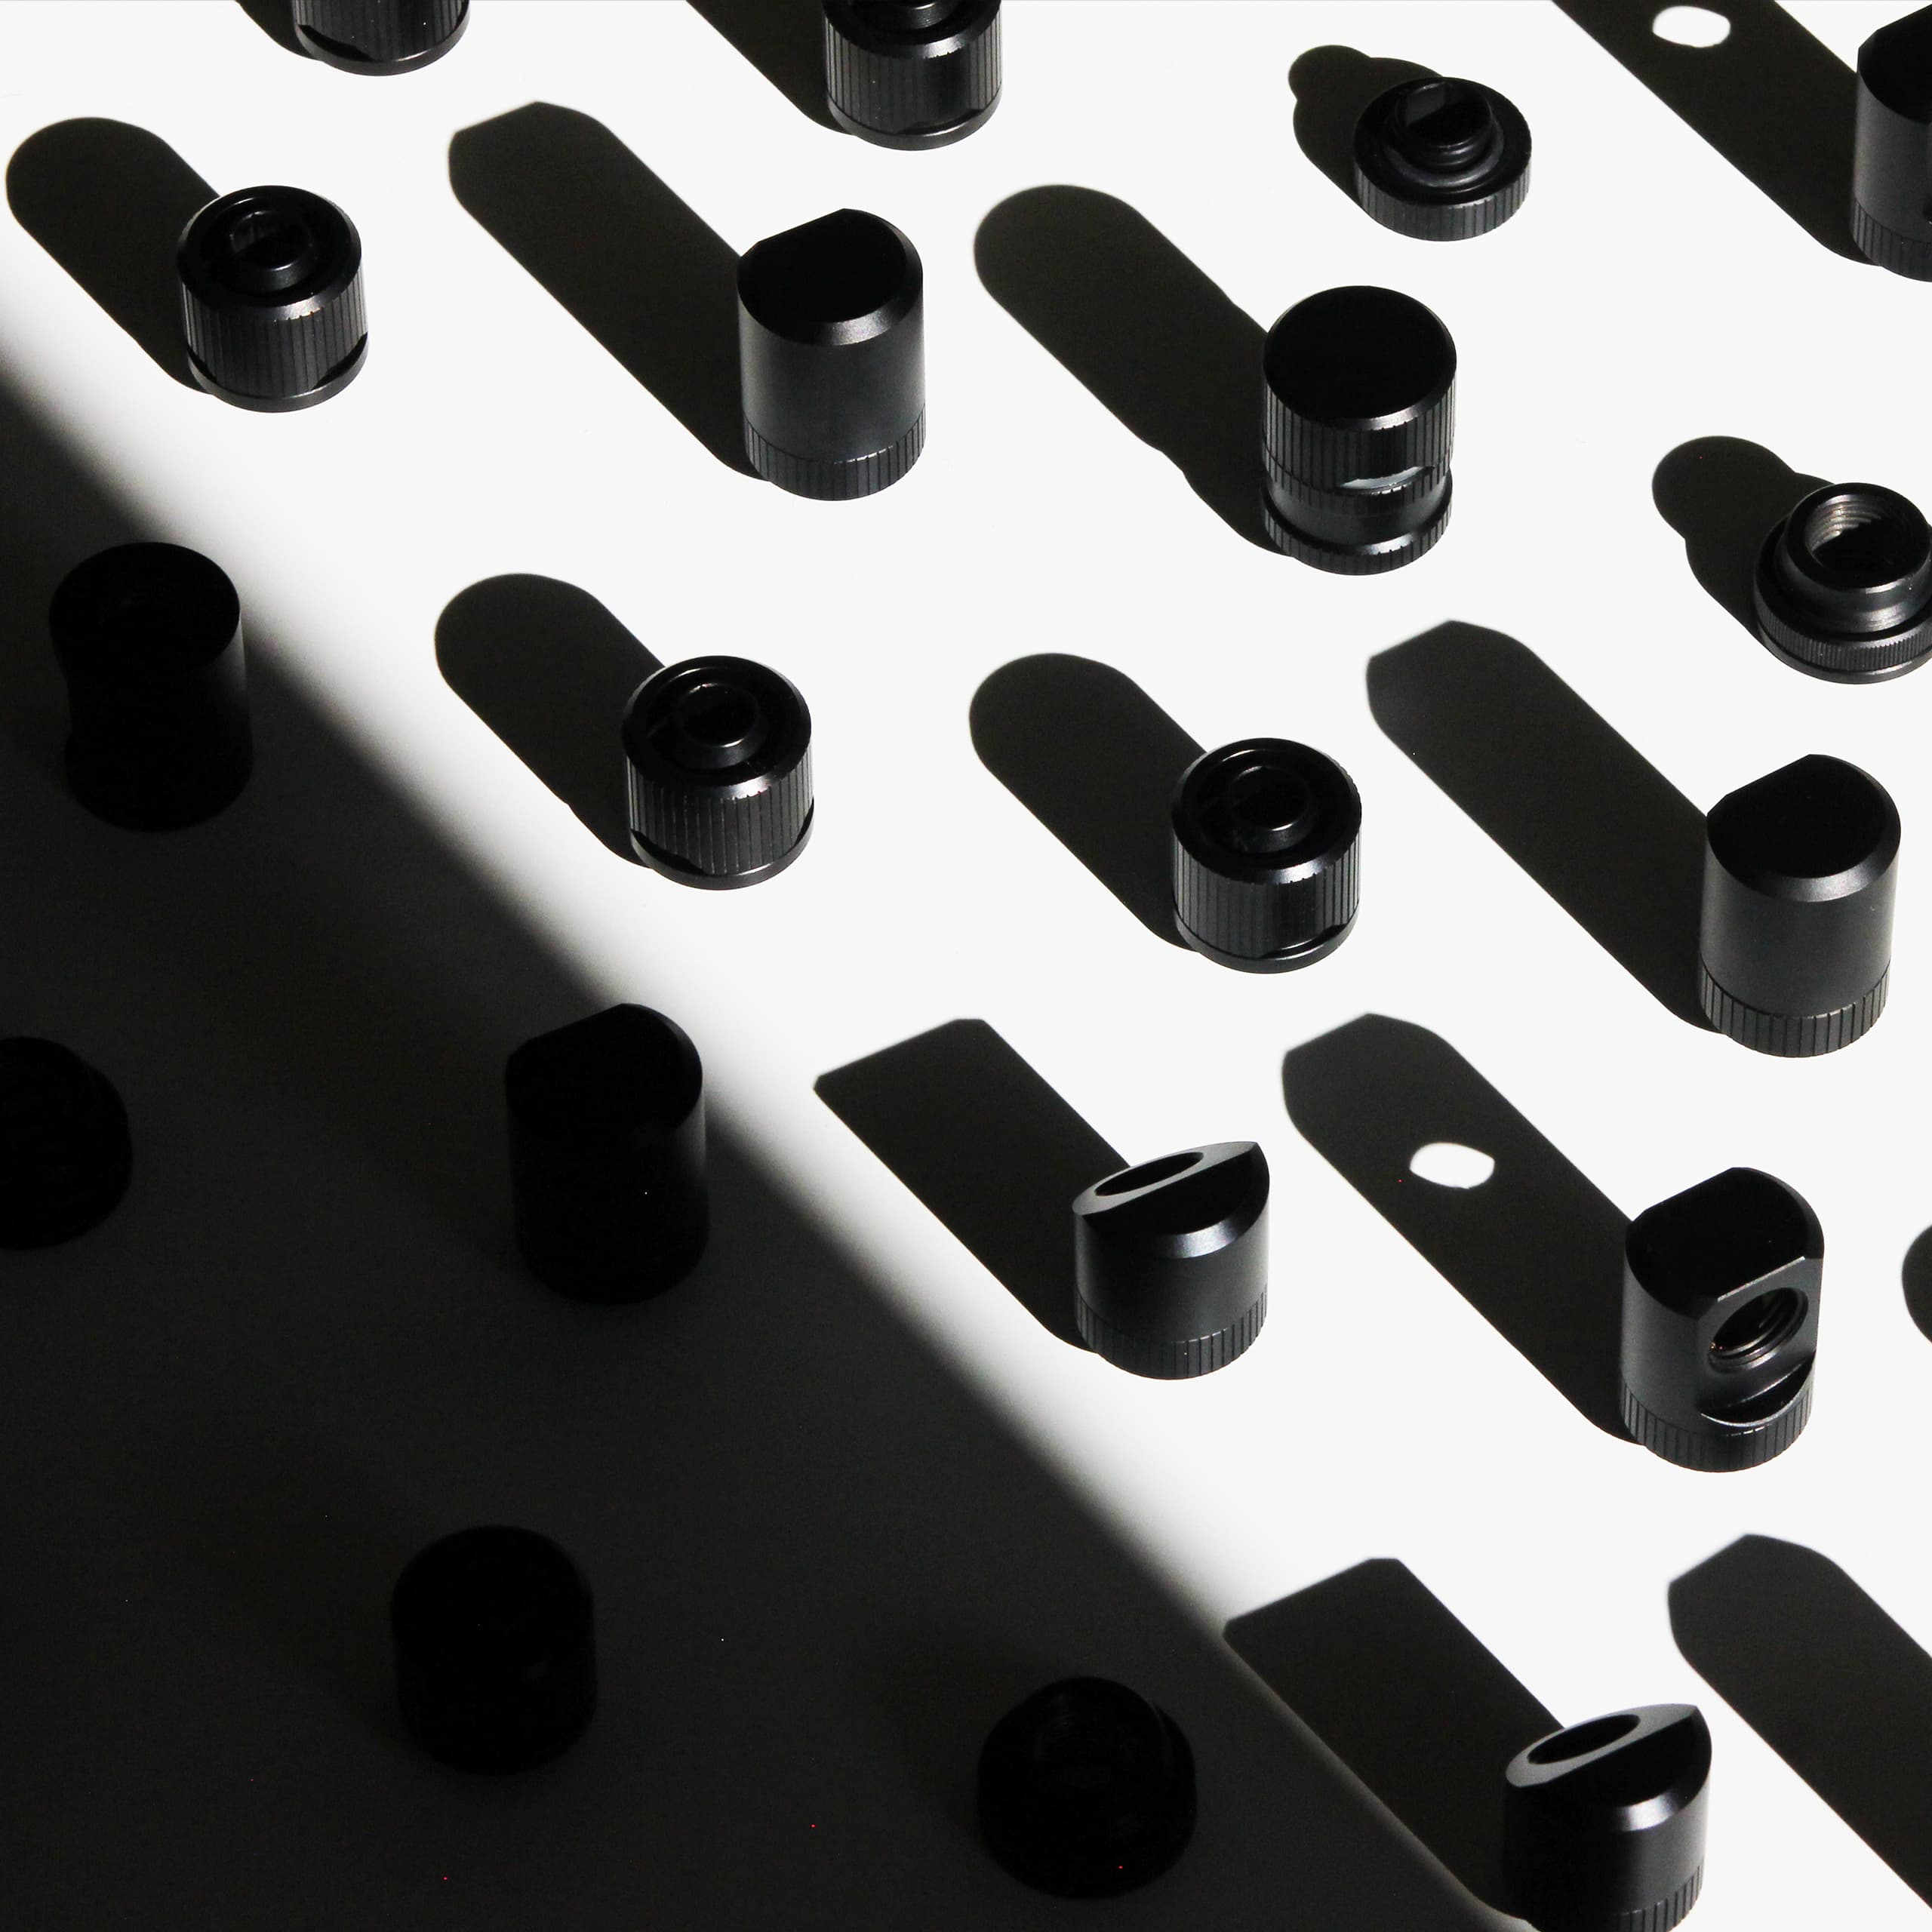
I’ve selected fittings exclusively from the EK-Quantum Torque series for this build, with the exception of the pass-through fittings, which come from EK’s earlier product line. I opted for the semi-matte black finish, but they’re also available in nickel, gold, and satin titanium. While these fittings are relatively large, I think their striking design and premium feel justify the added size.
I'm using a bunch of various adapters such as rotary 90-deg, 45-deg, and T-fittings in this build to simplify and clean up the tubing runs.
Design, Quality
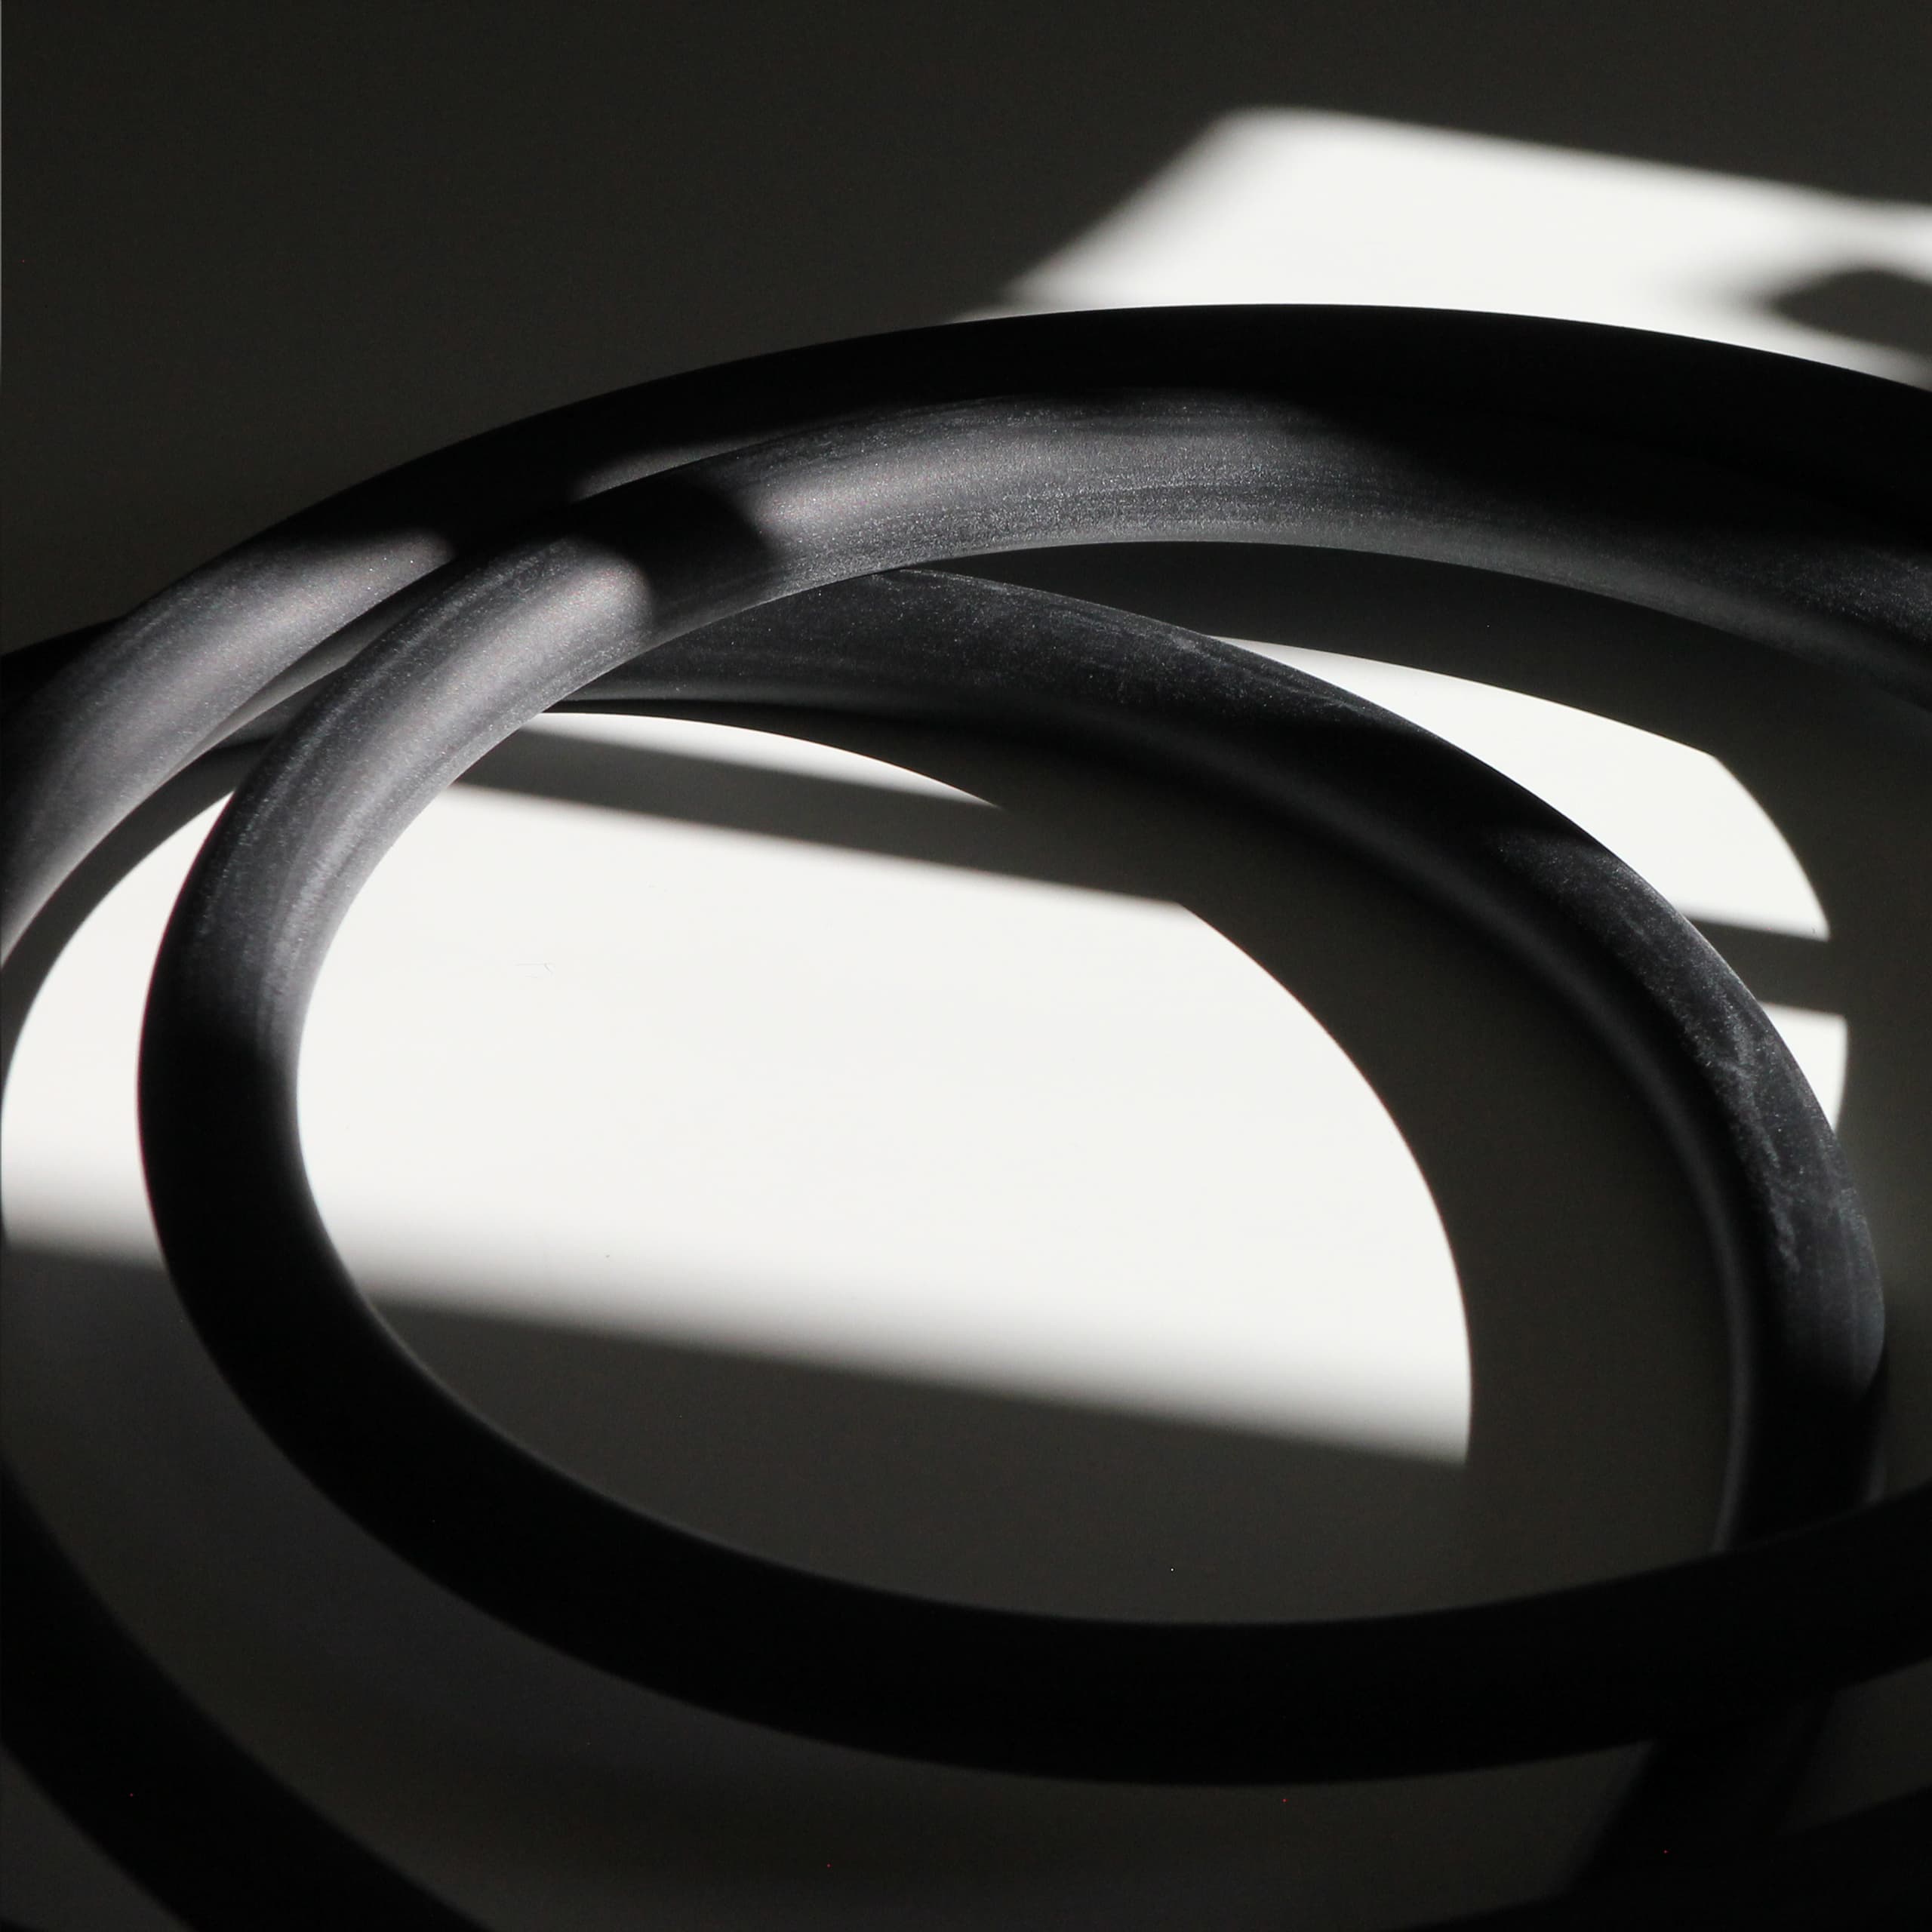
Although the tubing routes in this build seem simple enough for hard tubing, I opted for EK's matte black rubber zero-maintenance tubing. I appreciate the clean, minimal look and the practicality of soft tubing, especially considering this is my first liquid cooling build. It felt reasonable to choose the easier route rather than dealing with the complexity of hard tubing.
I’ll be using 10/16mm tubing, and in hindsight, I wonder if I should have gone with a smaller size. I didn’t fully account for how the larger diameter would affect the routing, and I now realize that smaller tubing would have allowed for tighter bends. Regardless, the thicker tubing fits well with the overall setup, and I’m sure I’ll be able to make it work.
Design, Practicality
While this was a shorter post, I've got some very exciting content lined up! Keep your eyes peeled for build log announcements on my Instagram.
Until next time!
What's Next?
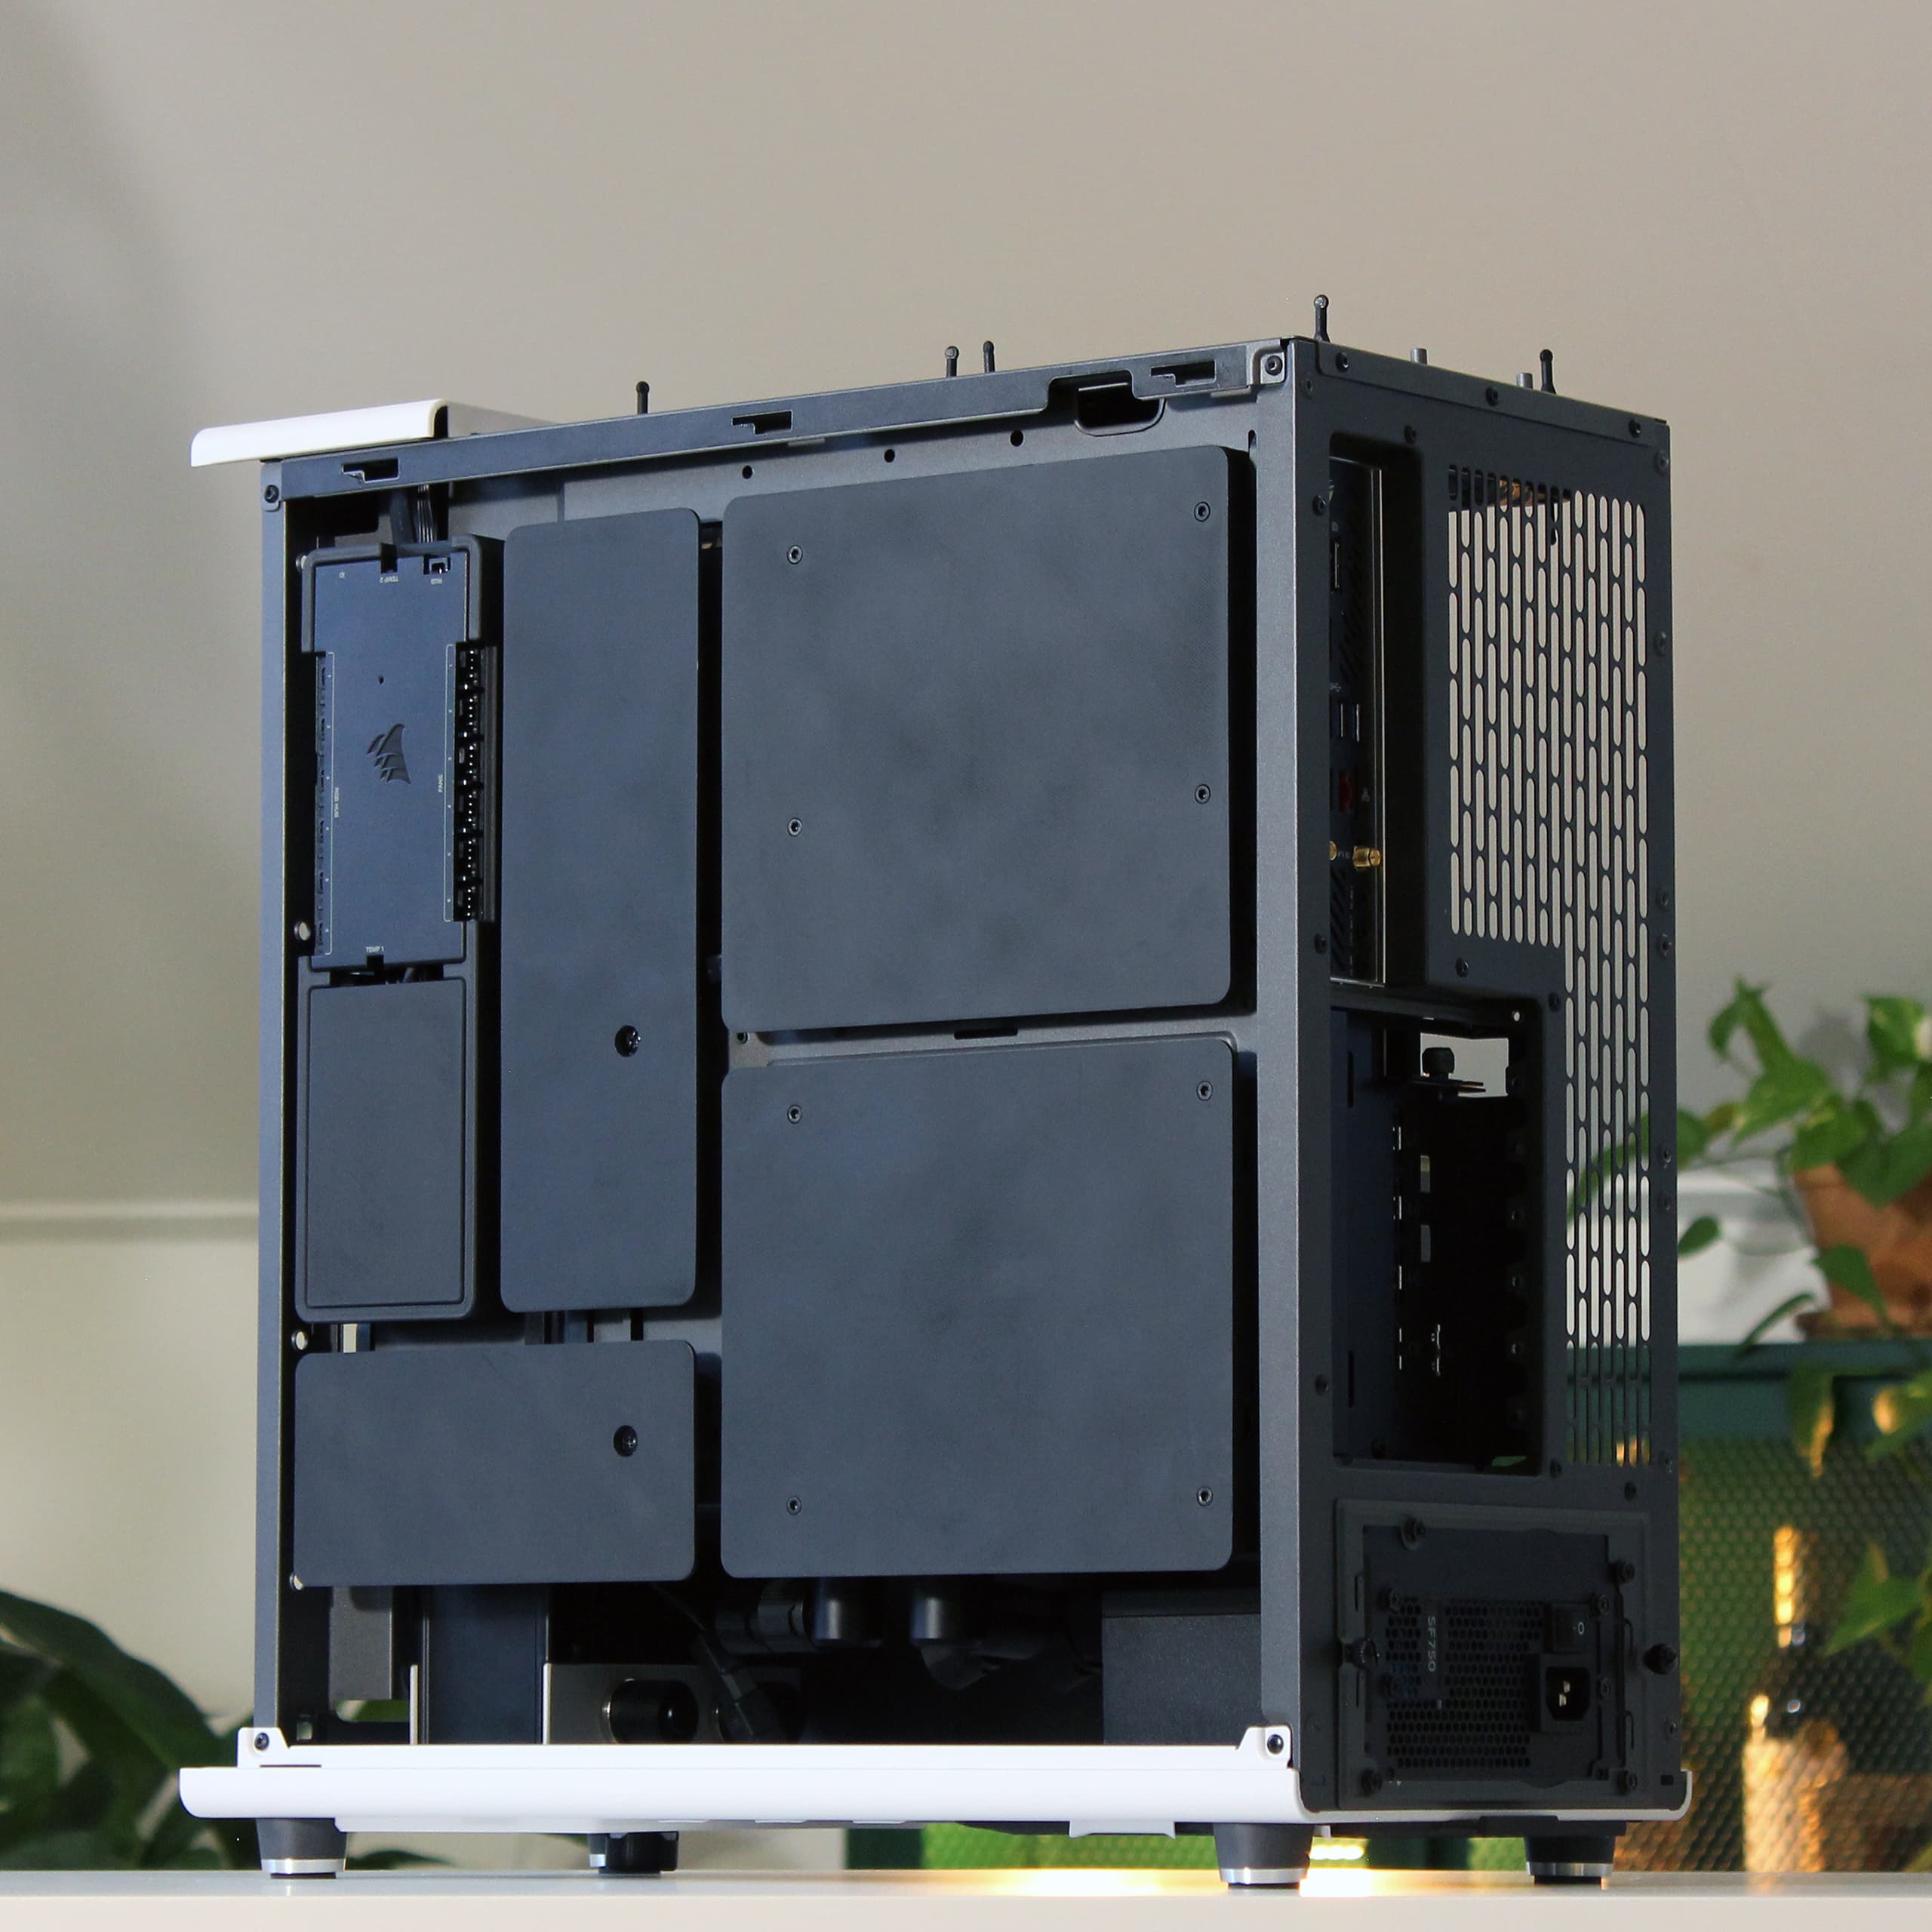
003: Test Fitting and Mods
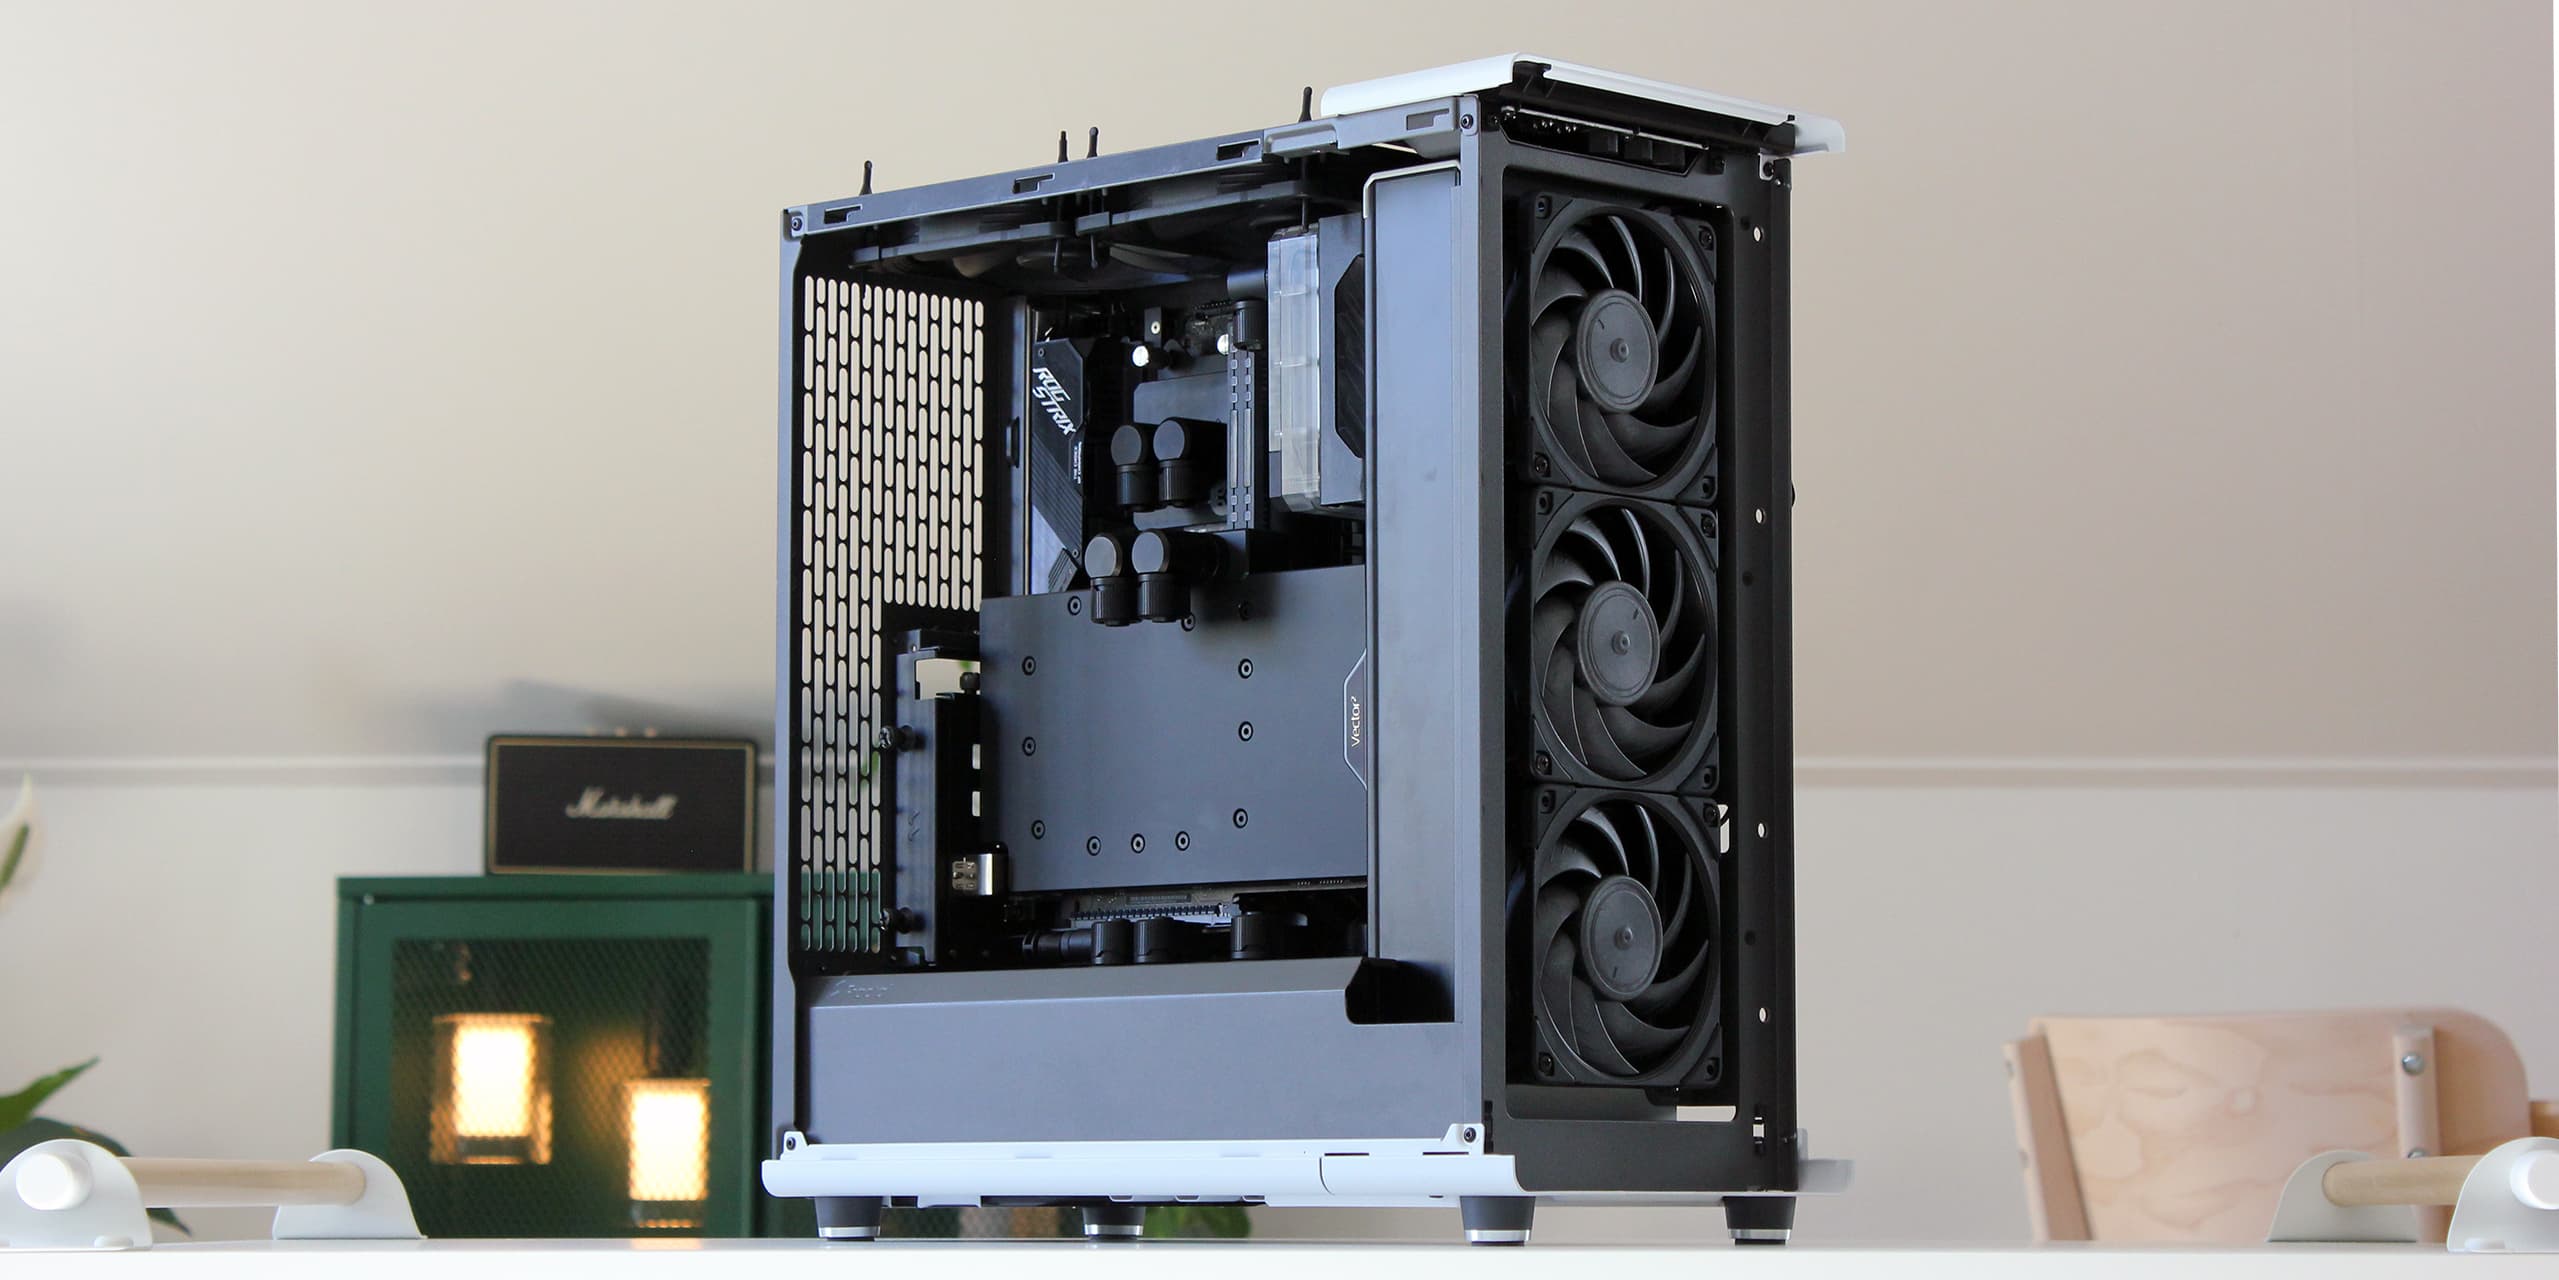
April 20, 2025I recently received the final shipment of core components for the build, allowing me to finally test-fit everything! While I was slightly doubtful about the fitment of certain components going into this, I can happily say that everything went well and even better than expected! On that note, I've adjusted some of my modifications for a cleaner result and I think it has turned out very well.
Given the sheer size of the radiator, it does not fit in a stock North chassis. While it may technically fit the radiator, the chassis panels enclosing the front radiator area are narrower, necessitating modifications. As outlined in the first post, I planned to cut away material on the left (main chamber) side. However, looking at this from a different angle I found that creating a cutout in the bottom of the chassis was a better approach. This completely hides the cut area, leaving the visible front chamber of the chassis clean. The unexpected bonus—and the only reason this approach worked—is that the radiator actually did fit, with virtually no clearance at all, despite what I previously thought. Lucky me!
Let's pause for some shots of the fully test-fitted build. I think it pretty much turned out as I planned which feels like an achievement in itself.
01
/

As you can see, I've cut quite a large opening at the bottom of the chassis, allowing me to slide the radiator into position from underneath. I outlined the opening using some of the features/indentations already present on the bottom panel and used my DREMEL 8240 cordless rotary tool to cut through the panel. The North has 1 mm powder-coated steel panels which are relatively easy to cut using a fiberglass-reinforced cutting disc.
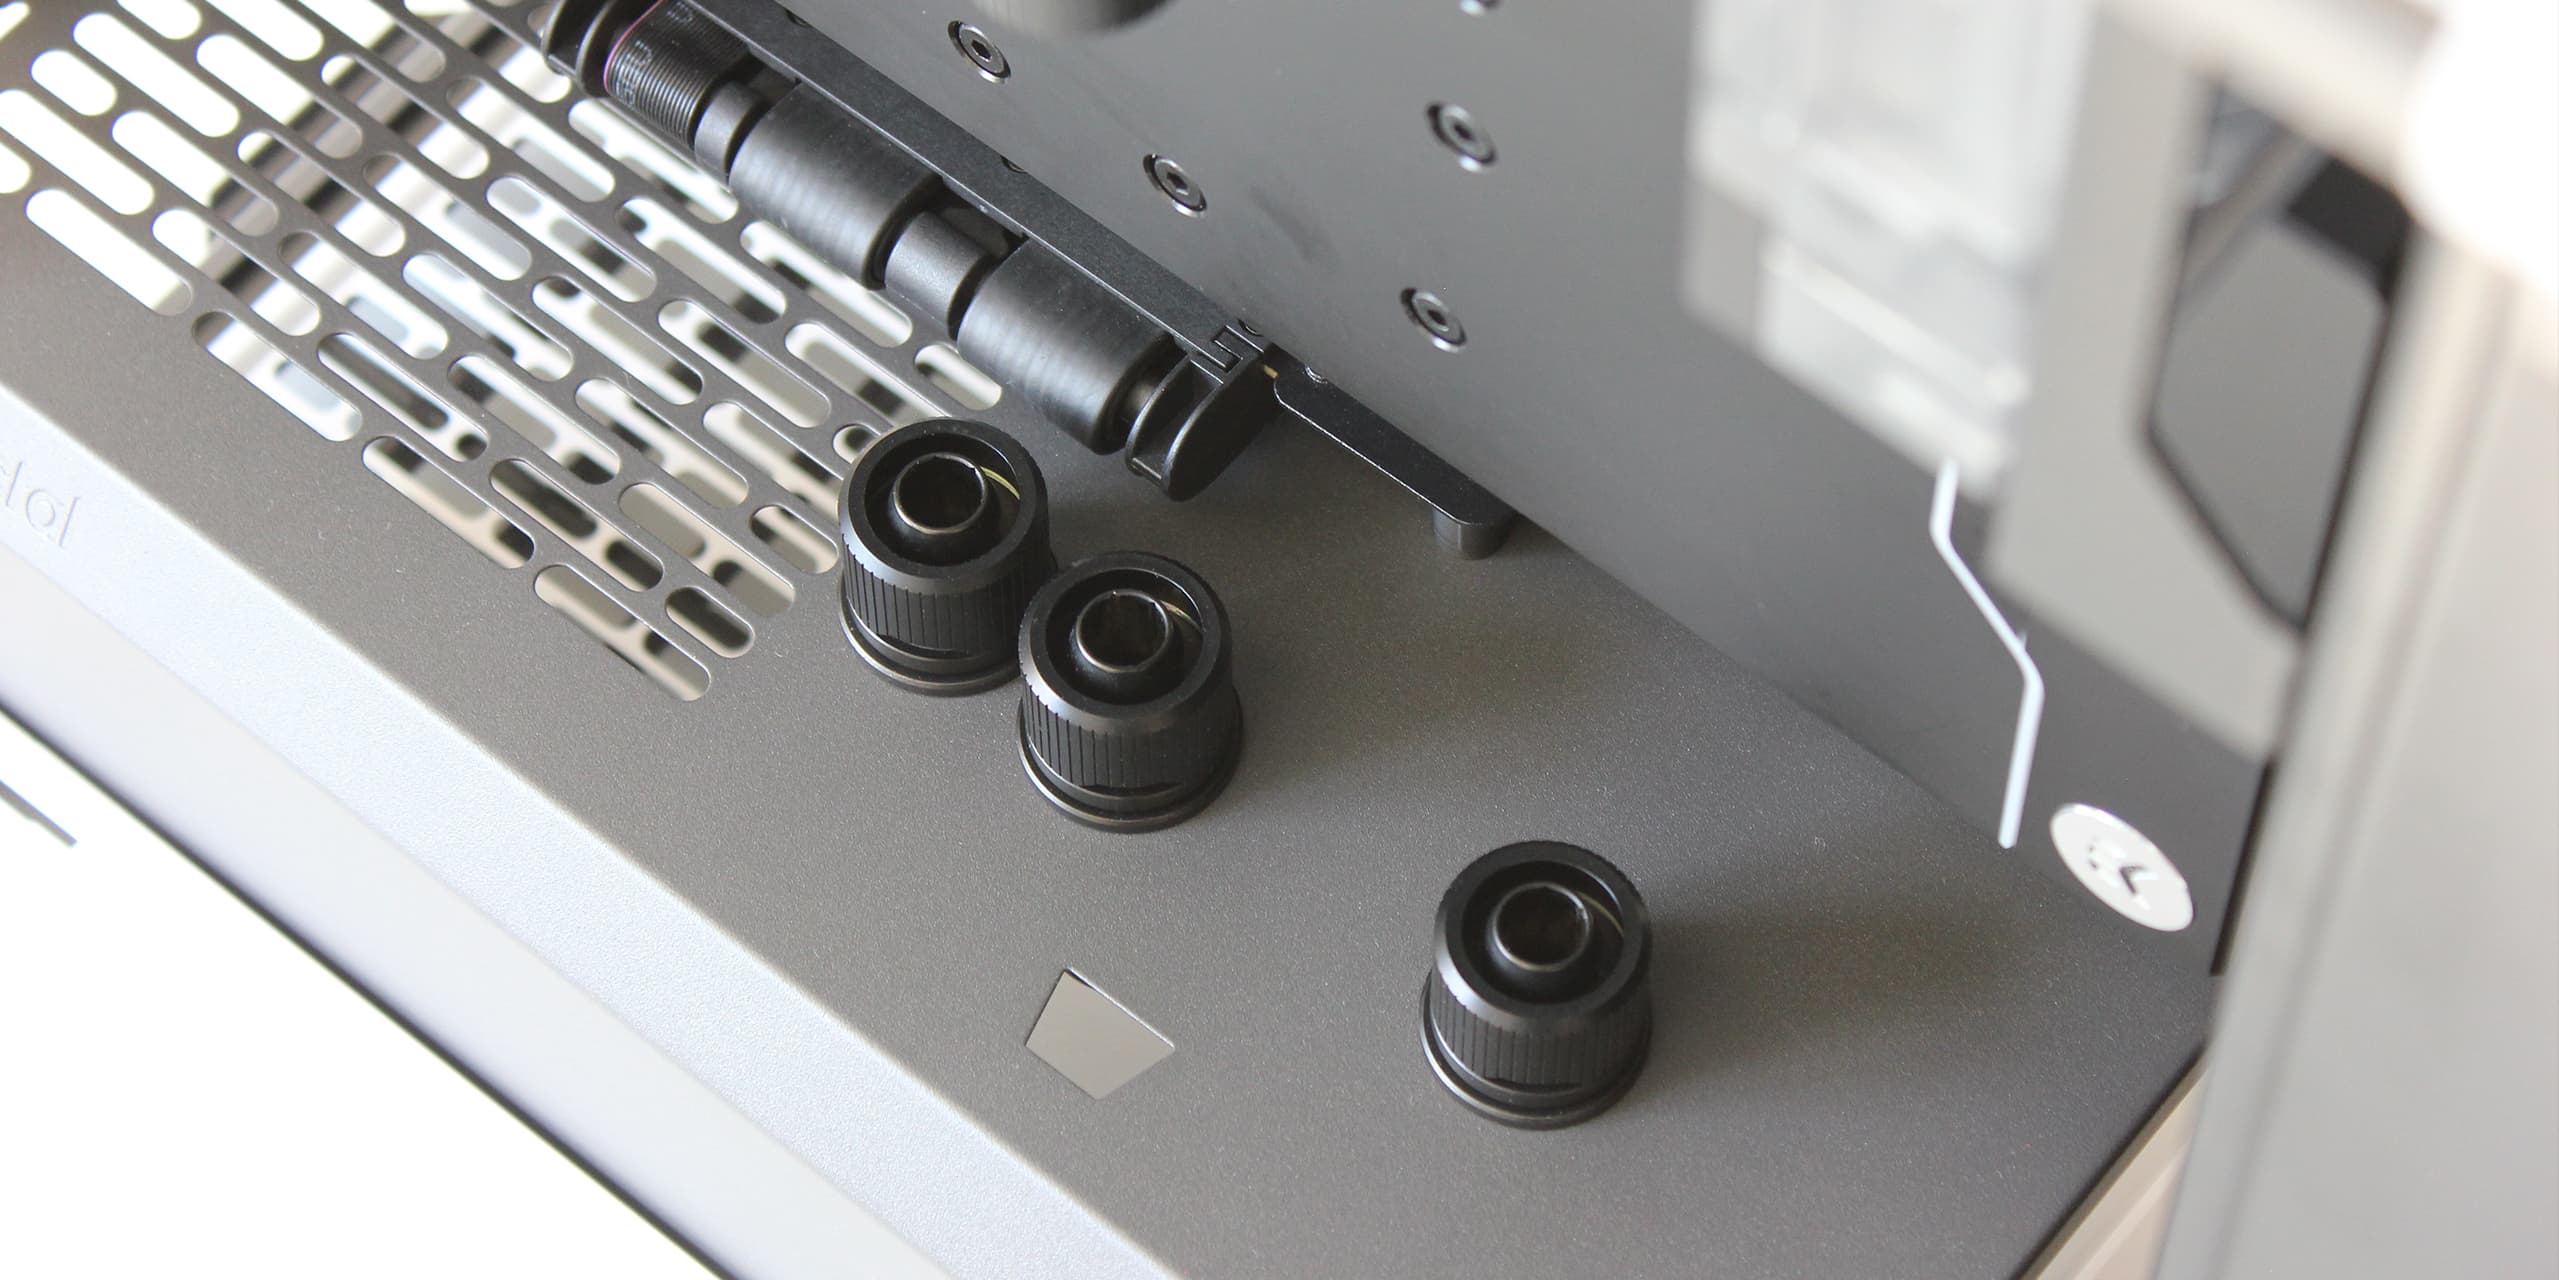
It's easier said than done to cut completely straight so I designed two plastic covers that magnetically attach to the chassis, concealing the edges and cleaning up the cutout. While designing these covers, I quickly realised that I had two unused G1/4 ports on the bottom of the radiator. I decided to use one of these ports as the drain instead of what I previously had planned, further simplifying the build with fewer fittings and less modifications. I incorporated a slot into the plastic cover, allowing both ports to be accessed from the bottom of the chassis. Unfortunately, the filament I'm using is slightly off-white and does not match the colour of the bottom panel. I think I'll try to find a matching spray paint at some point.
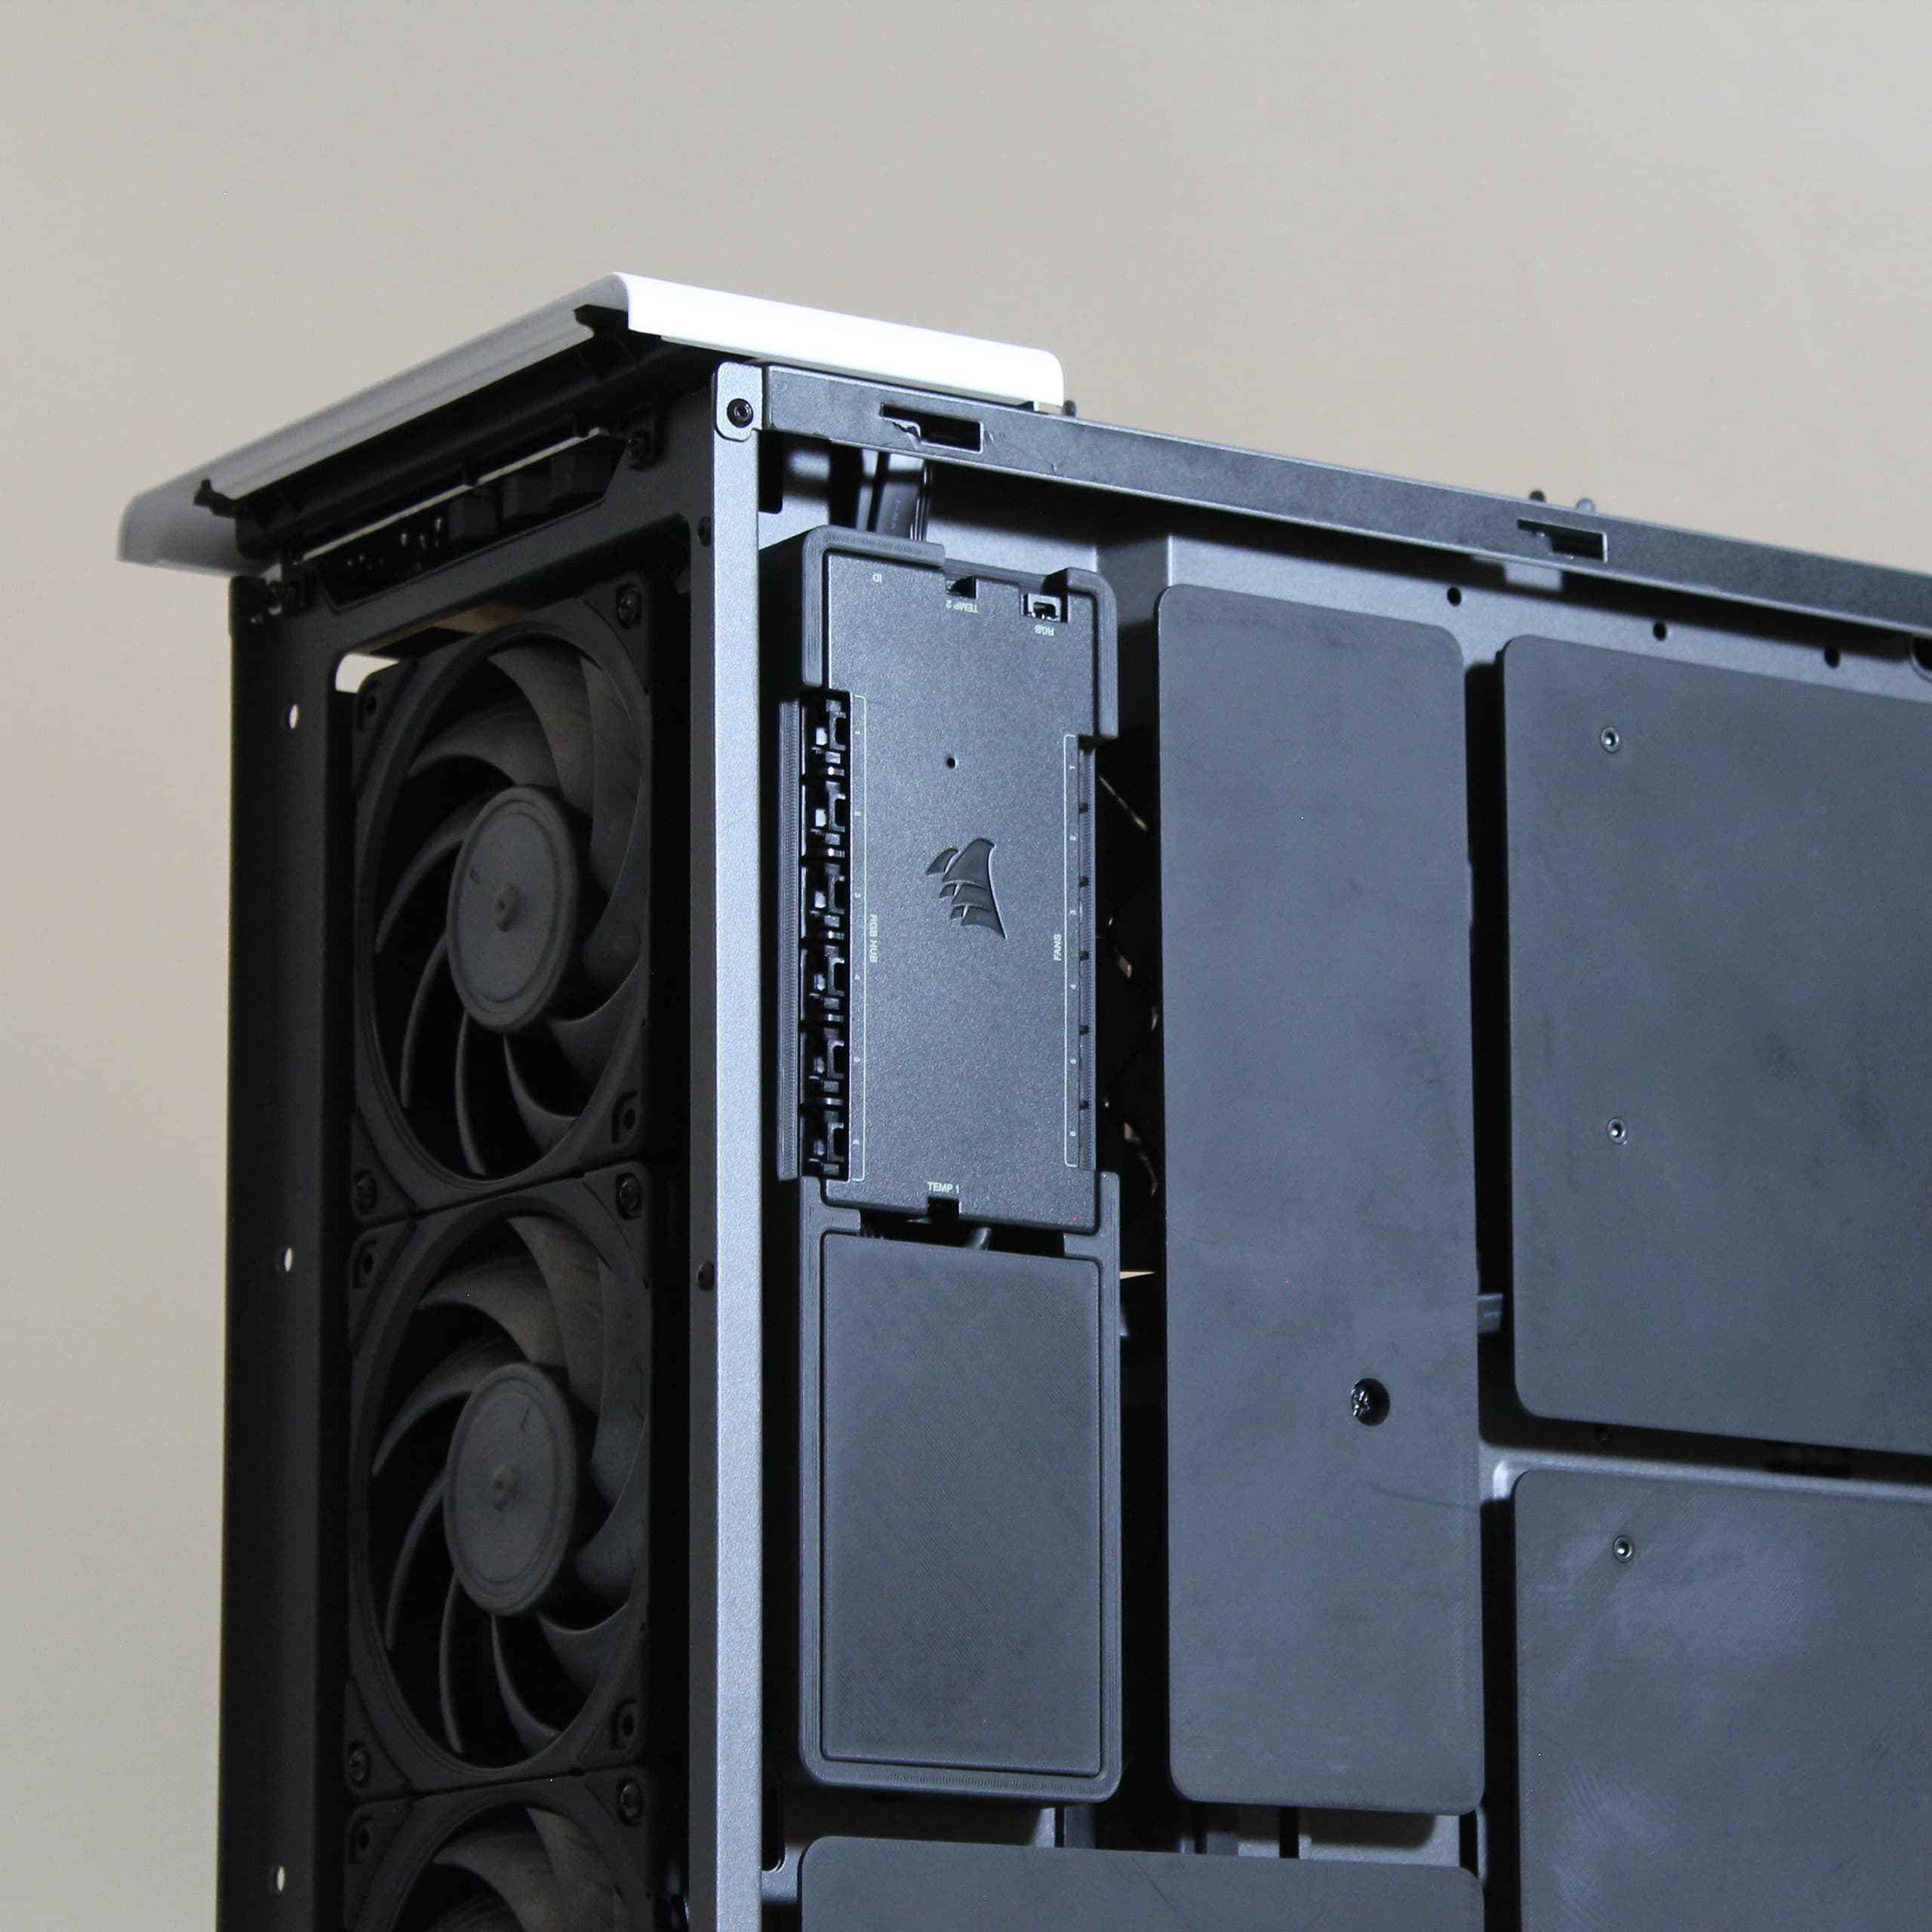
01
/ 00Pass-through
GPU Sag
GPU-RAM Clearance
SSD Heatsink
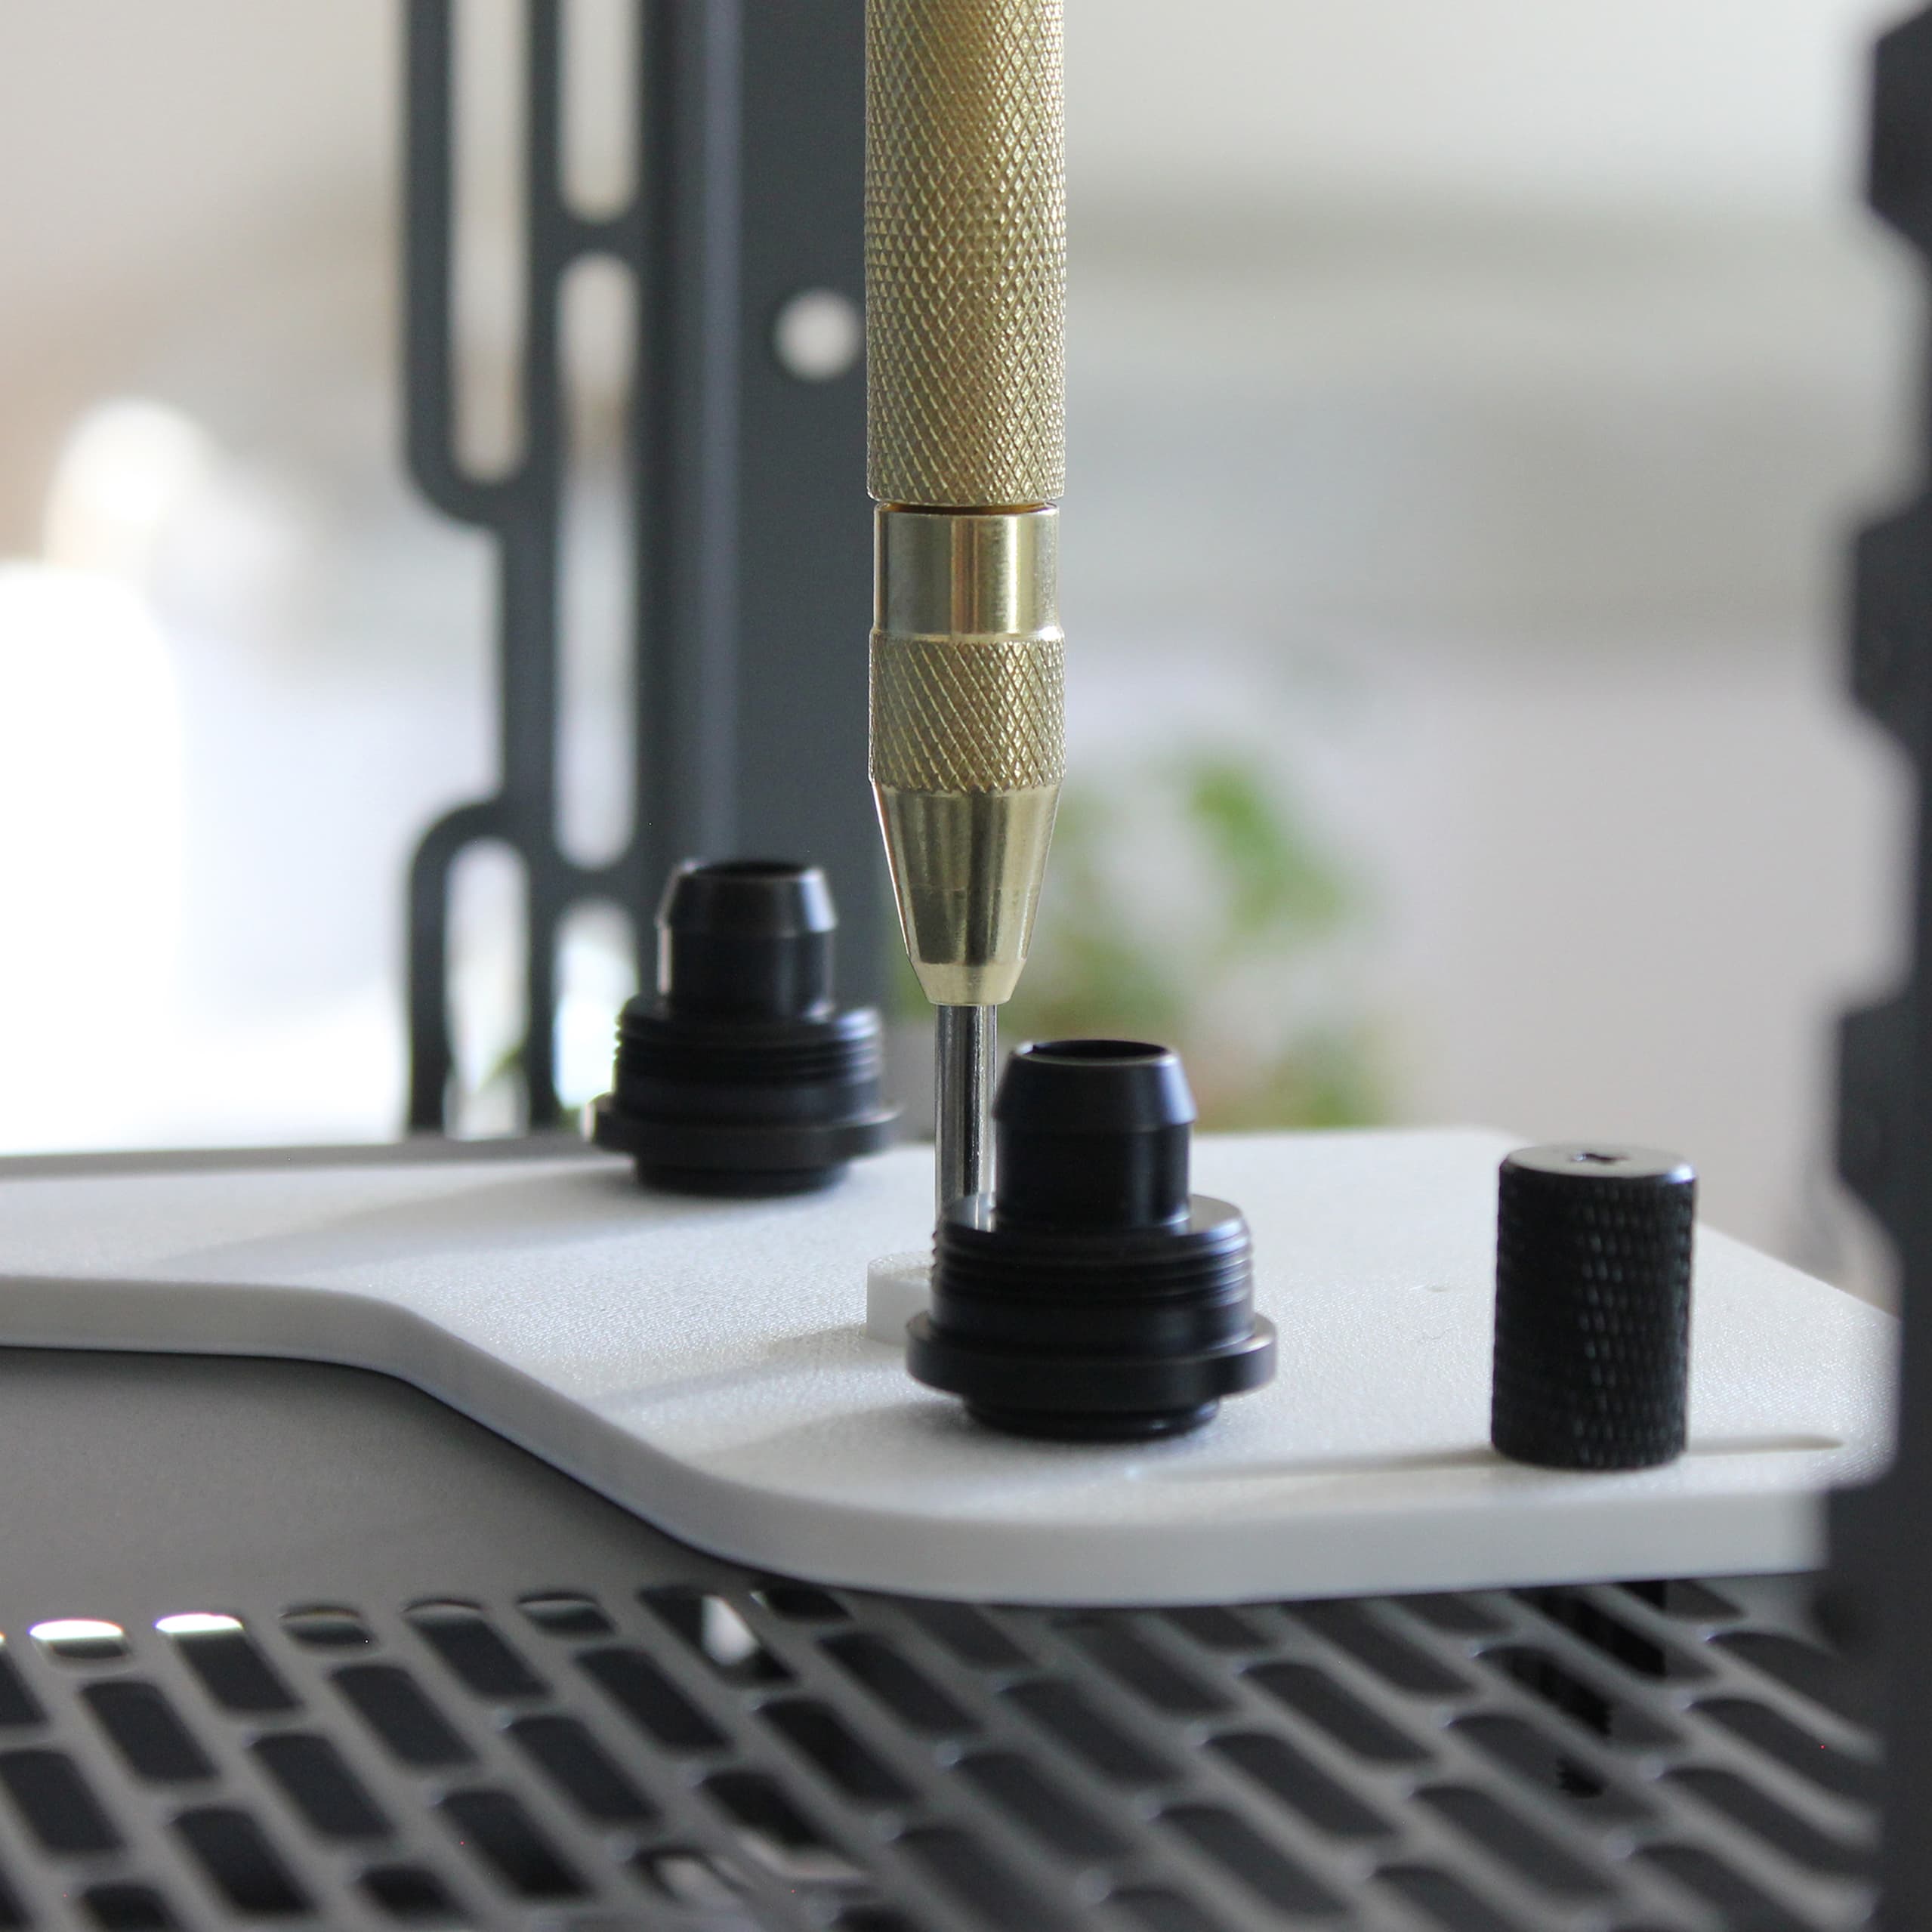
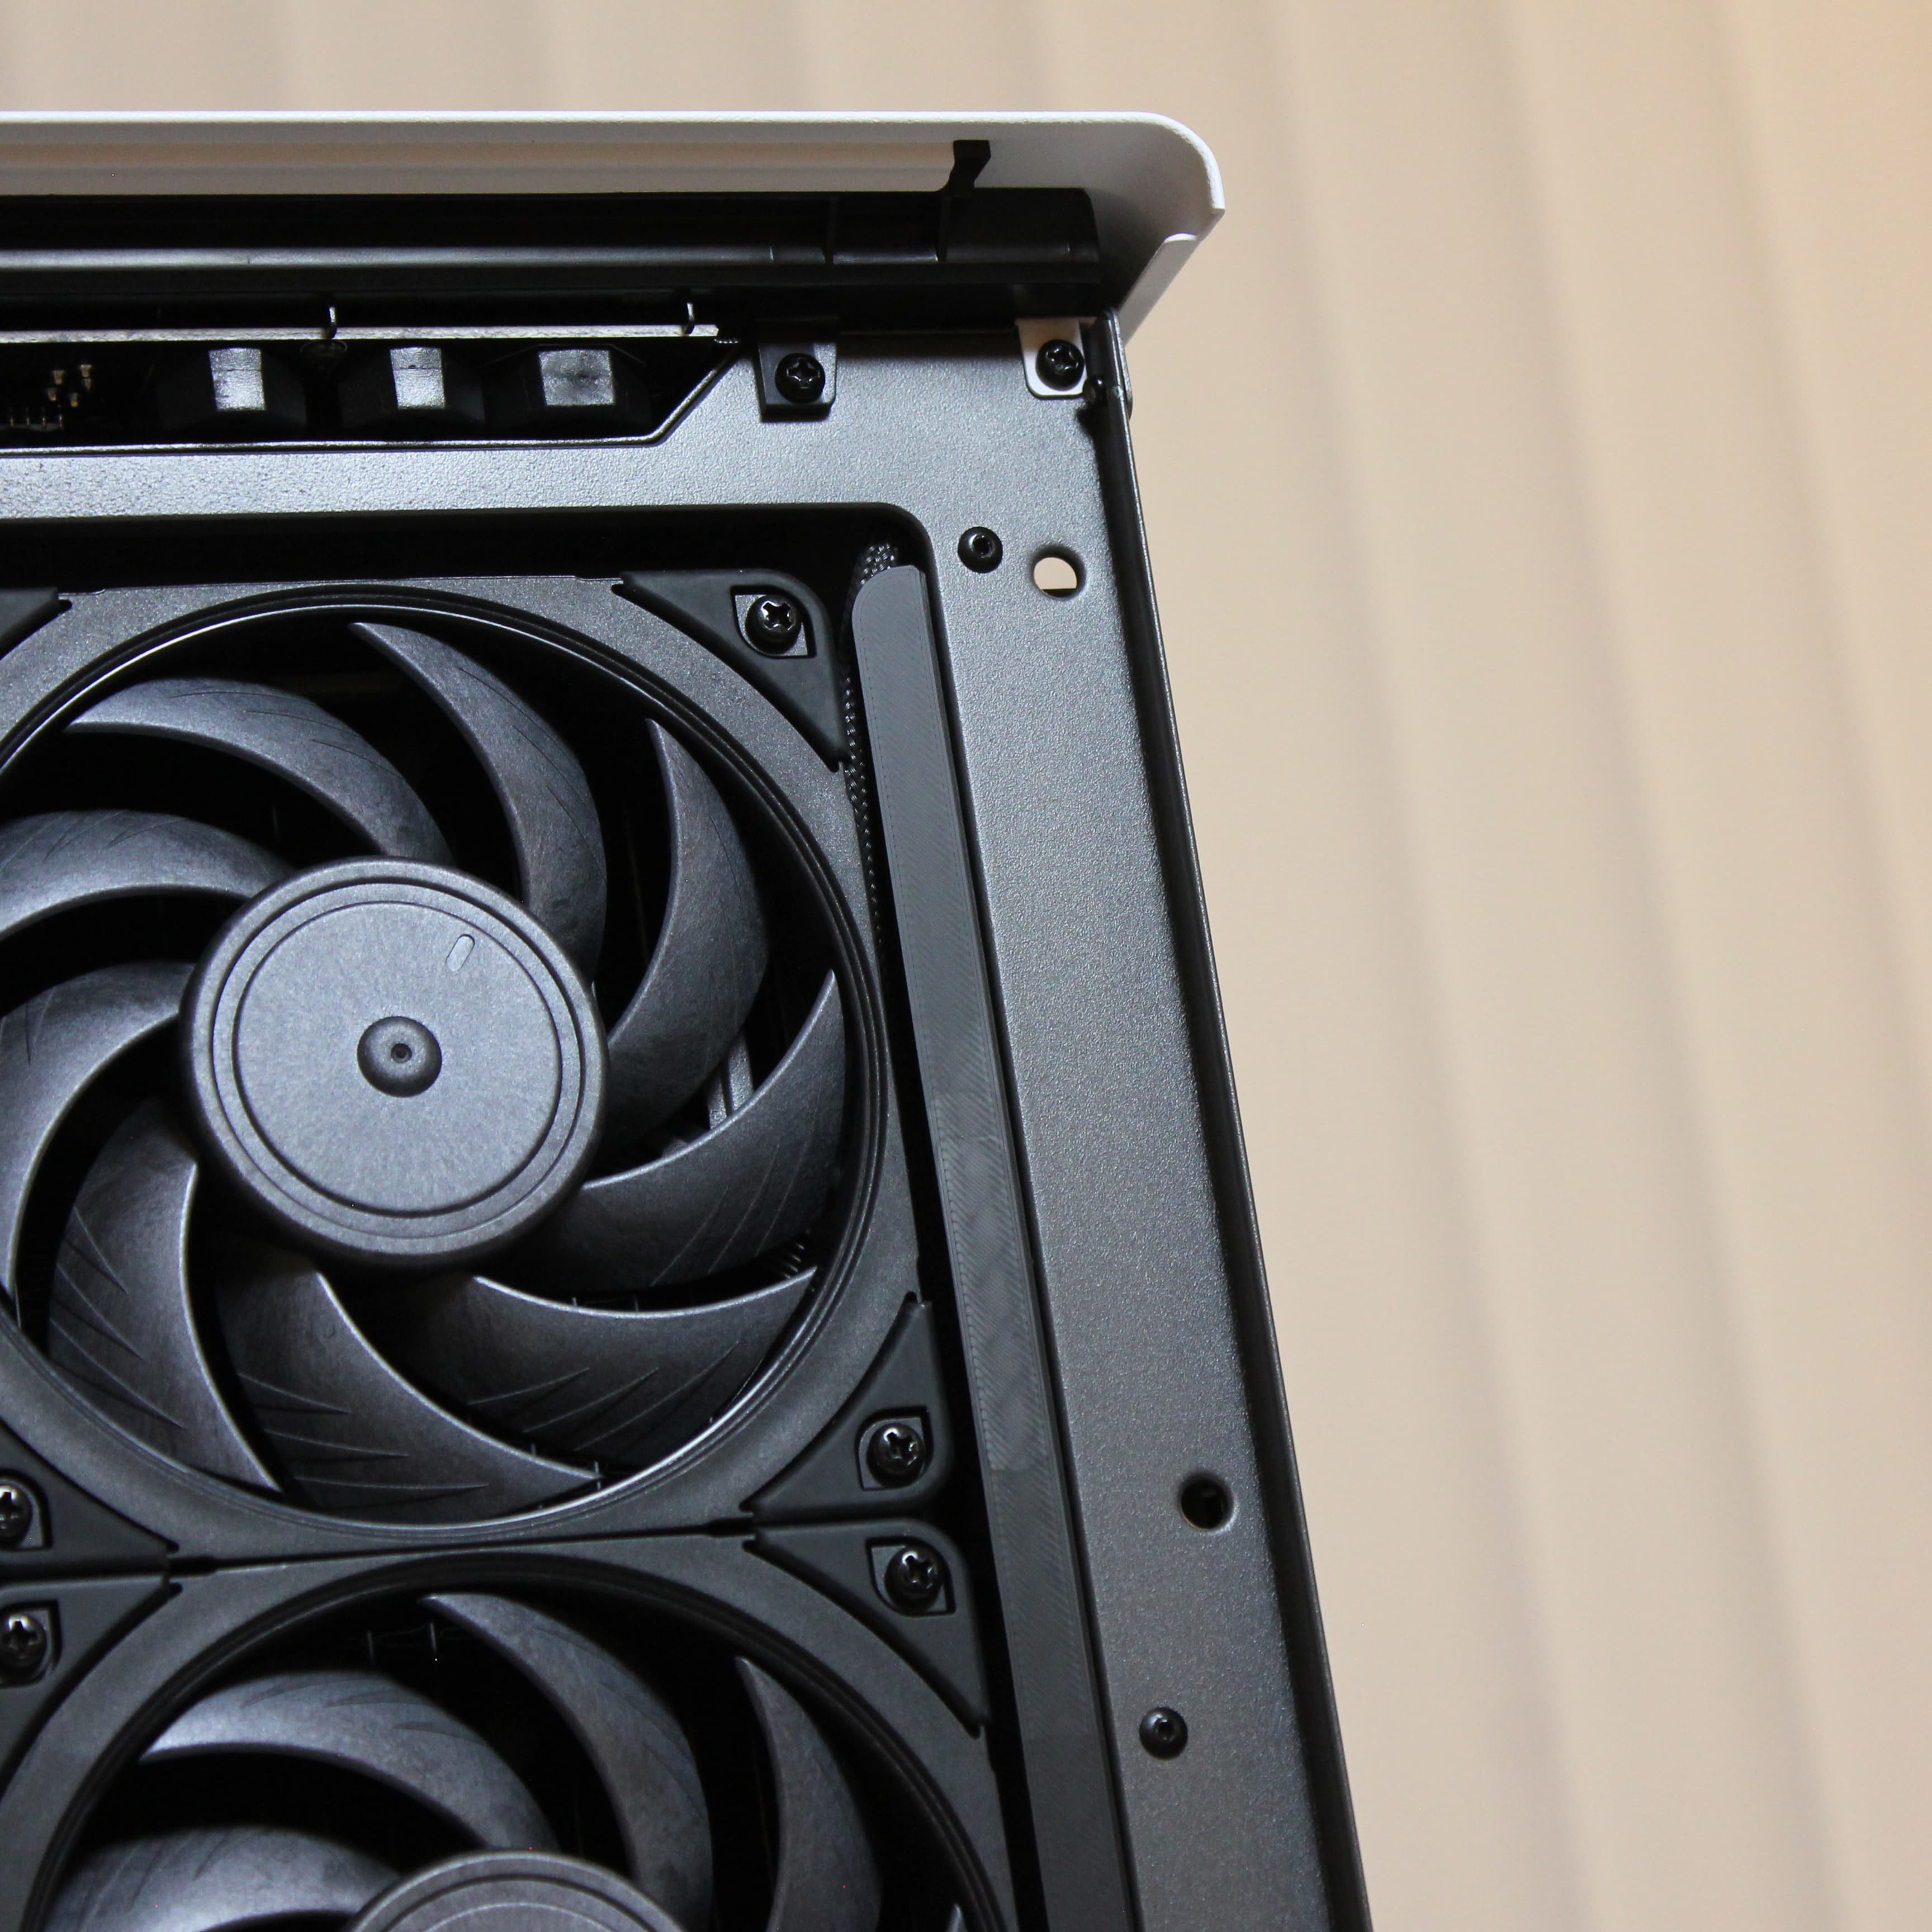
To drill the holes for the pass-through fittings, I started by masking the chassis with tape and mapping out the positions using a calliper. To ensure that the positions were as accurate as possible, I 3D-printed a couple of tools to help me verify and check my measurements. Achieving perfectly straight tubing runs is no easy task. A small misalignment of 2 mm would result in a 1-degree crooked tube. While it might not sound like much, it is very visible to the naked eye.
I used an automatic center-punch to mark out the drill positions, and even though I was very careful I ended up with some misalignment. Thankfully I was able to correct this with a sanding roll attachment on my DREMEL. I drilled the holes using a 6-20 mm step drill and a cordless Bosch 18V screwdriver, which worked remarkably well. Before using the step drill I created pilot holes using a 3 mm drill. A key factor for achieving clean-cut holes was to stay in the 1st gear (0-440 RPM) and occasionally pause to re-apply lubricating cutting oil. To finish off, I smoothened the edges using a manual deburring tool.
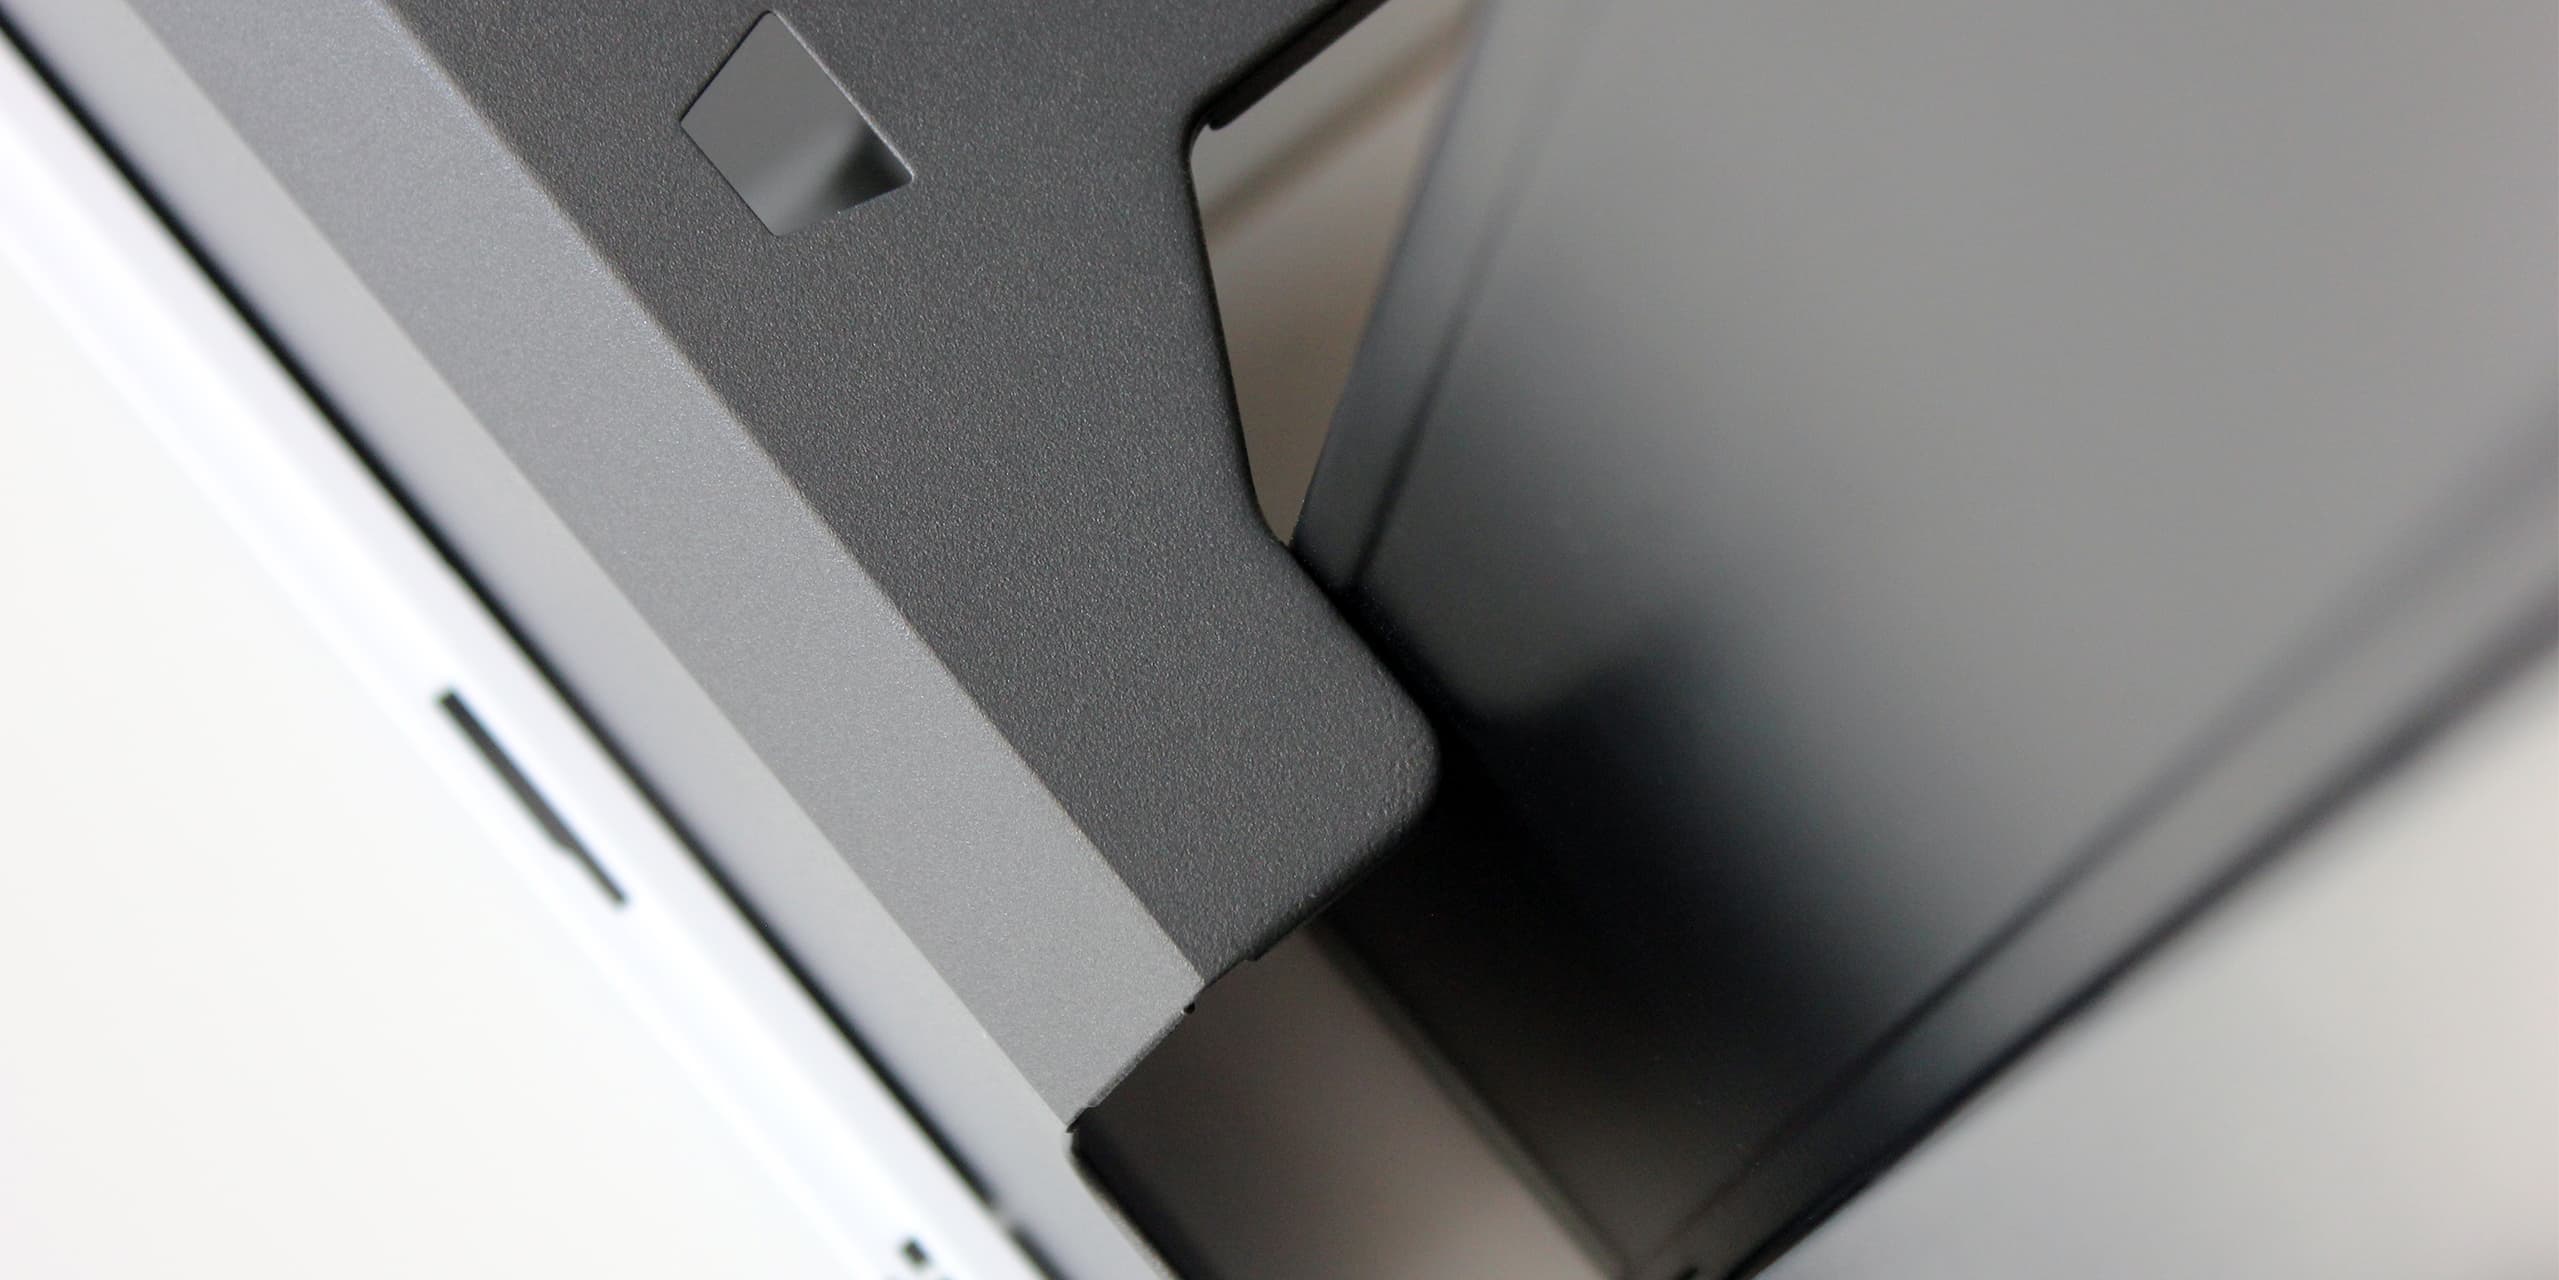
This is a common issue with most modern graphics cards. As cards have gotten more power-hungry over the years, their coolers have followed in size to keep up. While this issue generally presents with graphics cards in standard orientation, putting strain on the PCI-e slot on the motherboard, it remains an "issue" even with a vertical GPU bracket.
While the sag I'm experiencing might not impose any risk of damage to the hardware, it does impact the visual appearance of the setup. The weight of the graphics card causes the rear chassis panel to bend where the Flex 2 vertical GPU bracket is mounted. The result is a slightly slanted GPU which is noticeable when every other component sits in level.
To counteract this, I 3D-printed a small cylinder with a magnet insert that sits between the chassis and the tip of the vertical GPU bracket. This piece slightly lifts the GPU and transfers some of the load to the chassis panel below. Simple yet effective!
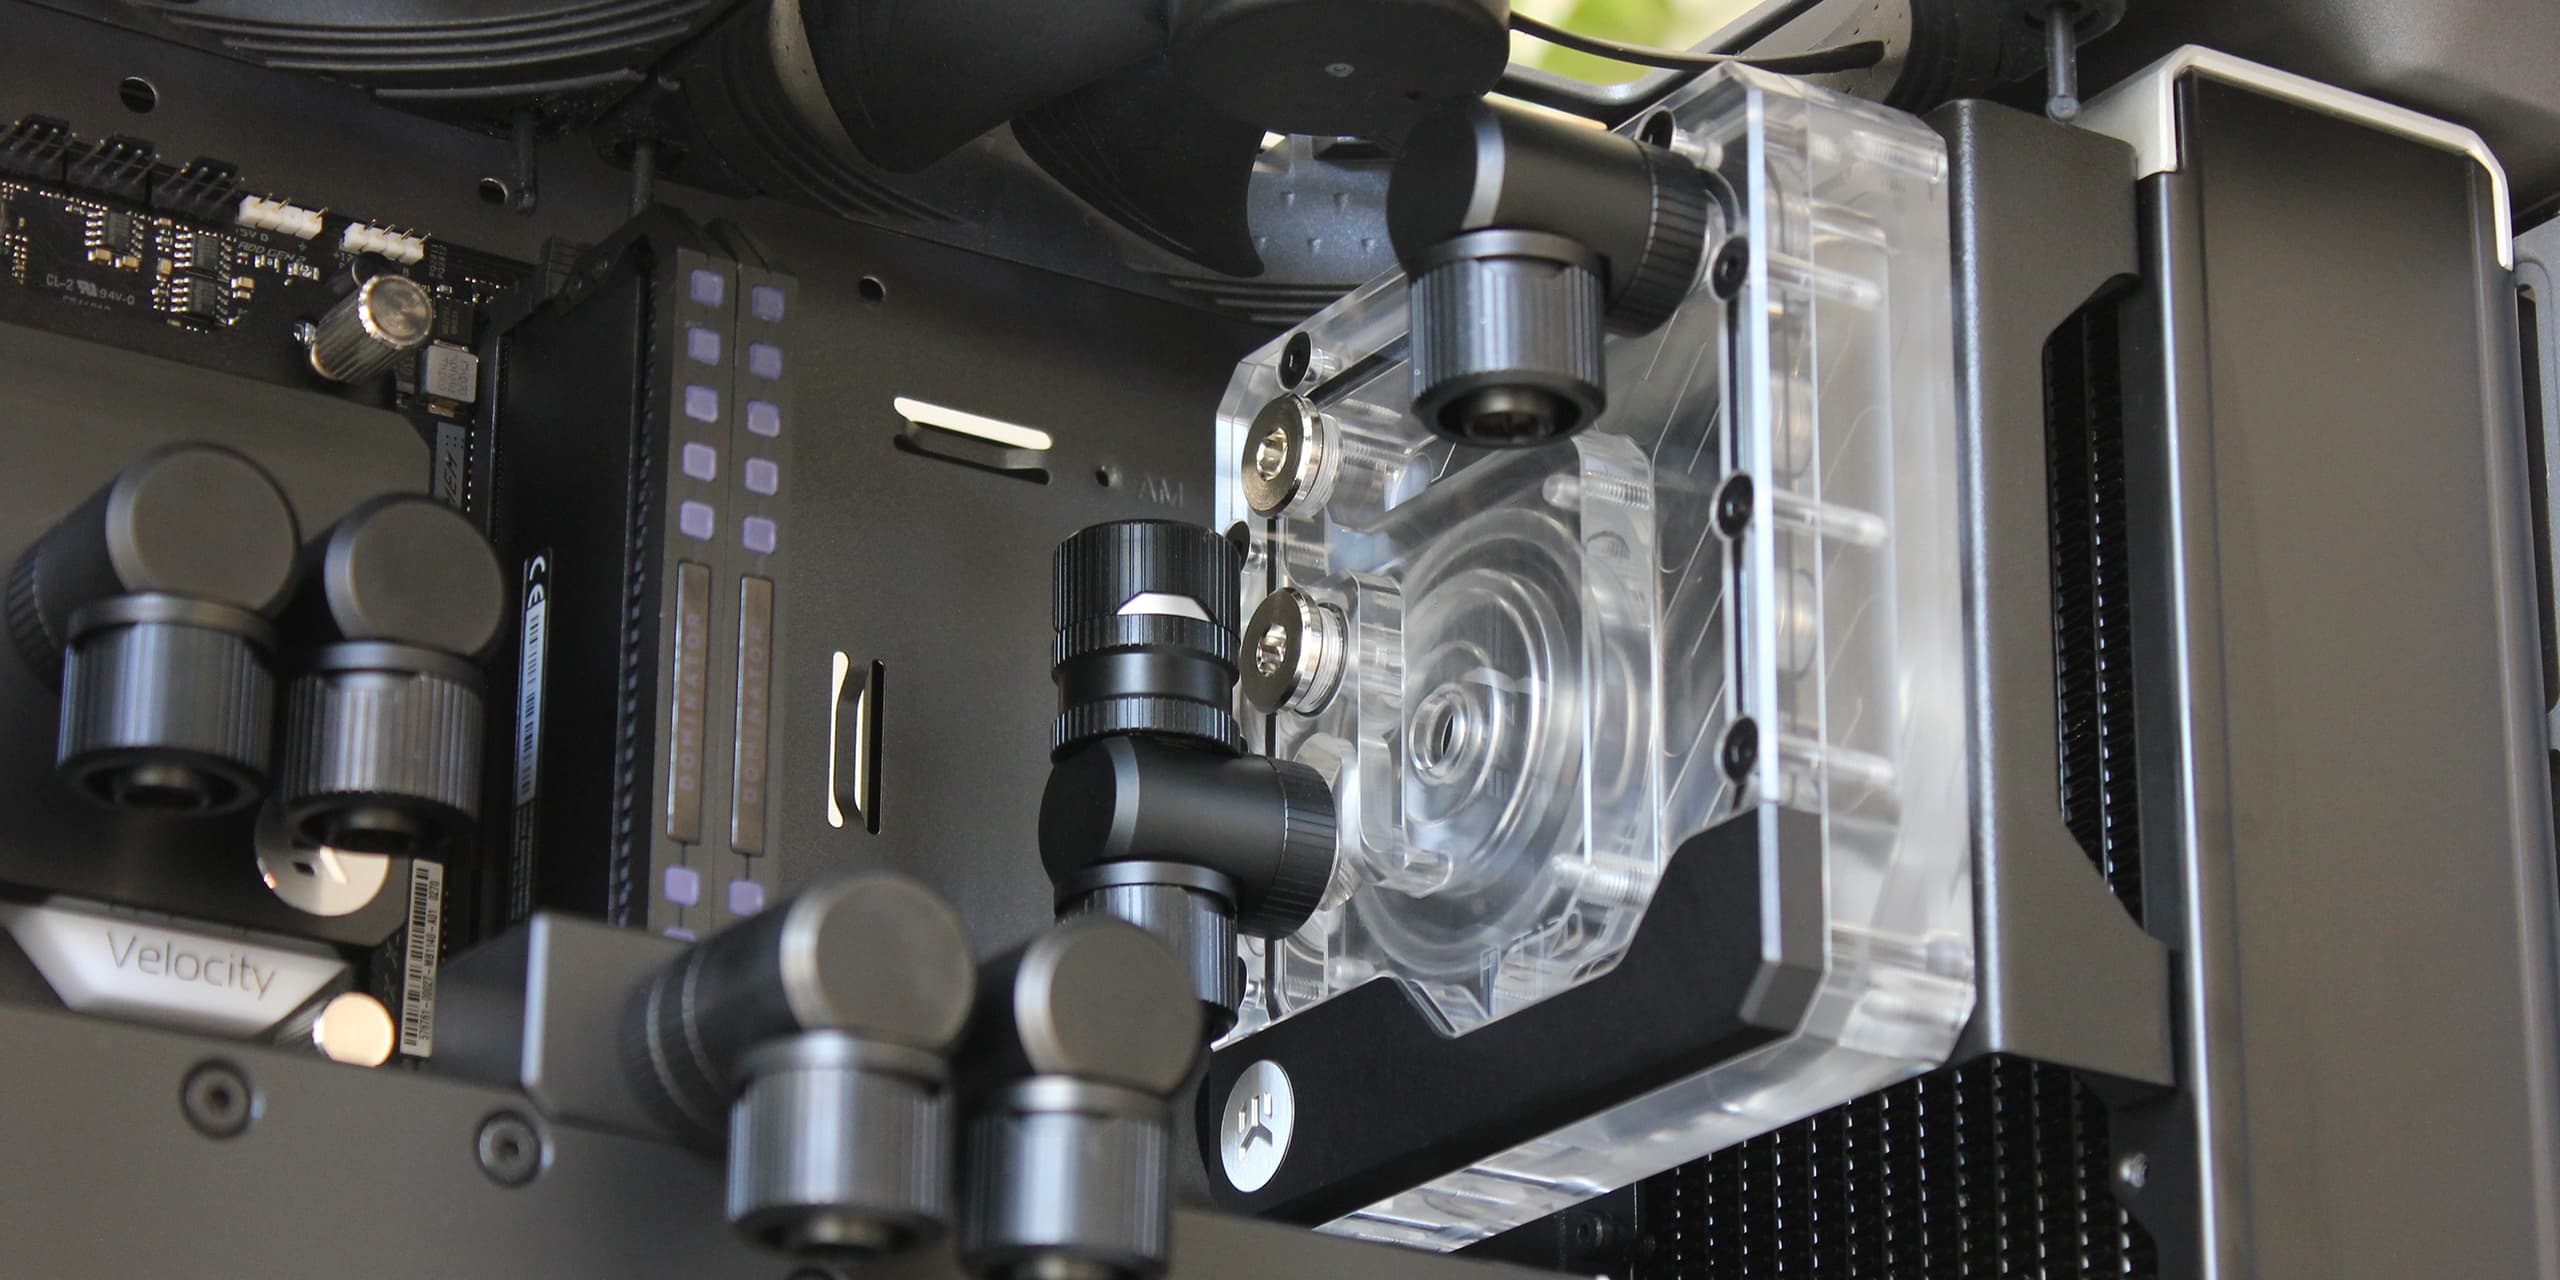
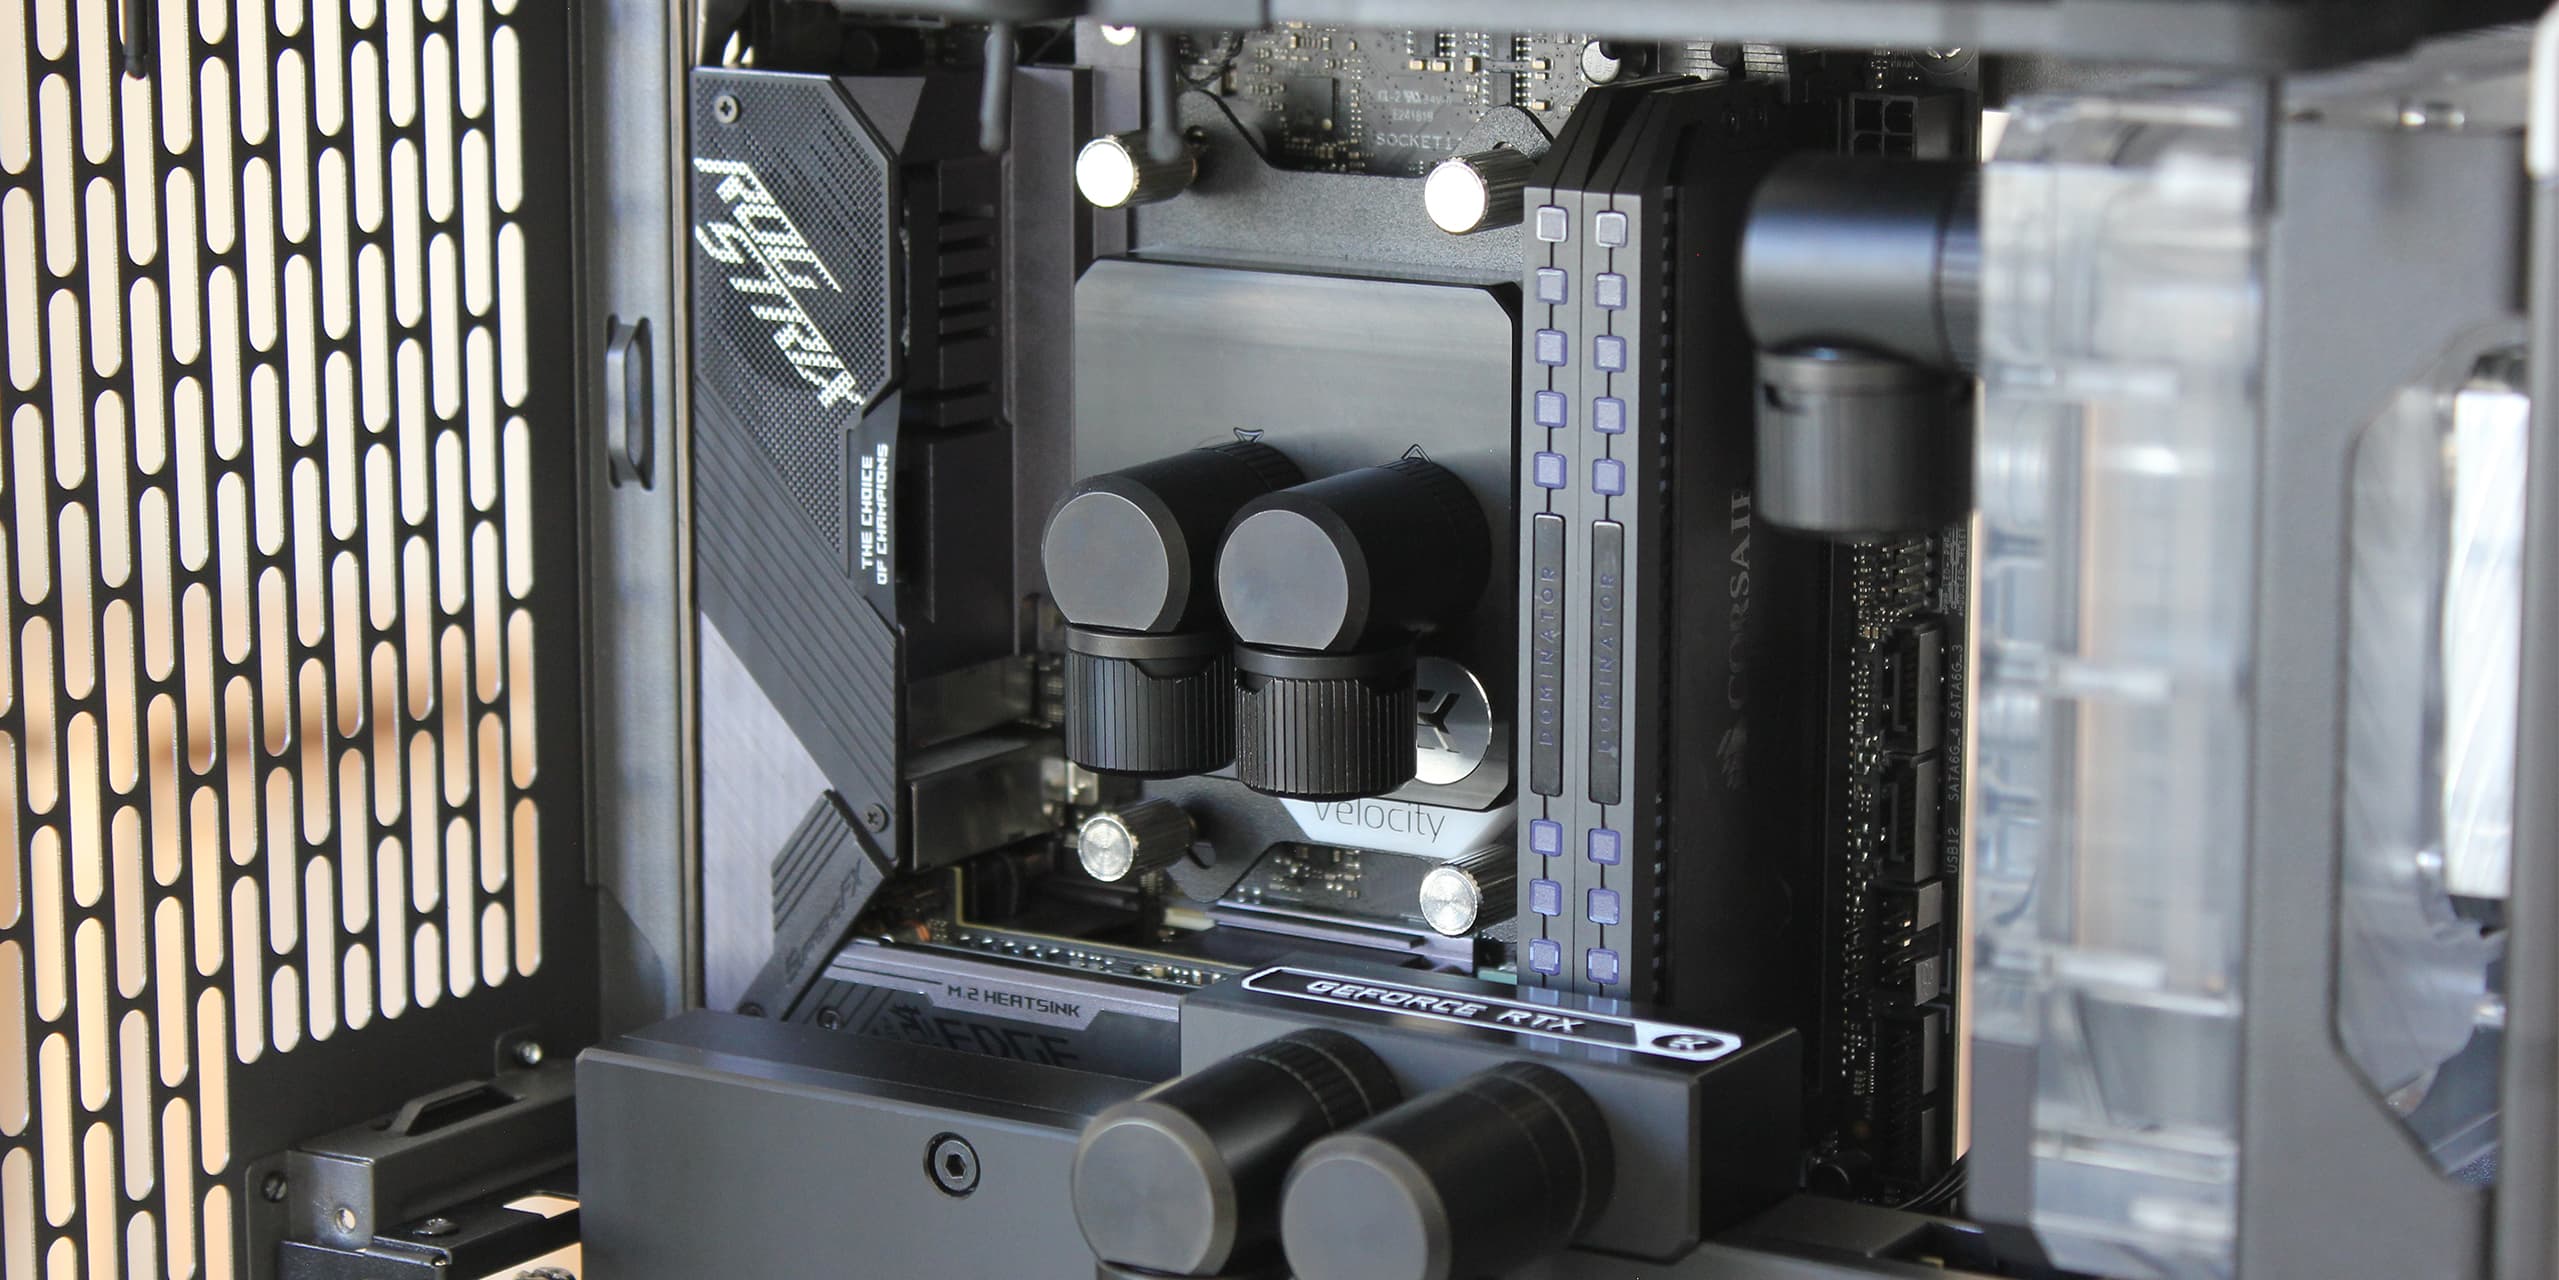
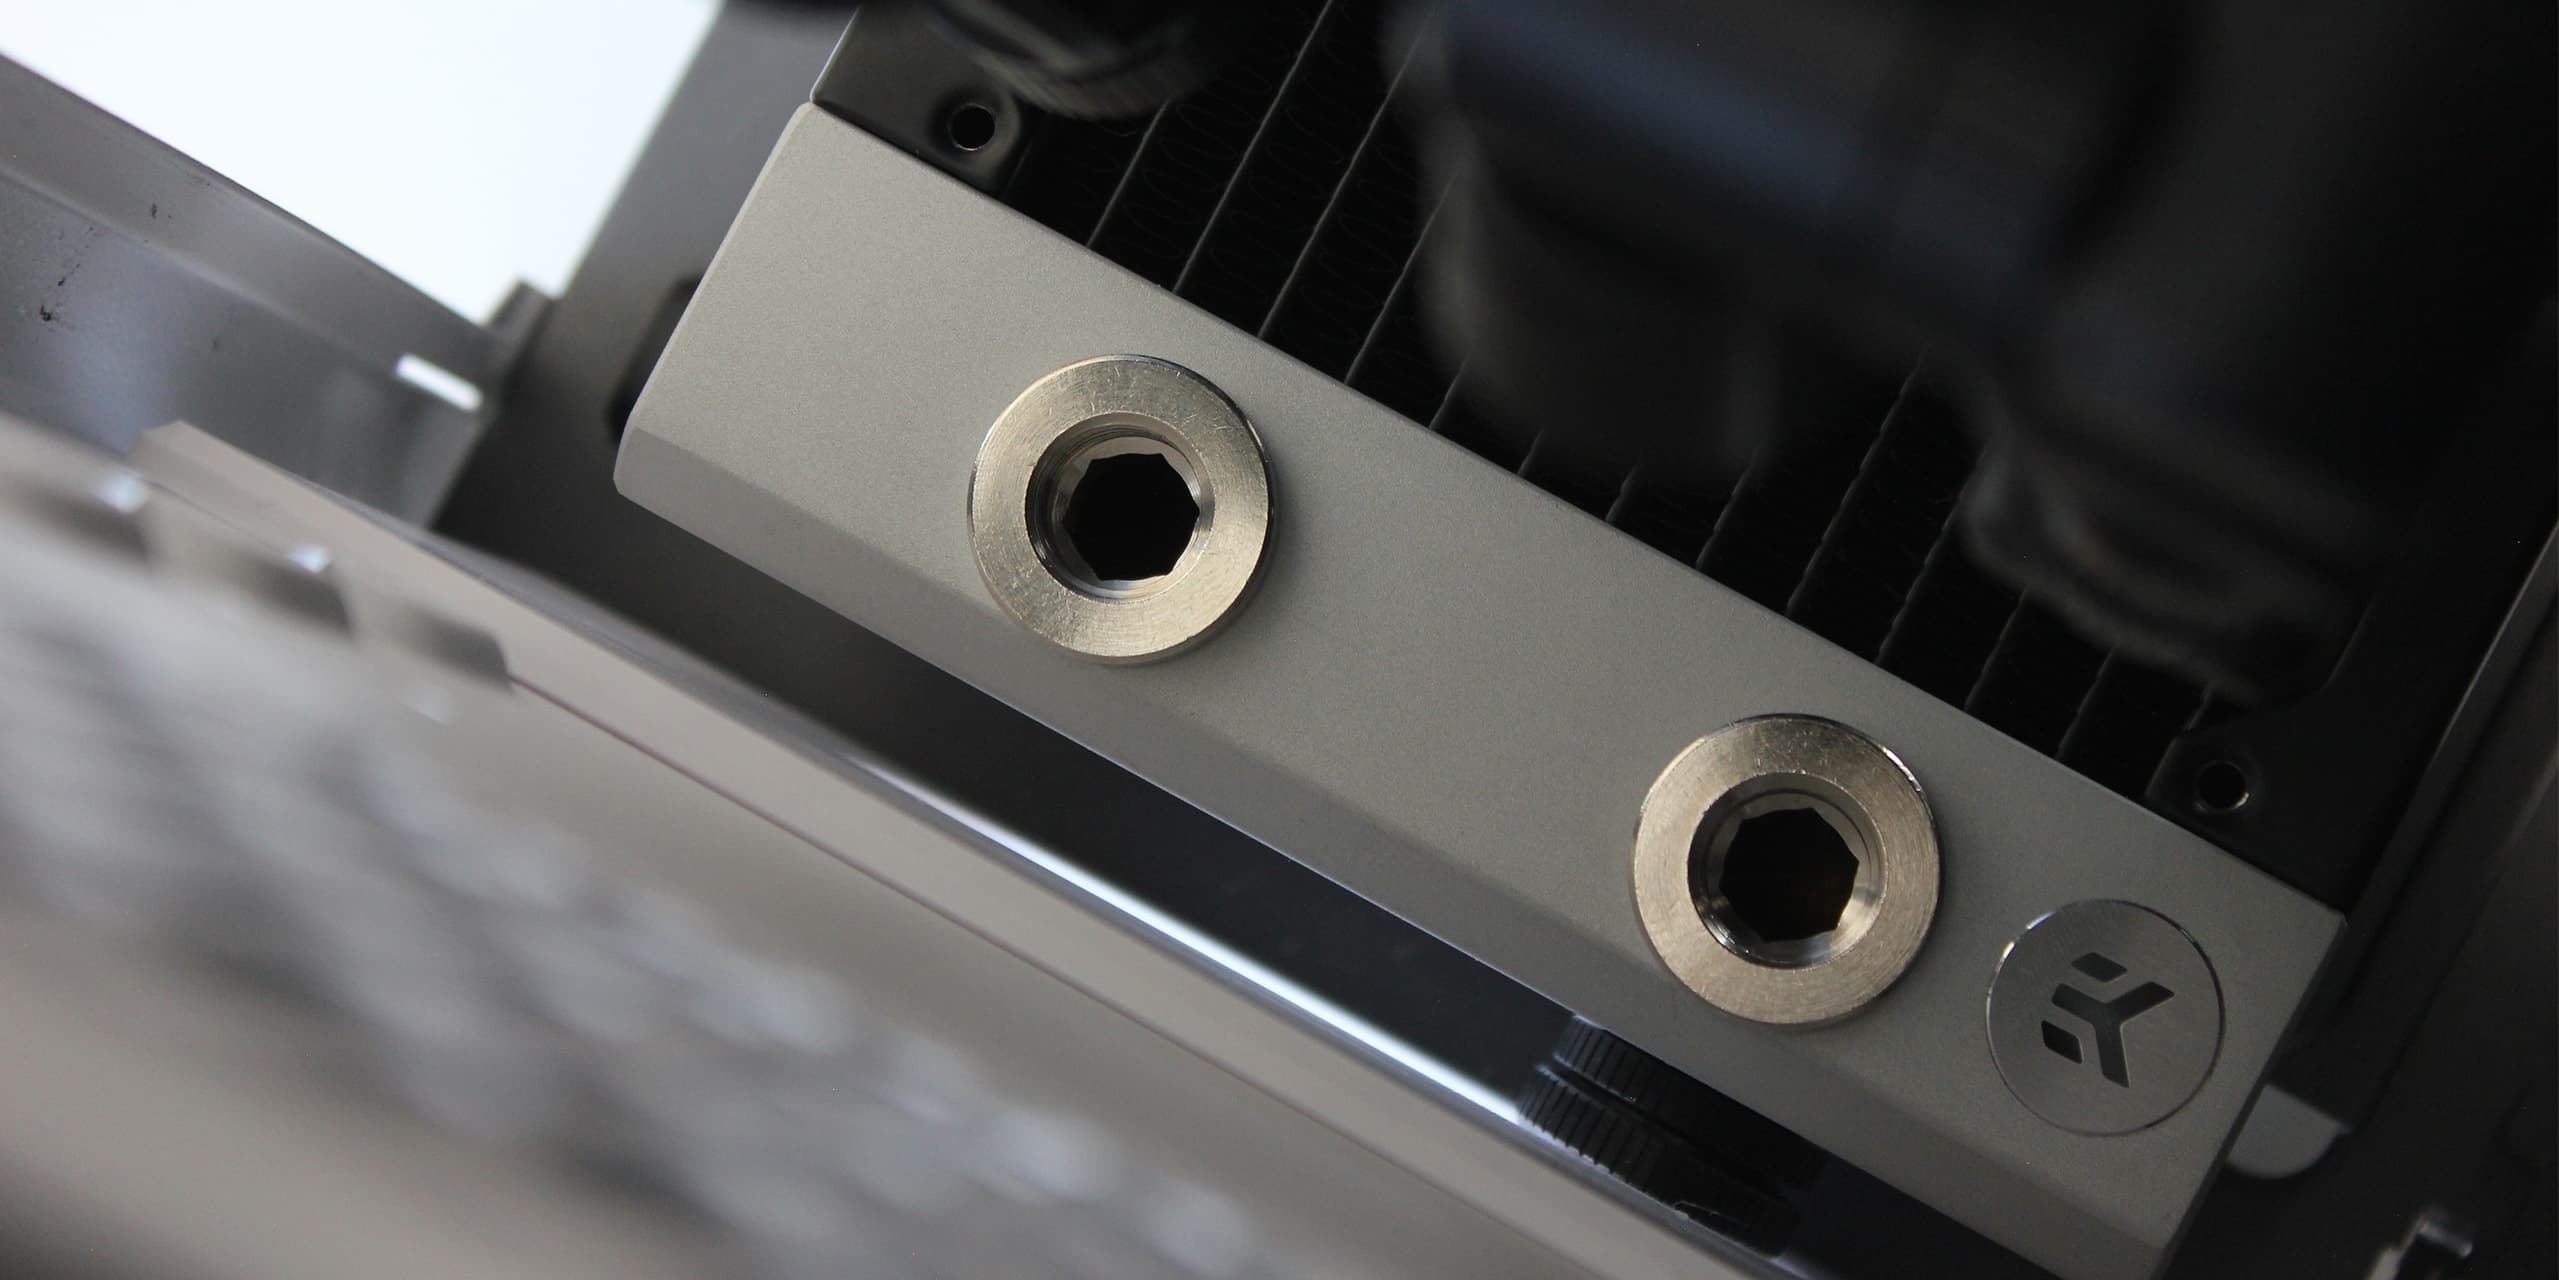
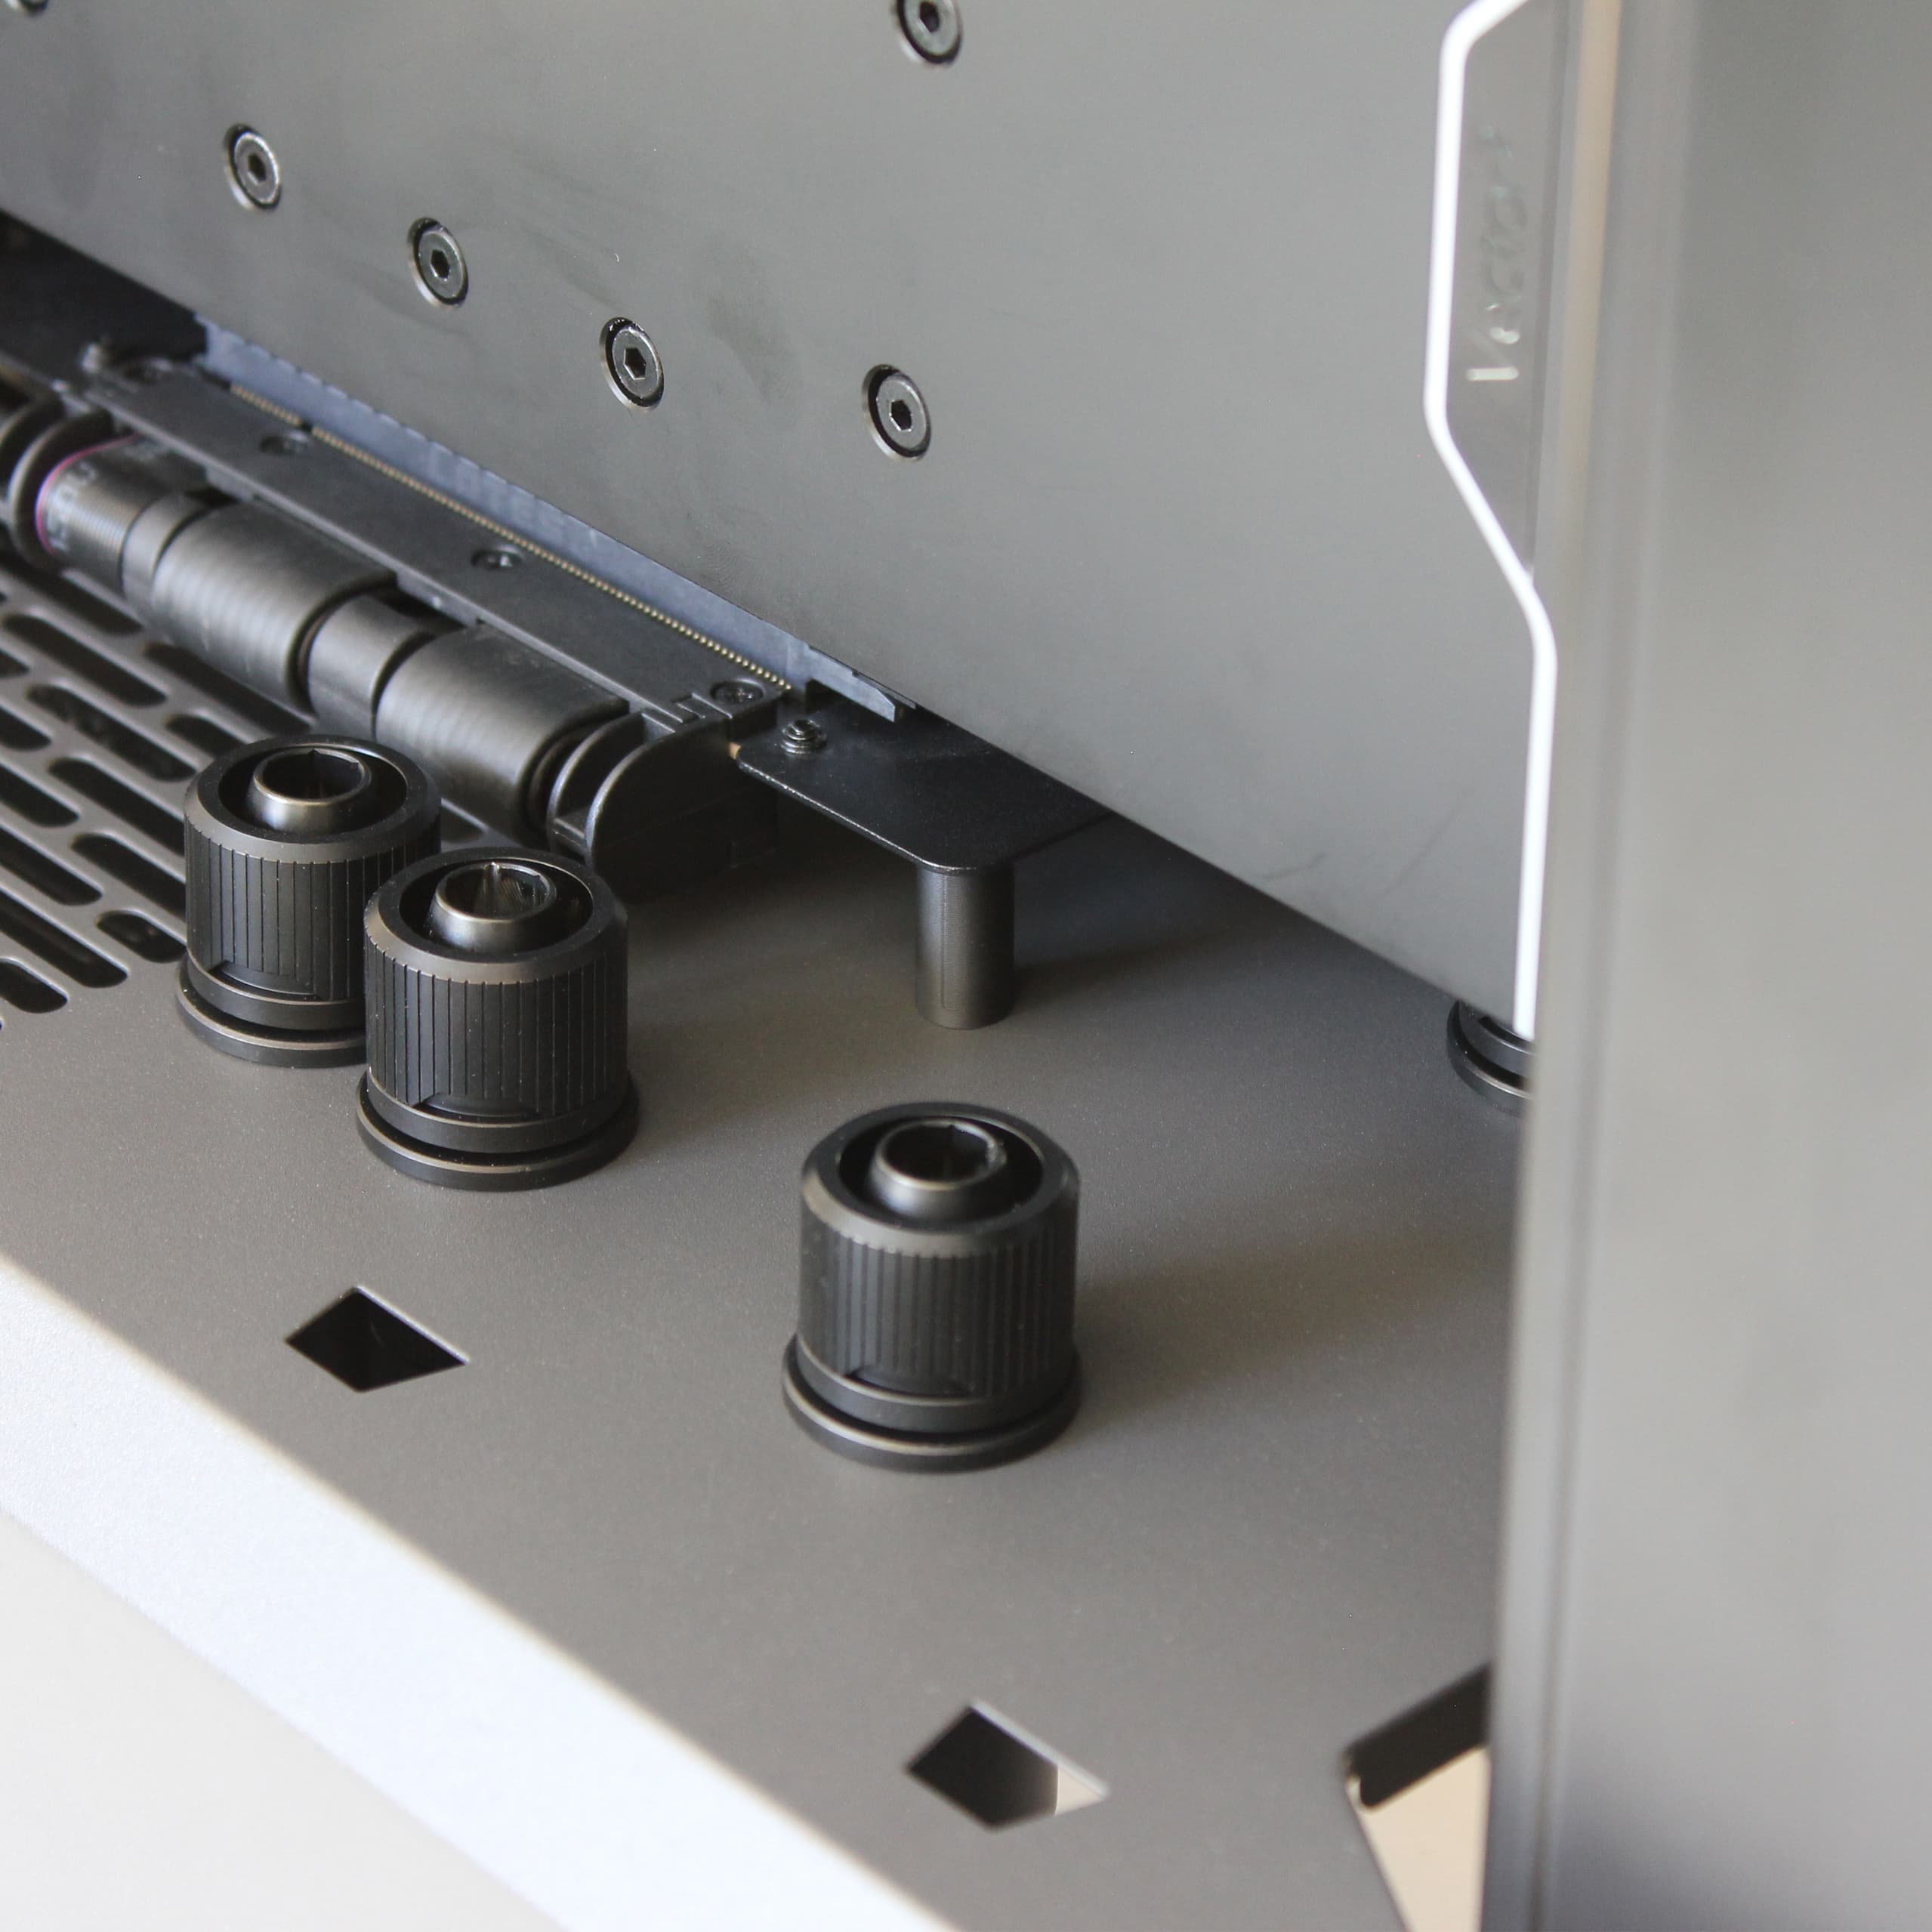
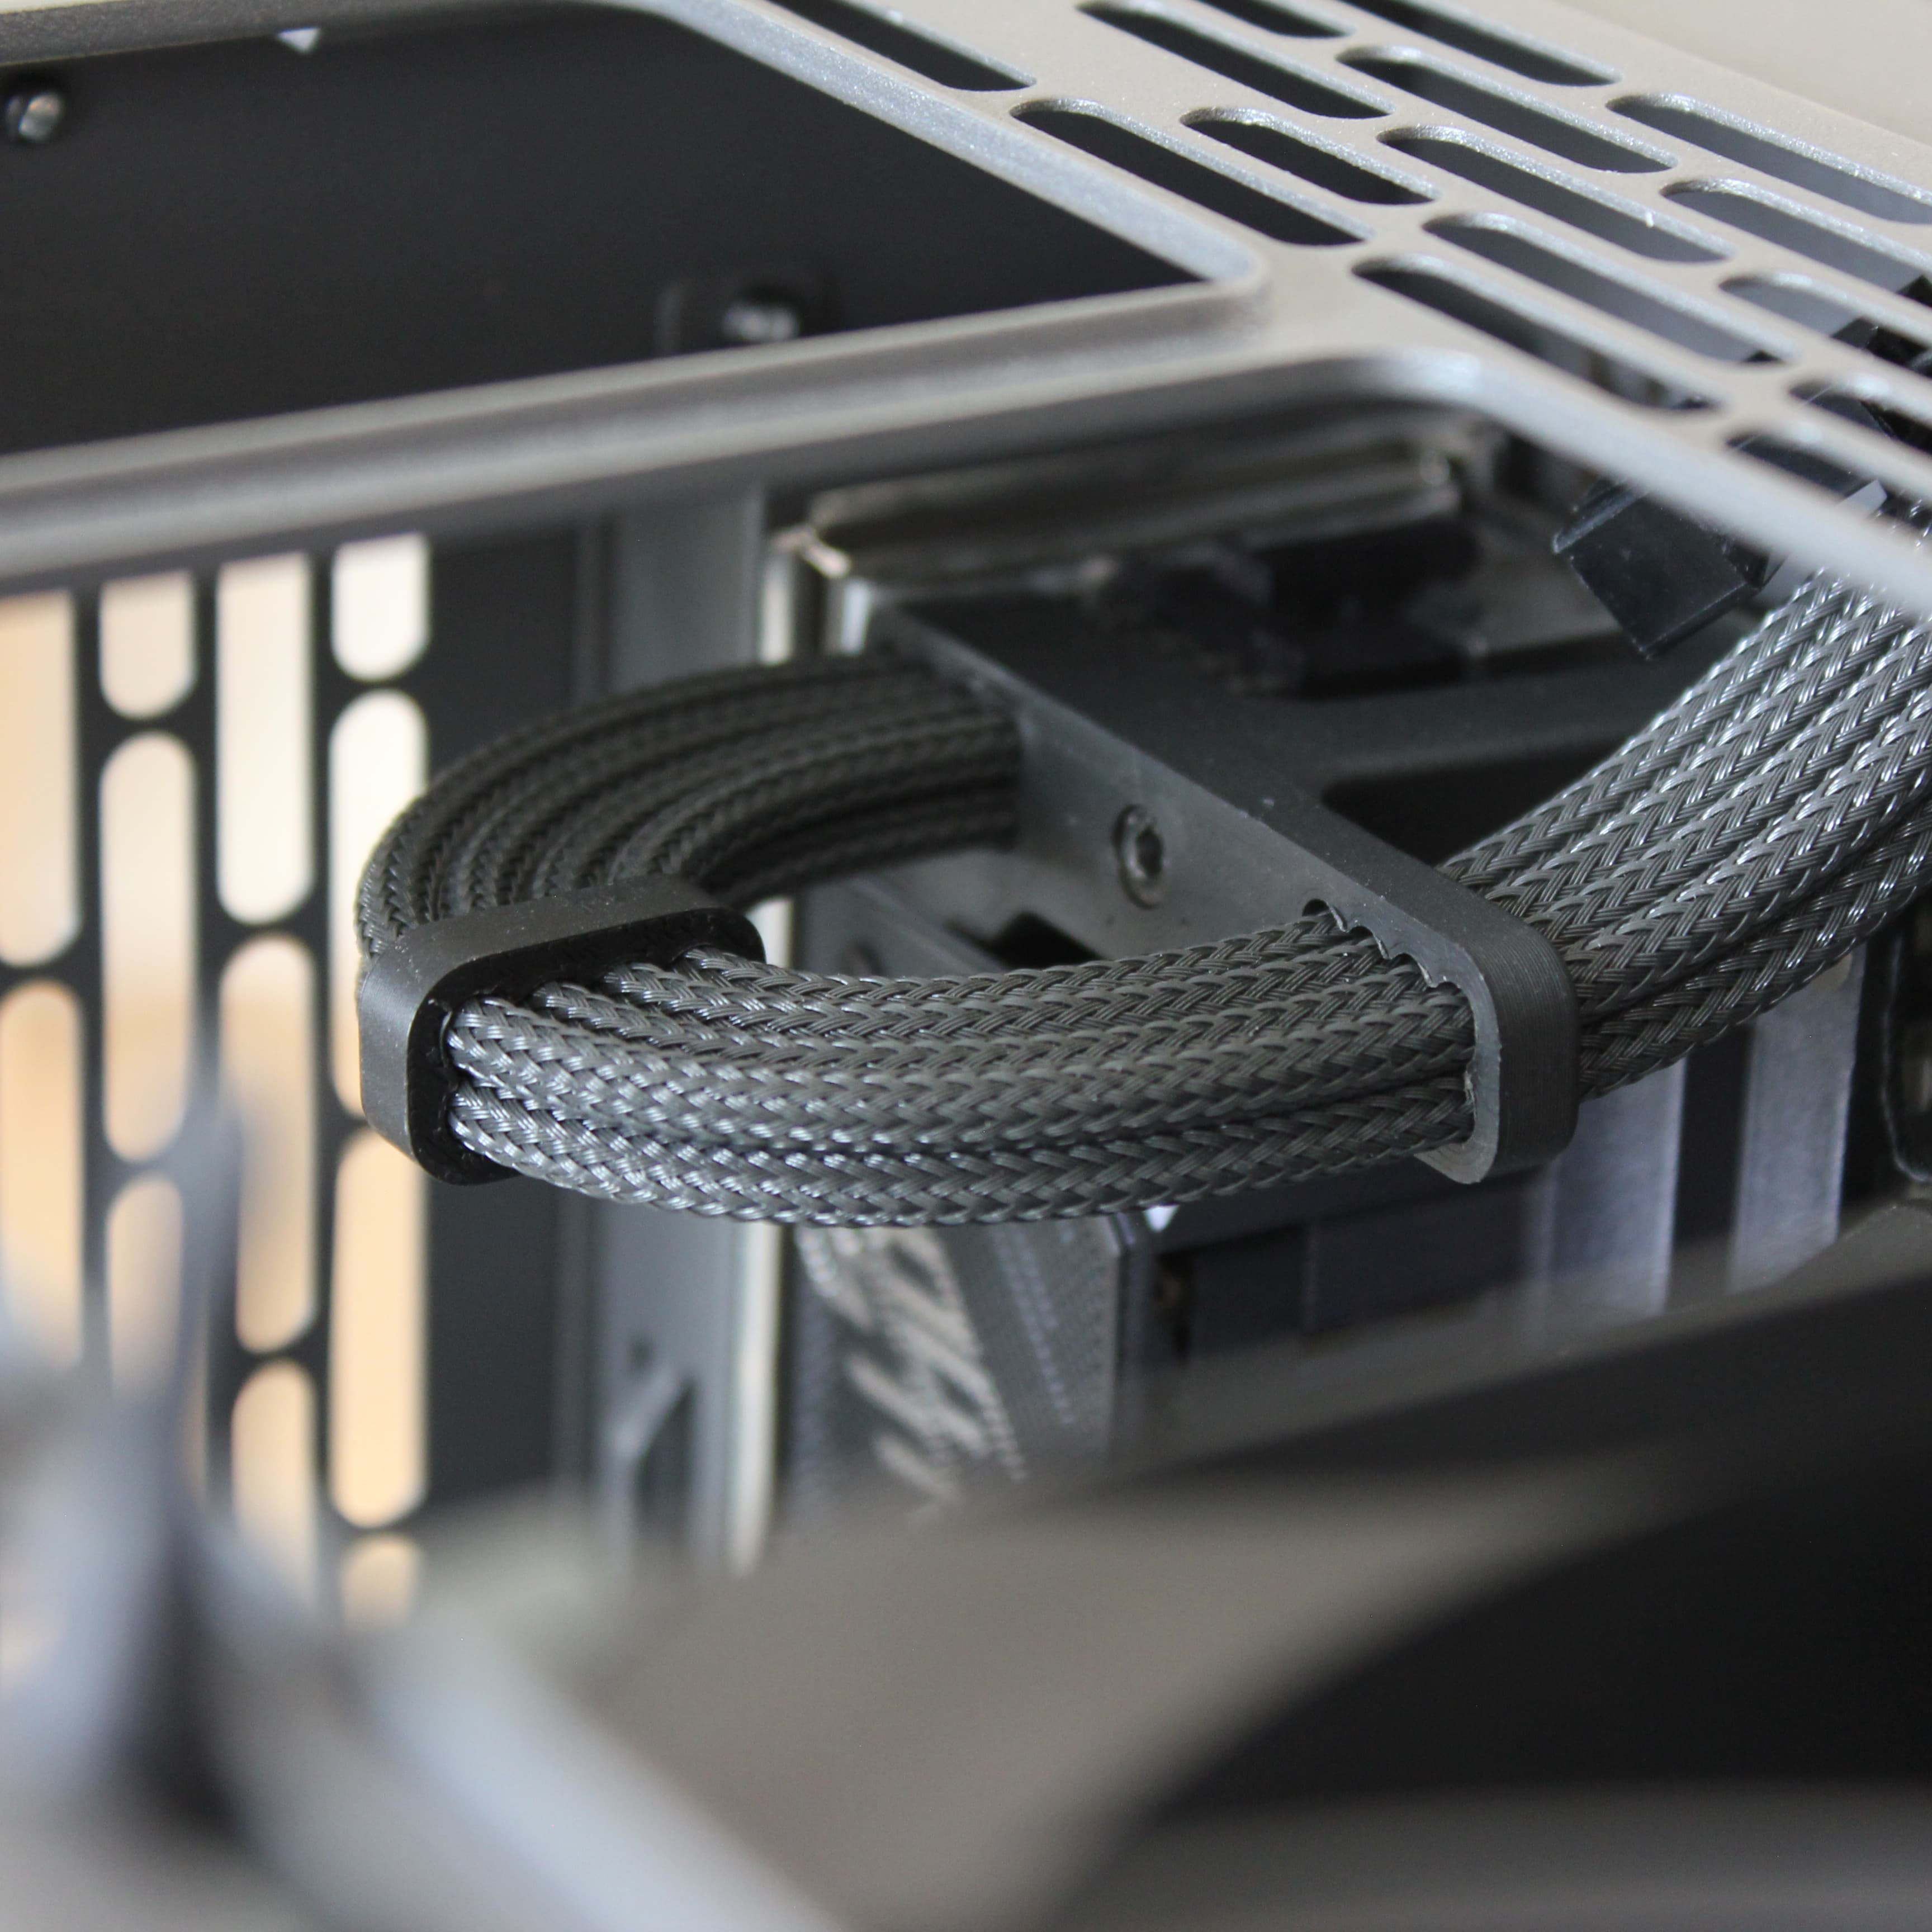
Another concern of mine was the clearance between the RAM and GPU, for which I was positively surprised! While there was an interference, it was actually 3 mm rather than the 6 mm I had calculated. I had a few spare motherboard standoffs which happened to be ~6.35mm tall (0.25") that were a perfect fit to offset the vertical GPU bracket. The result is roughly 3 mm clearance between the plug fittings on the top of the GPU block and the RAM.
Using low-profile G1/4" plug fittings is paramount here for clearance. These are roughly 3 mm tall when installed, as compared to the EK-Quantum Torque plugs that have an installed height of 5.5 mm. While not visible in this image, offsetting the GPU like this is also necessary to create enough space between the motherboard and the GPU to fit the 10/16 tubing.
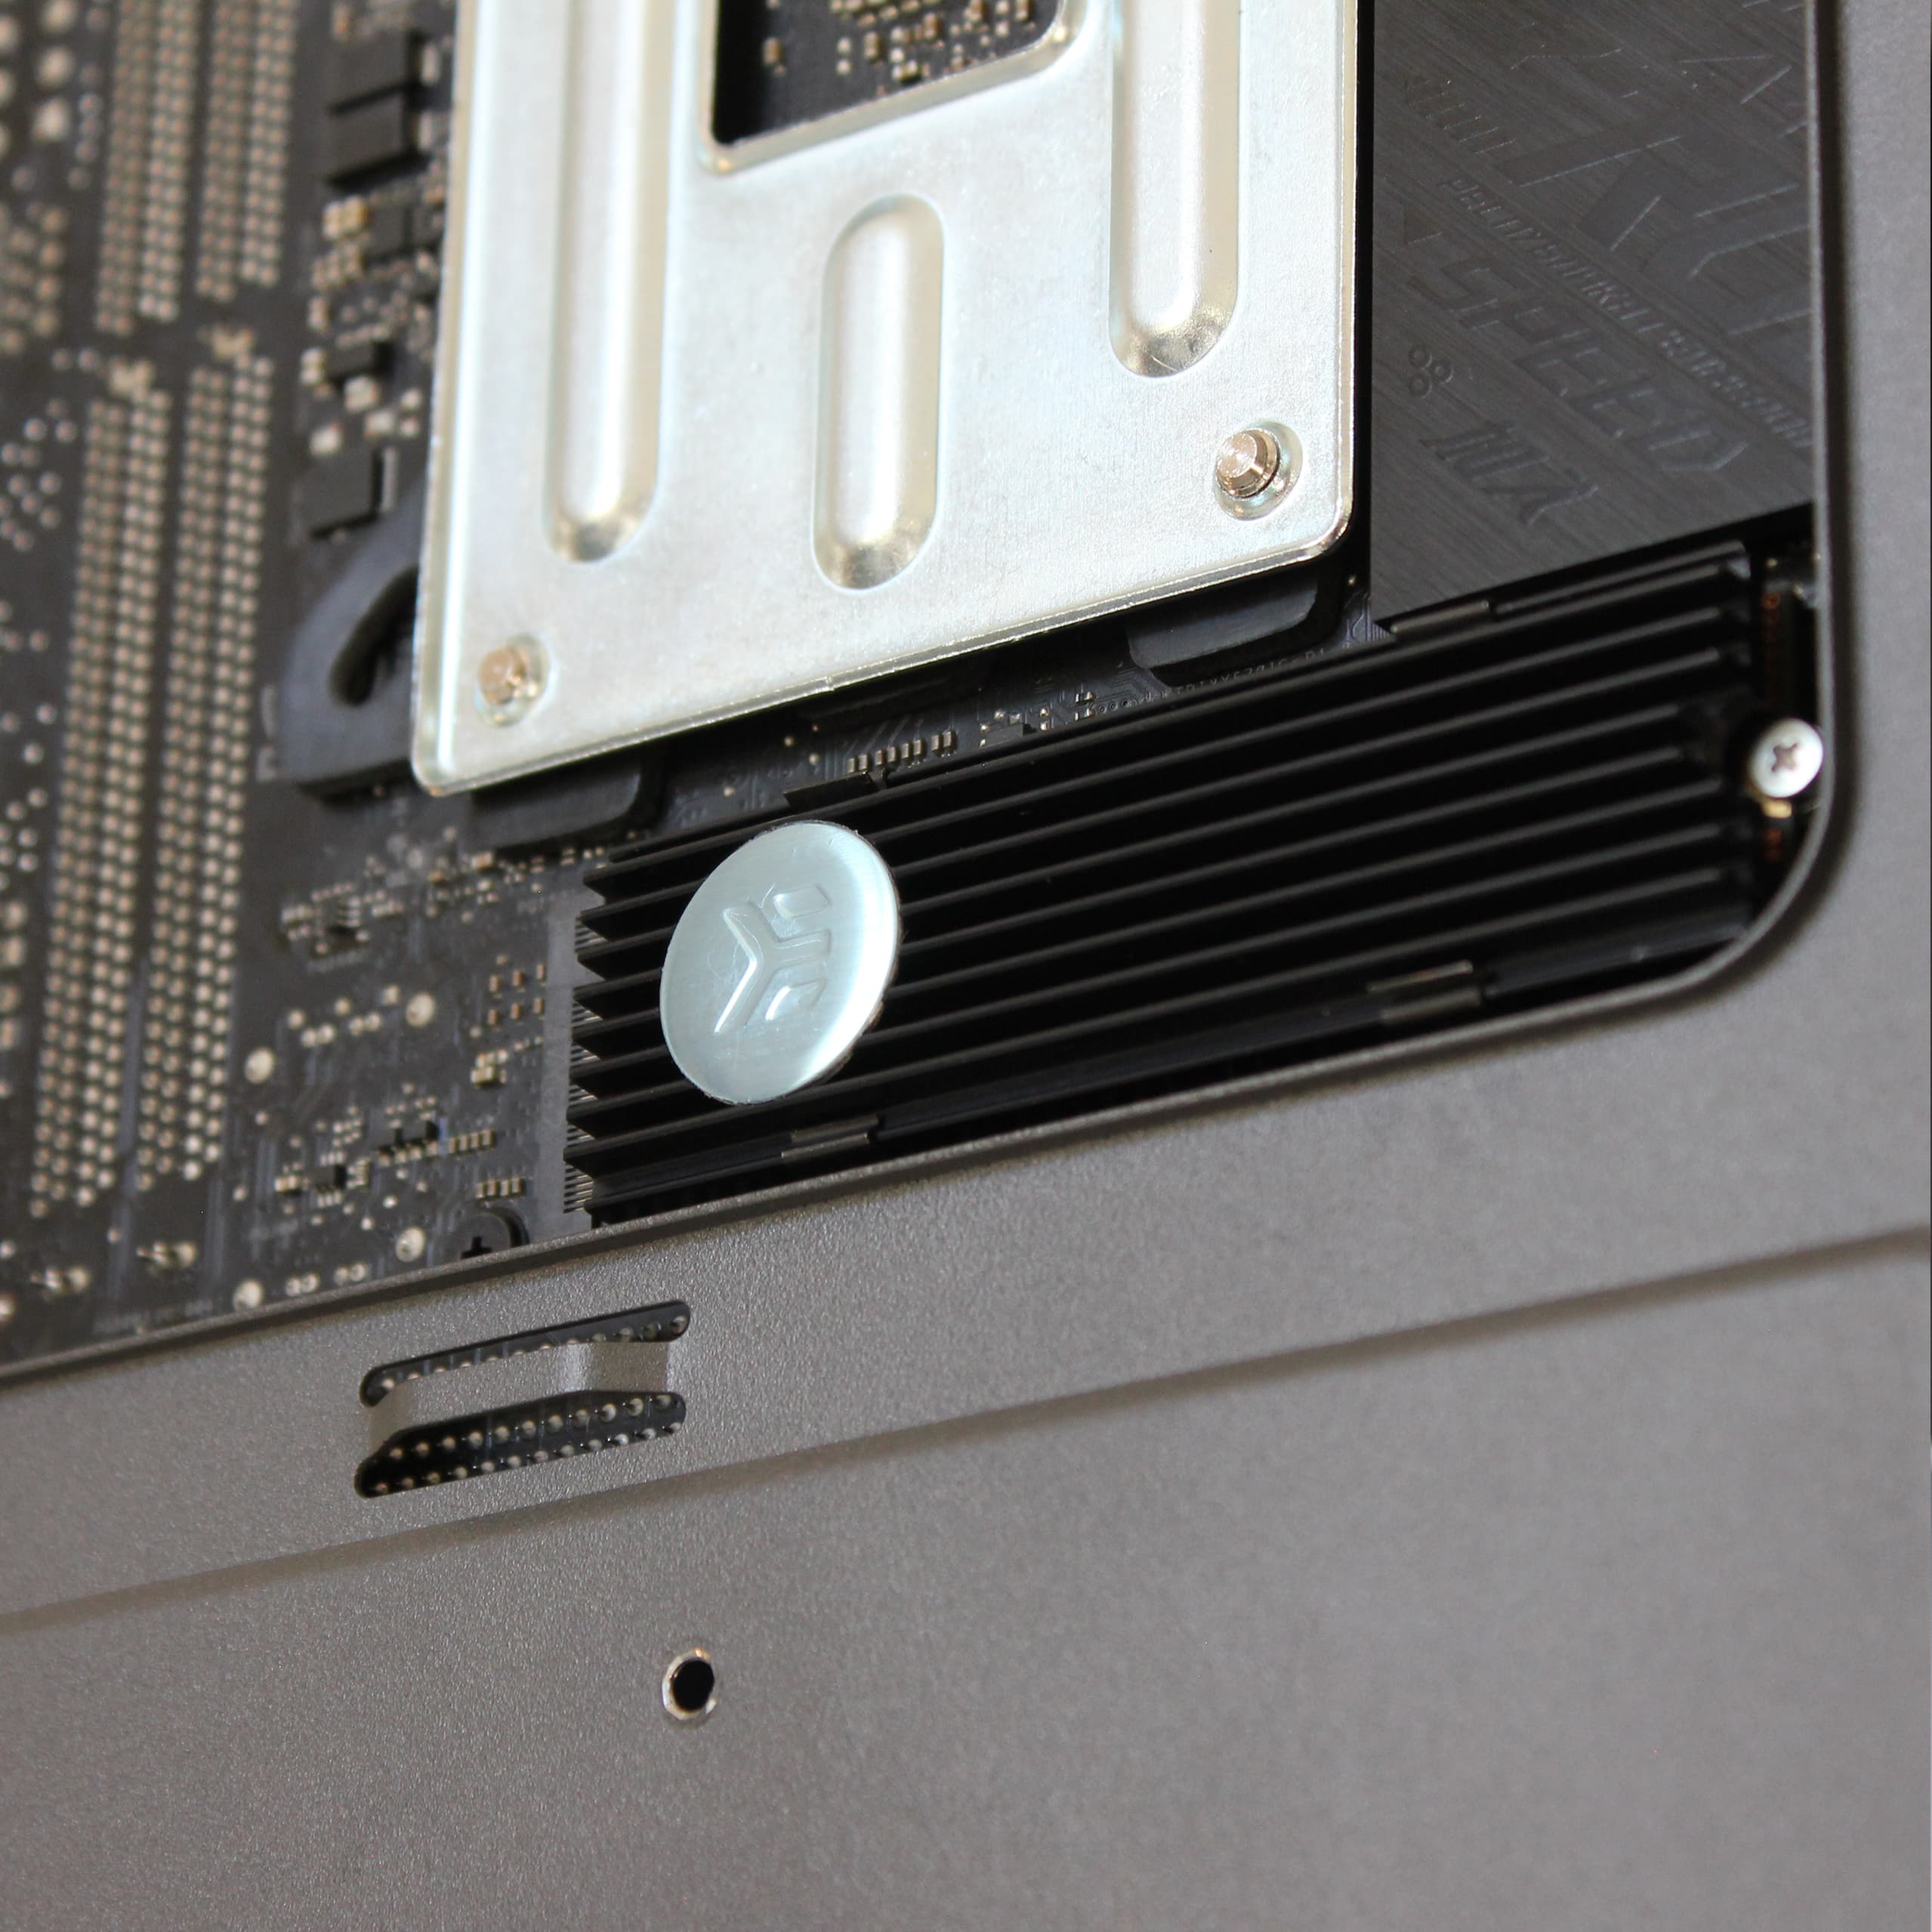
Applying the EK M.2 heatsink was not as straightforward as I expected it to be. The SSD is sandwiched between a backplate and the heatsink which is held together by metal clips. To improve thermal performance, thermal pads of two different thicknesses are to be placed in between. Seems like an easy task at first glance, however...the clips would not flex as much as they needed to grip both sides of the heatsink. After applying highly excessive force in an attempt to attach the clips, I gave up since I'd be more likely to snap the SSD in half before actually succeeding.
The thermal pads that come with the SSD are 1 and 1.5 mm thick respectively so naturally I thought I'd use the thinner variant on both sides, if only they had provided more pads than the absolute minimum. Luckily, I had some spare thermal pads from the GPU block which I could use, and voila! The clips snapped into place!
According to EK, the heatsink should fit any single-side style M.2 SSD, which the Samsung 970 EVO Plus is, so I'm not entirely sure why it wouldn't. Either I received a faulty sample or the heatsink is poorly designed. Slightly too much frustration for such an insignificant component but I'm glad that I could resolve it at least.
I'm working on a ton of exciting and very neat cable management, more on this in the next post!
/ Nik
What's Next?
004: Perfecting Cable Management
April 29, 2025Cable management is the arbiter—might I say the reaper of death—for most computer builds. It is certainly not an easy task, and what most commonly happens is that a spaghetti catastrophe of cables is tucked into the rear chamber (if the chassis has one) never again to see the light of day. While this is completely fine given the typically lengthy interval between PC upgrades, I wouldn't be able to live with myself if I built such a fancy-pants system, knowing that the opposing side of my chassis was left in complete and utter chaos.
Therefore, I've been cooking up a collection of 3D-printed parts to get this under control. After all, I do have quite the set of cables in this build even though there are no 2.5" or 3.5" storage drives. I could try to explain in writing where all the cables come from and where they go, but that's not fun for anyone. Let's take a look at some diagrams and images instead!
Components & Cables
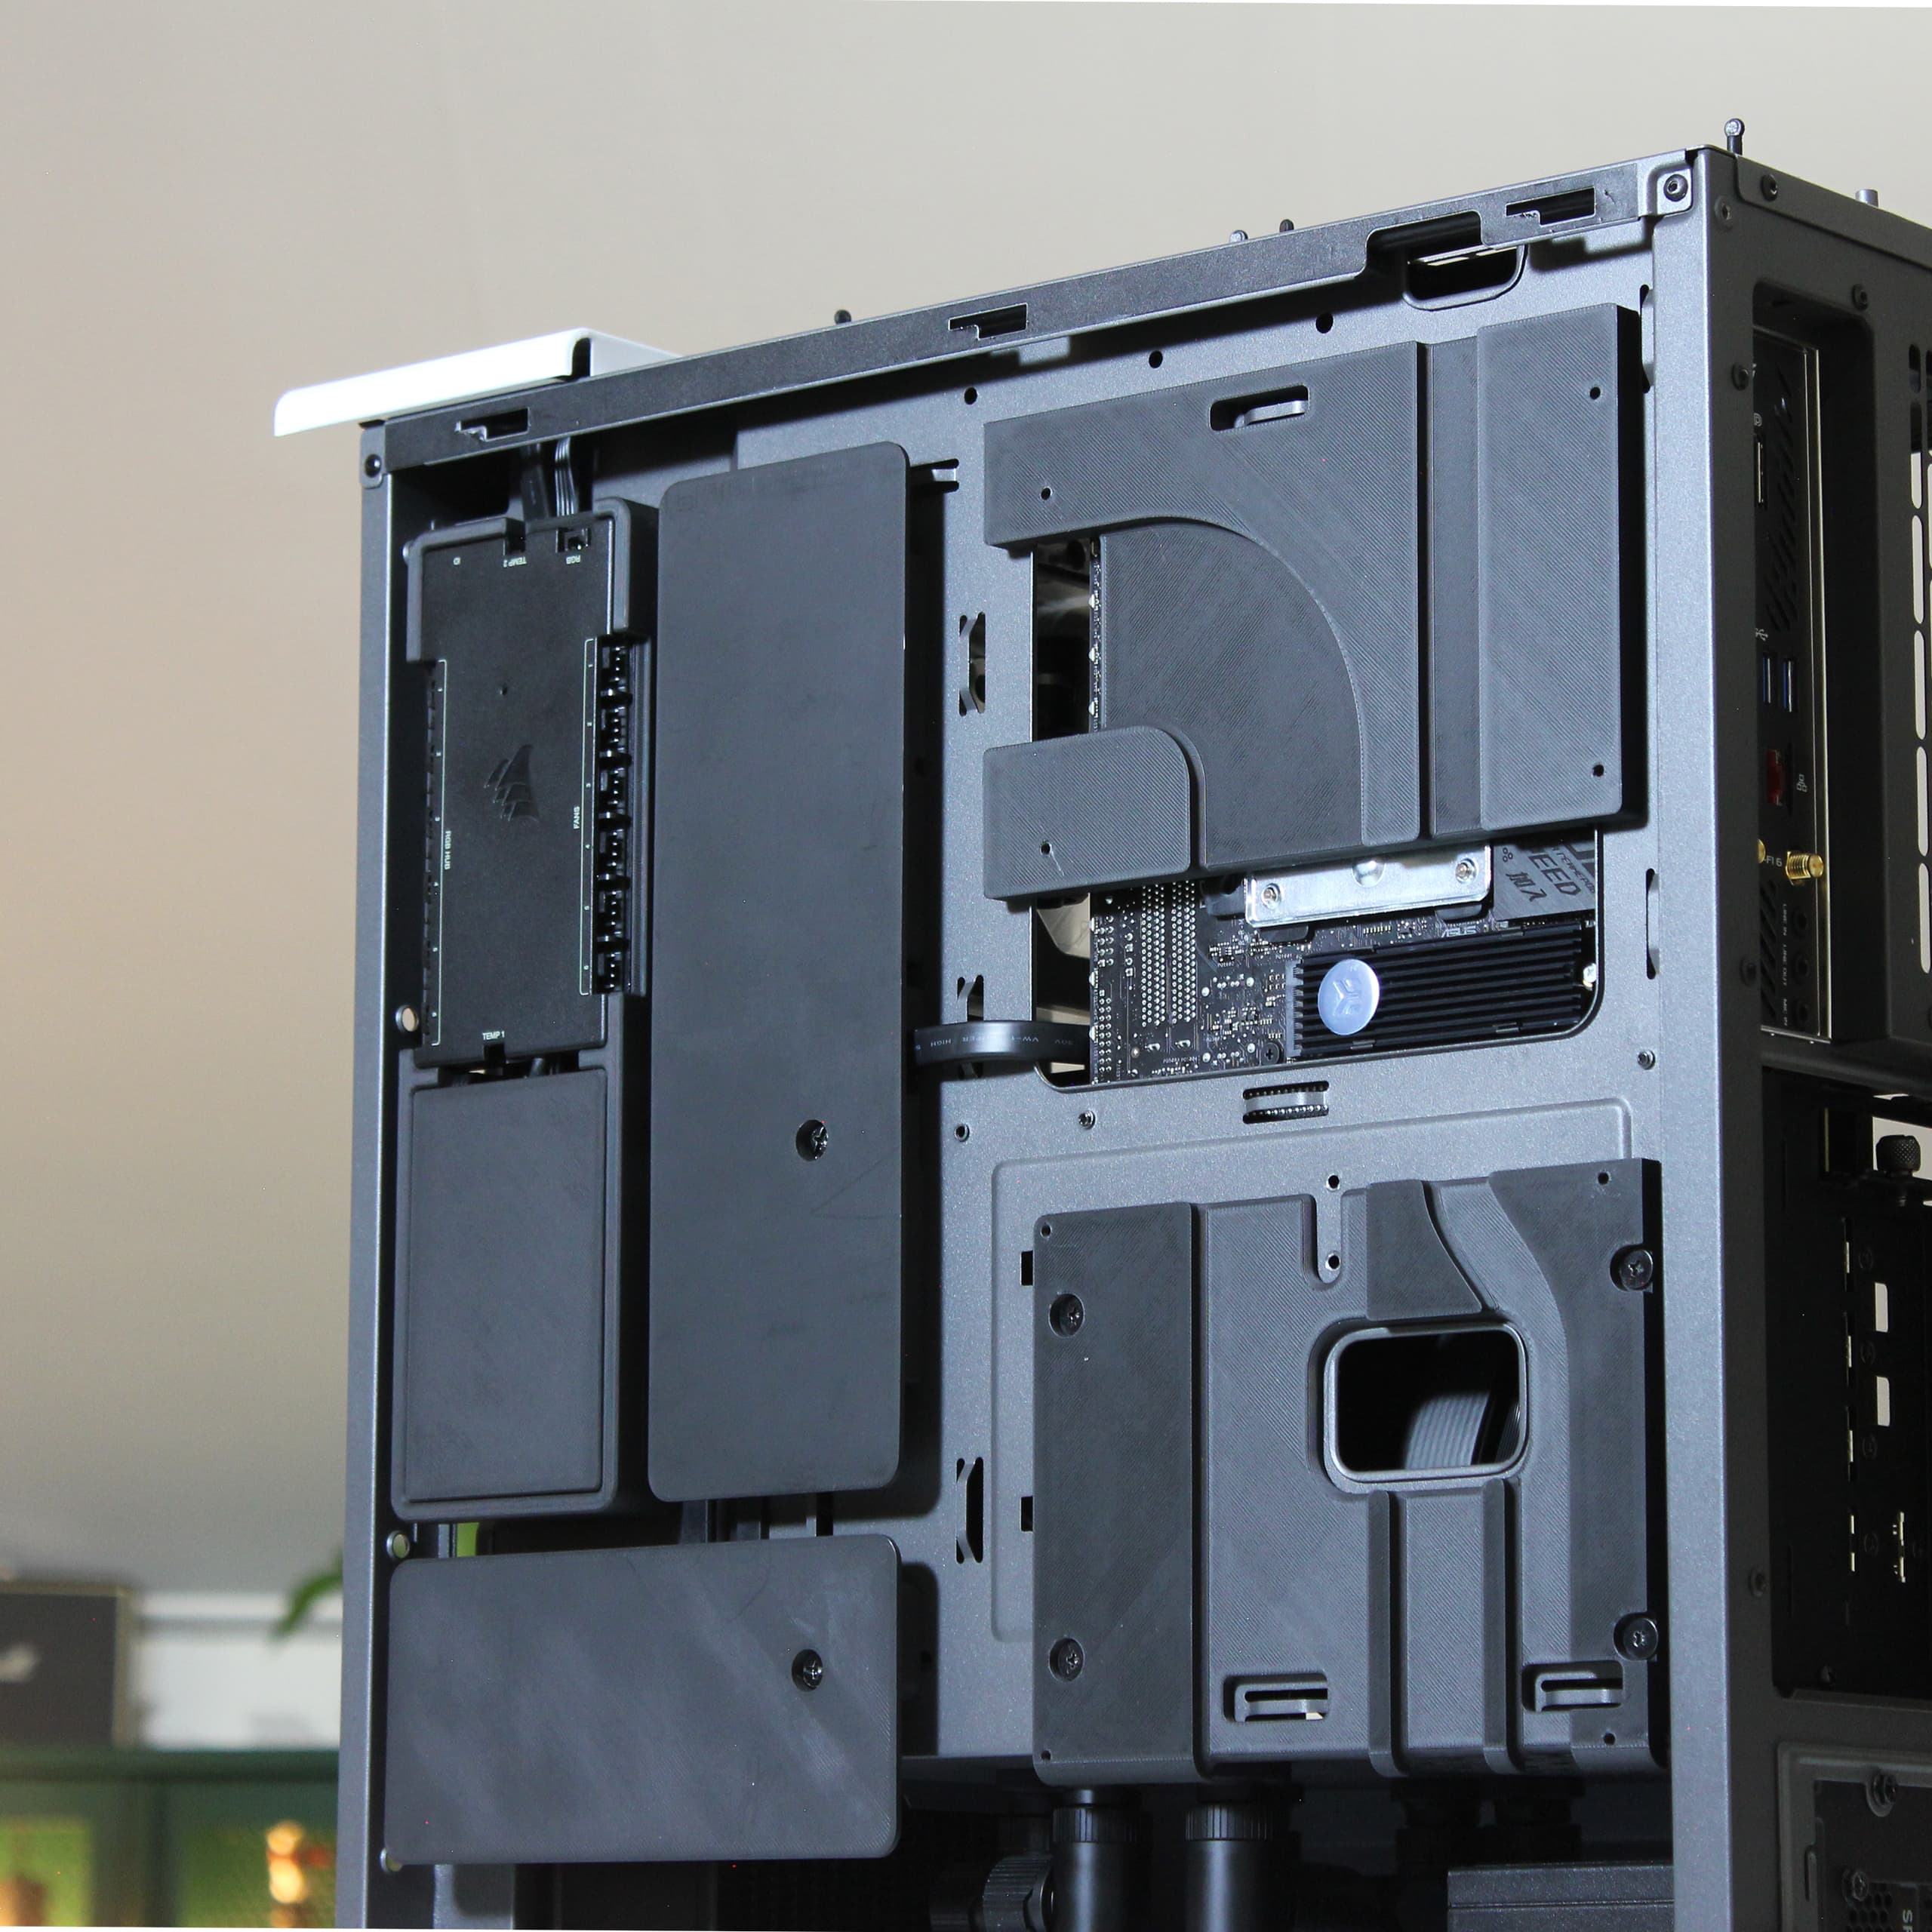
01
/ 00Management
Hub Attachment
Big Cables
Bottom Cover
Fan Covers
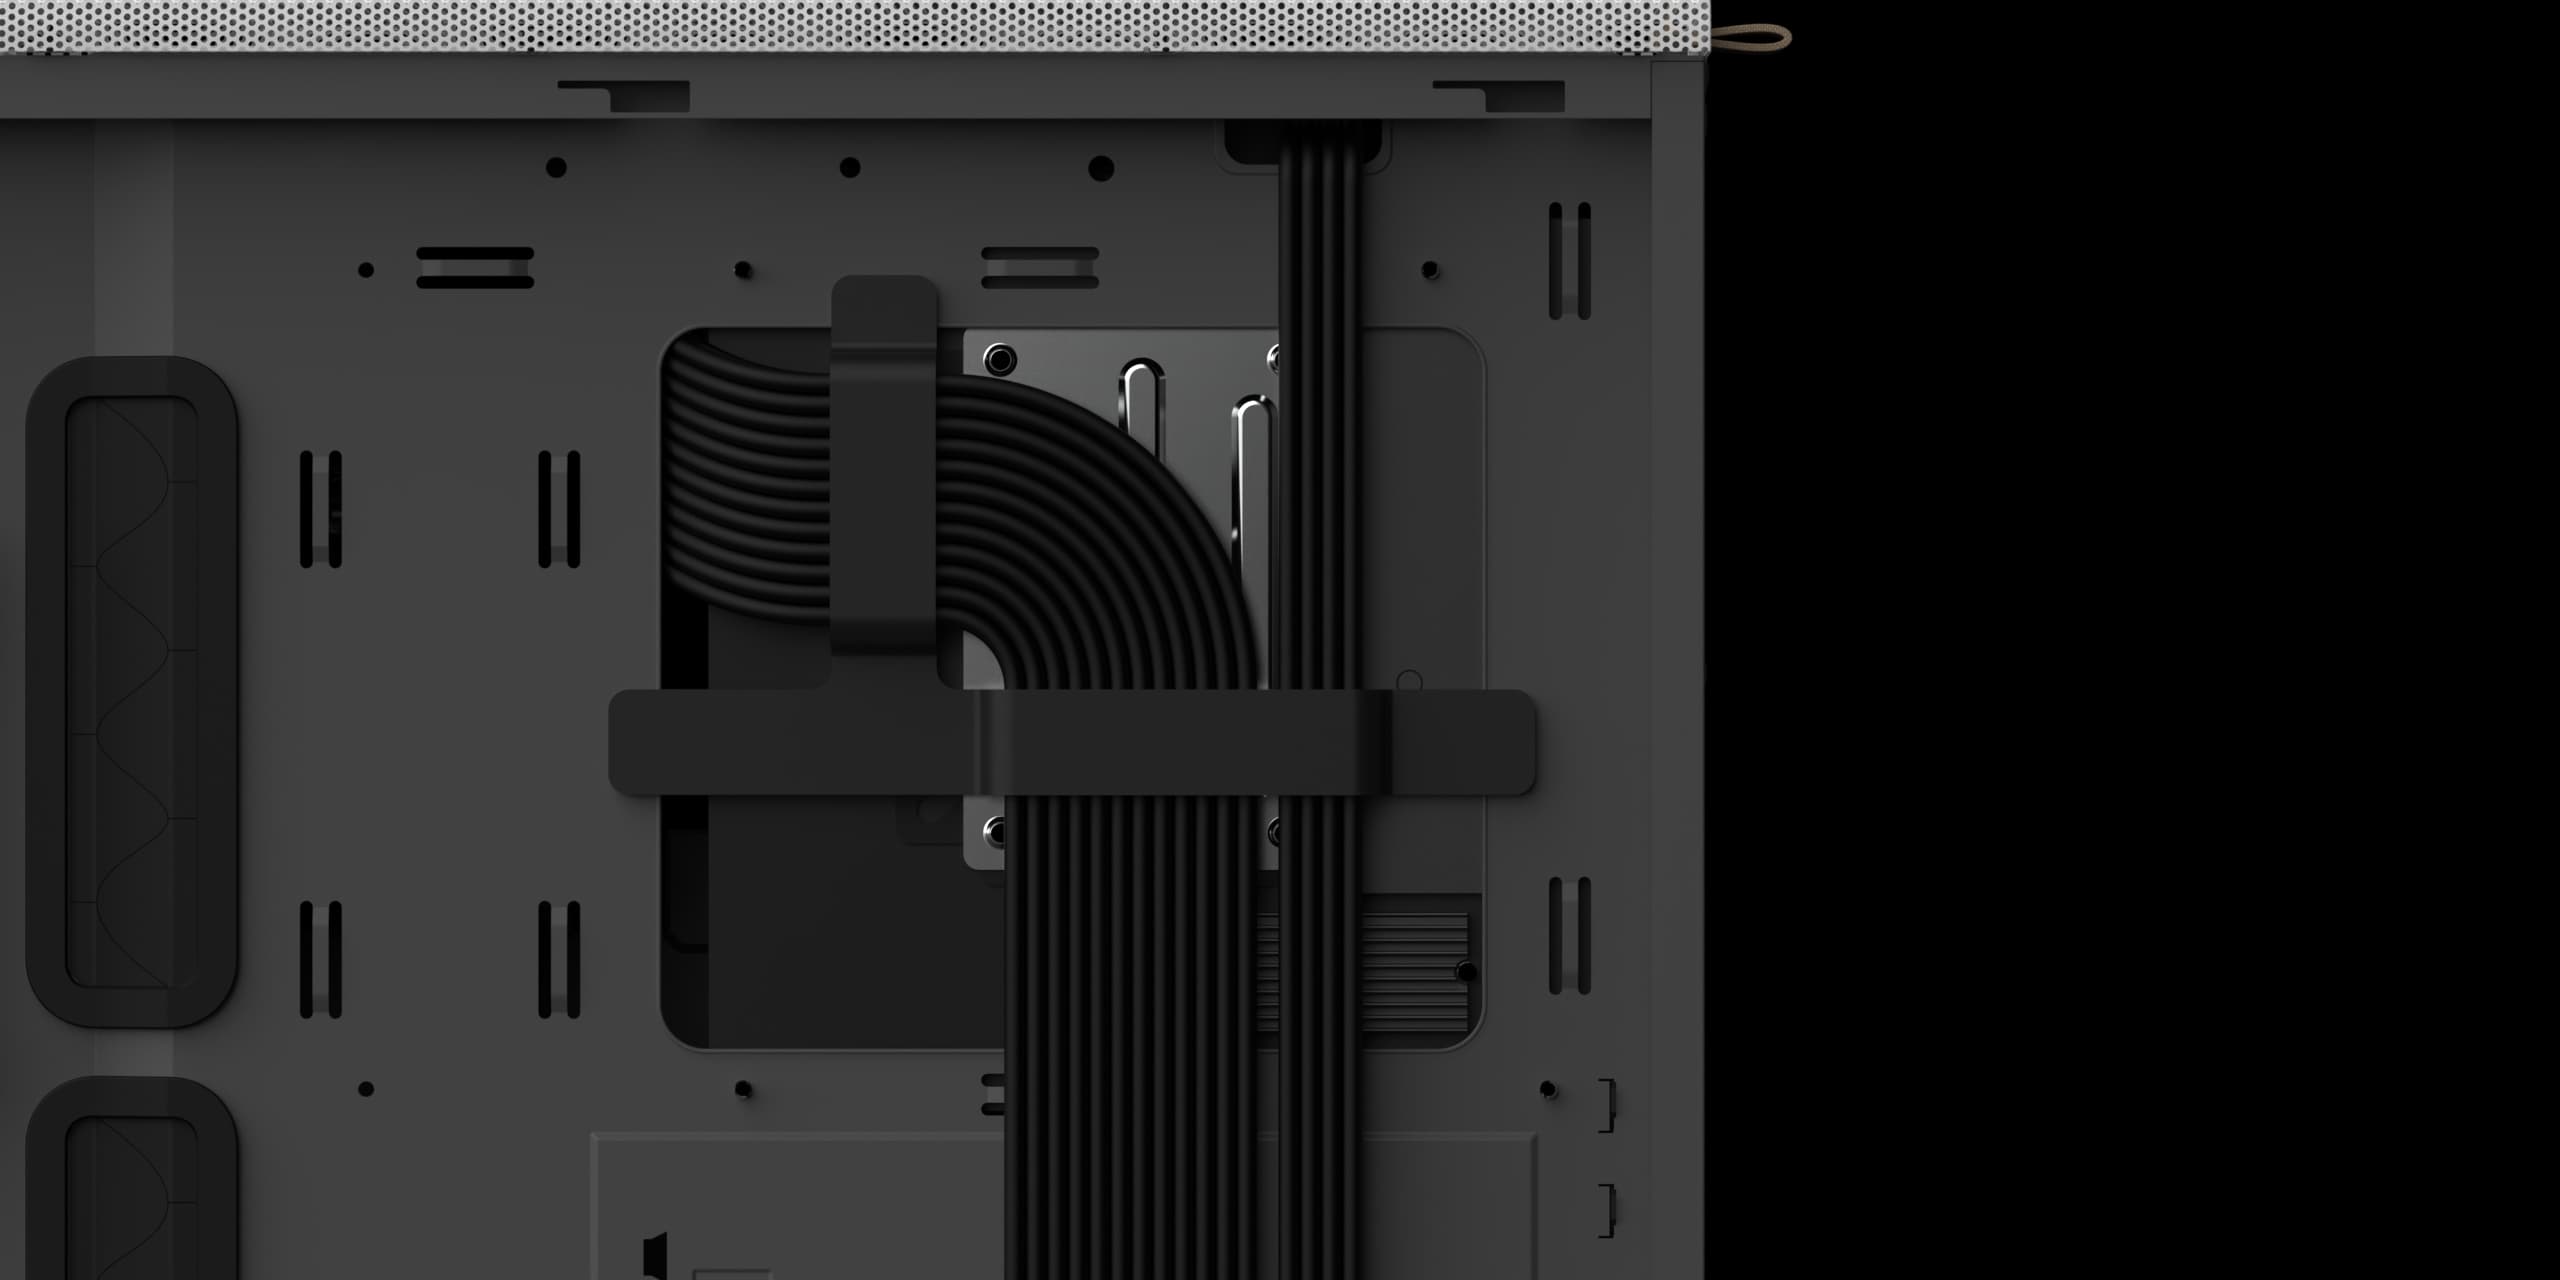
I have designed a set of plastic components that will serve all of the cable management in the rear chamber. This set consists of 5 individual pieces which I have fabricated using my Bambulab A1 3D-printer. While the primary function of these pieces is to guide the cables to and from their respective connectors, they also form a seamless tile-like design in the rear chamber, with the cables being exposed only in a few locations. Although this may counteract the purpose of the cable sleeving to a certain extent, I think it looks very clean. Keep in mind that these covers are still a work in progress, so there will most definitely be some updates to them as I install the sleeved cables. More on this in a future post.
These pieces are all attached to the chassis by either magnets, screws, or a combination of both. Thanks to the use of an ITX motherboard, a lot of mounting holes are left unused and can be utilized for this purpose.
In the top-left corner, we have a multi-functional attachment that is primarily used as a seat for the Corsair Commander Core XT, but also as storage for cable slack and routing. The indentation on this side of the chassis allows for a design where cables can be tucked in underneath the control hub which is very functional, especially as a ton of cables are connected to the hub. The bottom section of the attachment features additional cable storage with a magnetically attached lid to cover it up.
While I previously mentioned I wouldn't be able to live with myself if I left the cables in a tangled mess, this attachment is kind of my sanctuary grey zone. I could cut each cable to the perfect length, but I'd honestly rather keep them as they are in case I ever need to repurpose them for another build that might require longer cables. I'd consider this a reasonable middle-ground. Less work, same result, ...and my conscience will allow it.
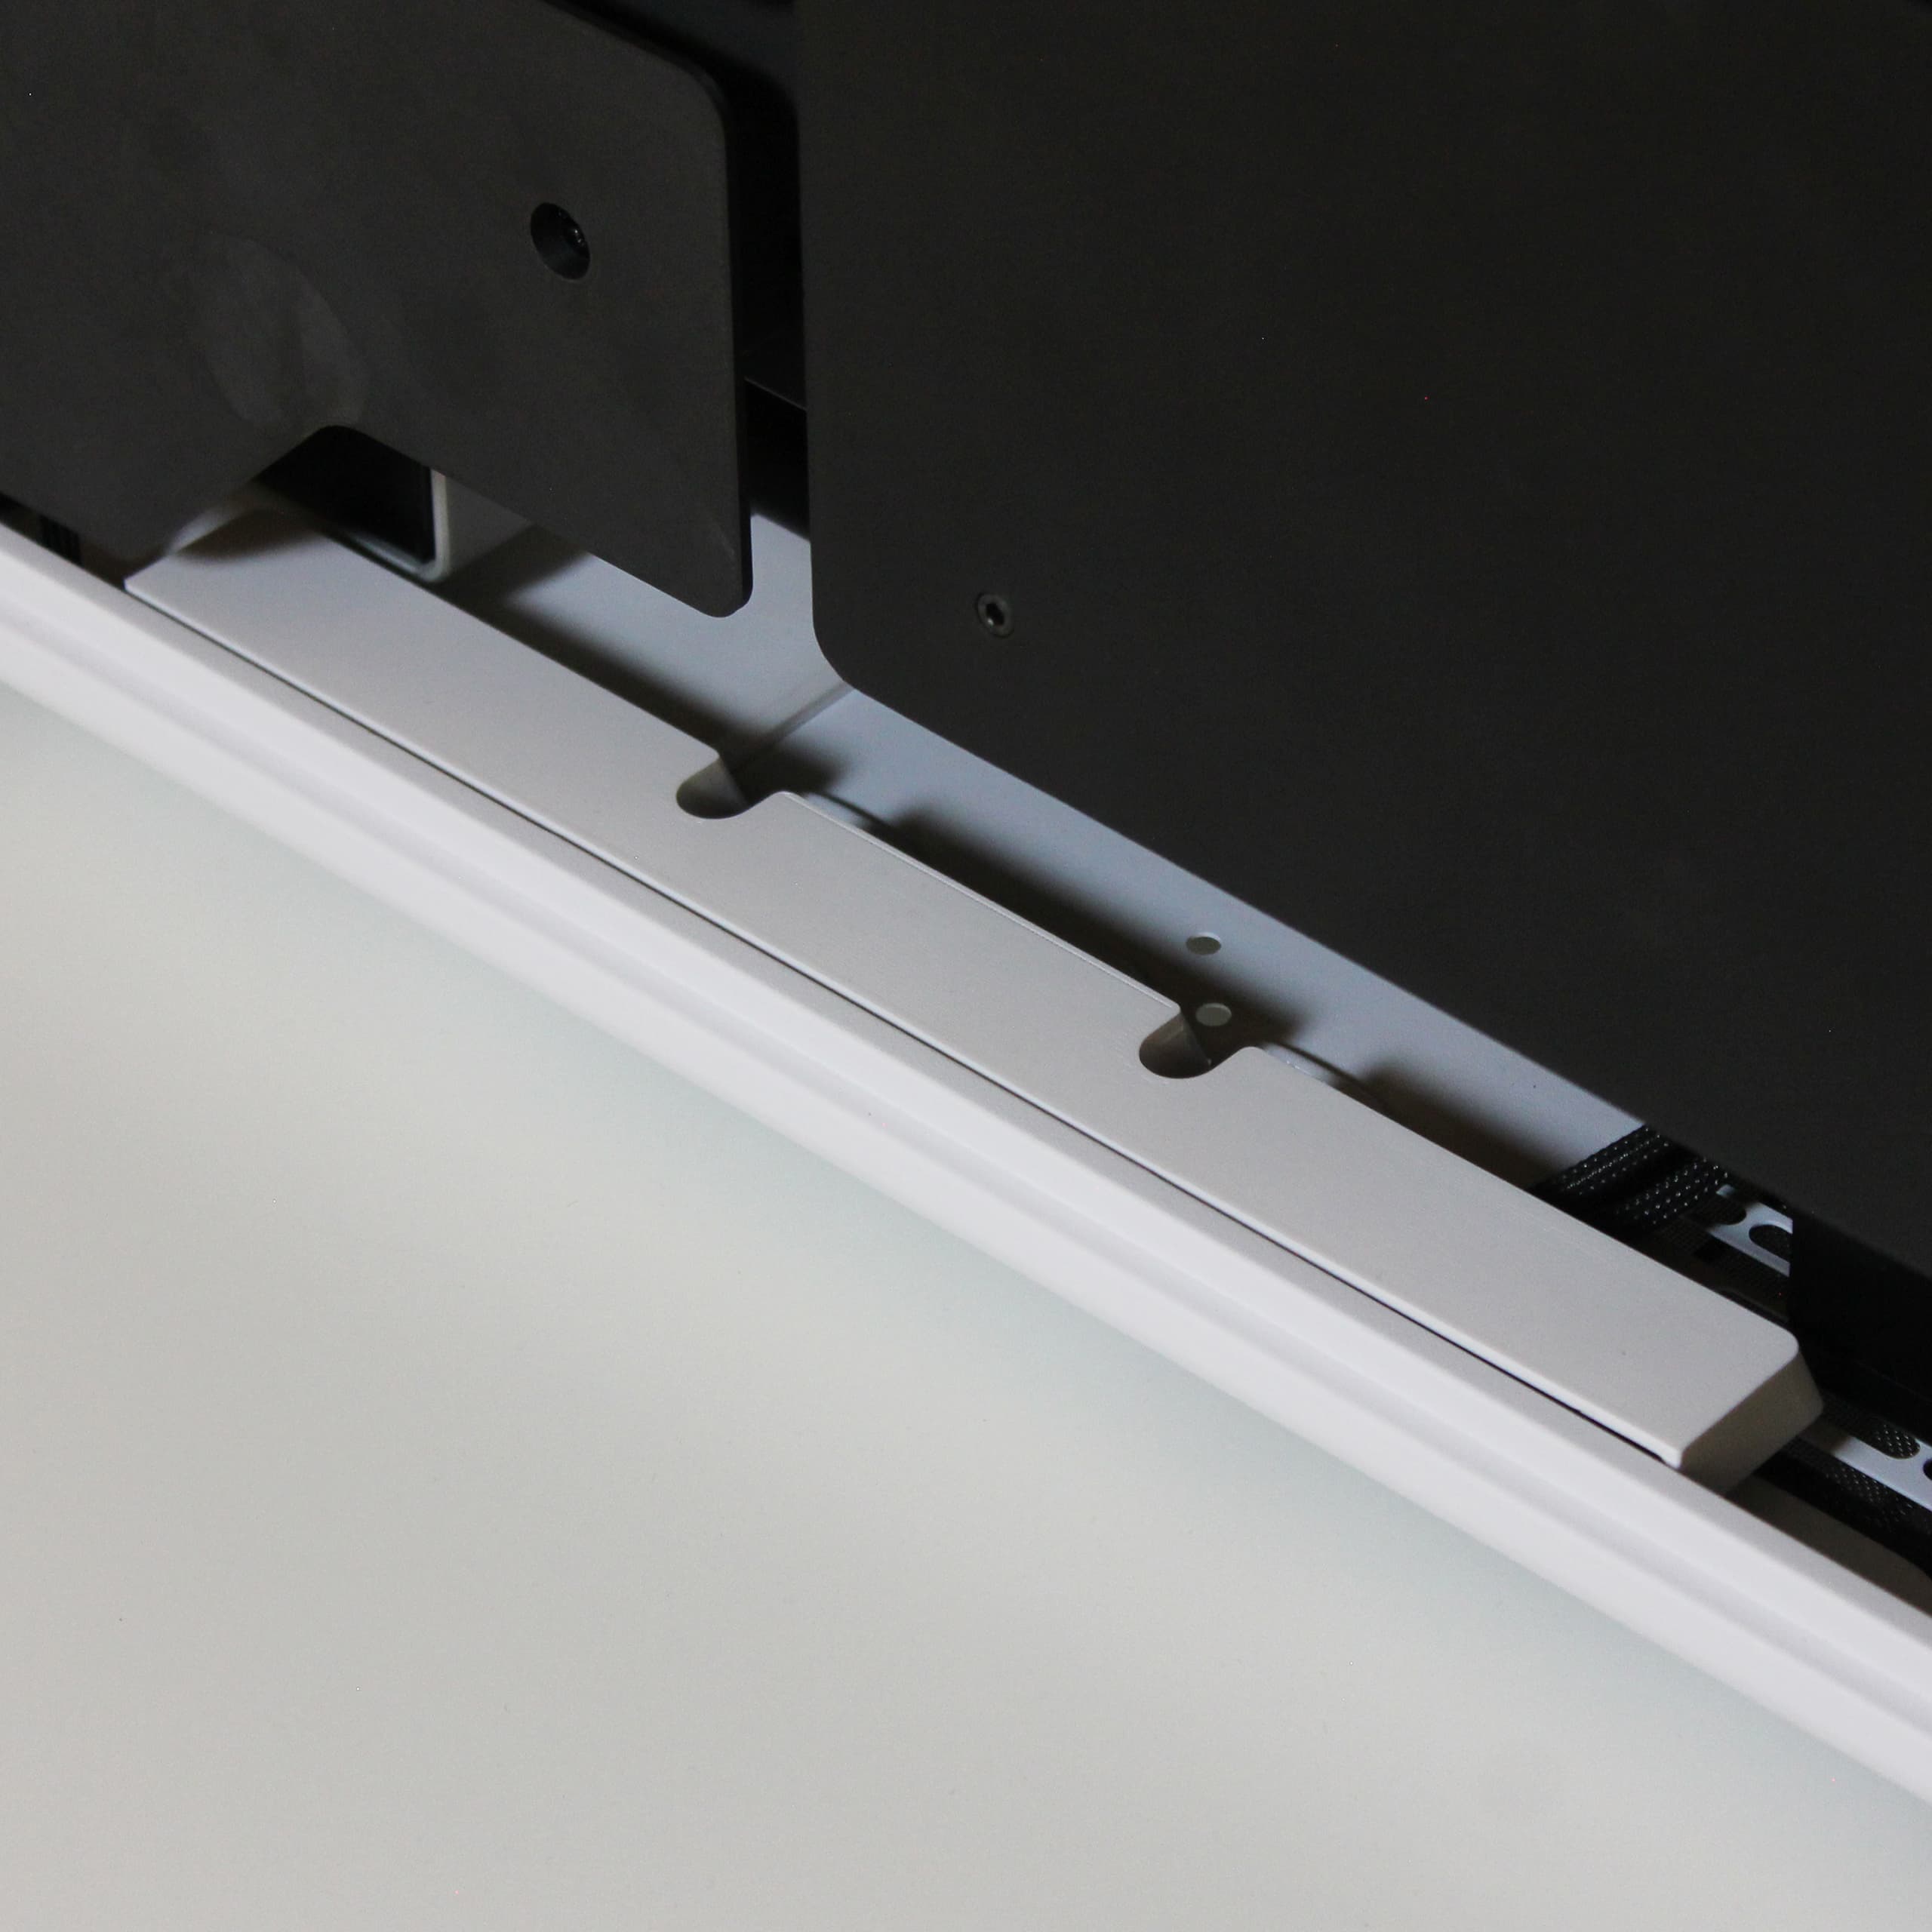
It's worth mentioning that the North has some extra space behind the front I/O cover which is perfect for tucking in excess cable length from the front USB and power button/LED cables.
On the right-hand side of the rear chamber sits two large attachments. These are two-piece designs that feature channels used to route the larger individually-sleeved cables. Their bottom piece is attached to the chassis with magnets and/or screws, while their top is fastened with M3 screws, clamping the cables in place. The piece closest to the power supply has a pass-through for the GPU cable and also features a 90-degree turn at the bottom, redirecting the cables towards the power supply. Thanks to the overhang, the cables are barely visible at the bottom.
The upper attachment leaves an open space surrounding the rear-mounted M.2 SSD to allow for some heat to escape. Currently, these are printed in PLA, which is generally not suitable for high-temperature environments. I'll have to observe if the heat causes any warping/deflection in the plastic when booting up the system. If so, I'll print them in PETG as it has a glass transition temperature of 85° C, which is 20 degrees higher than PLA.
The same goes for the area surrounding the CPU. I'll most likely add a cutout to let the heat escape, and the part might have to be printed in PETG to prevent warping.
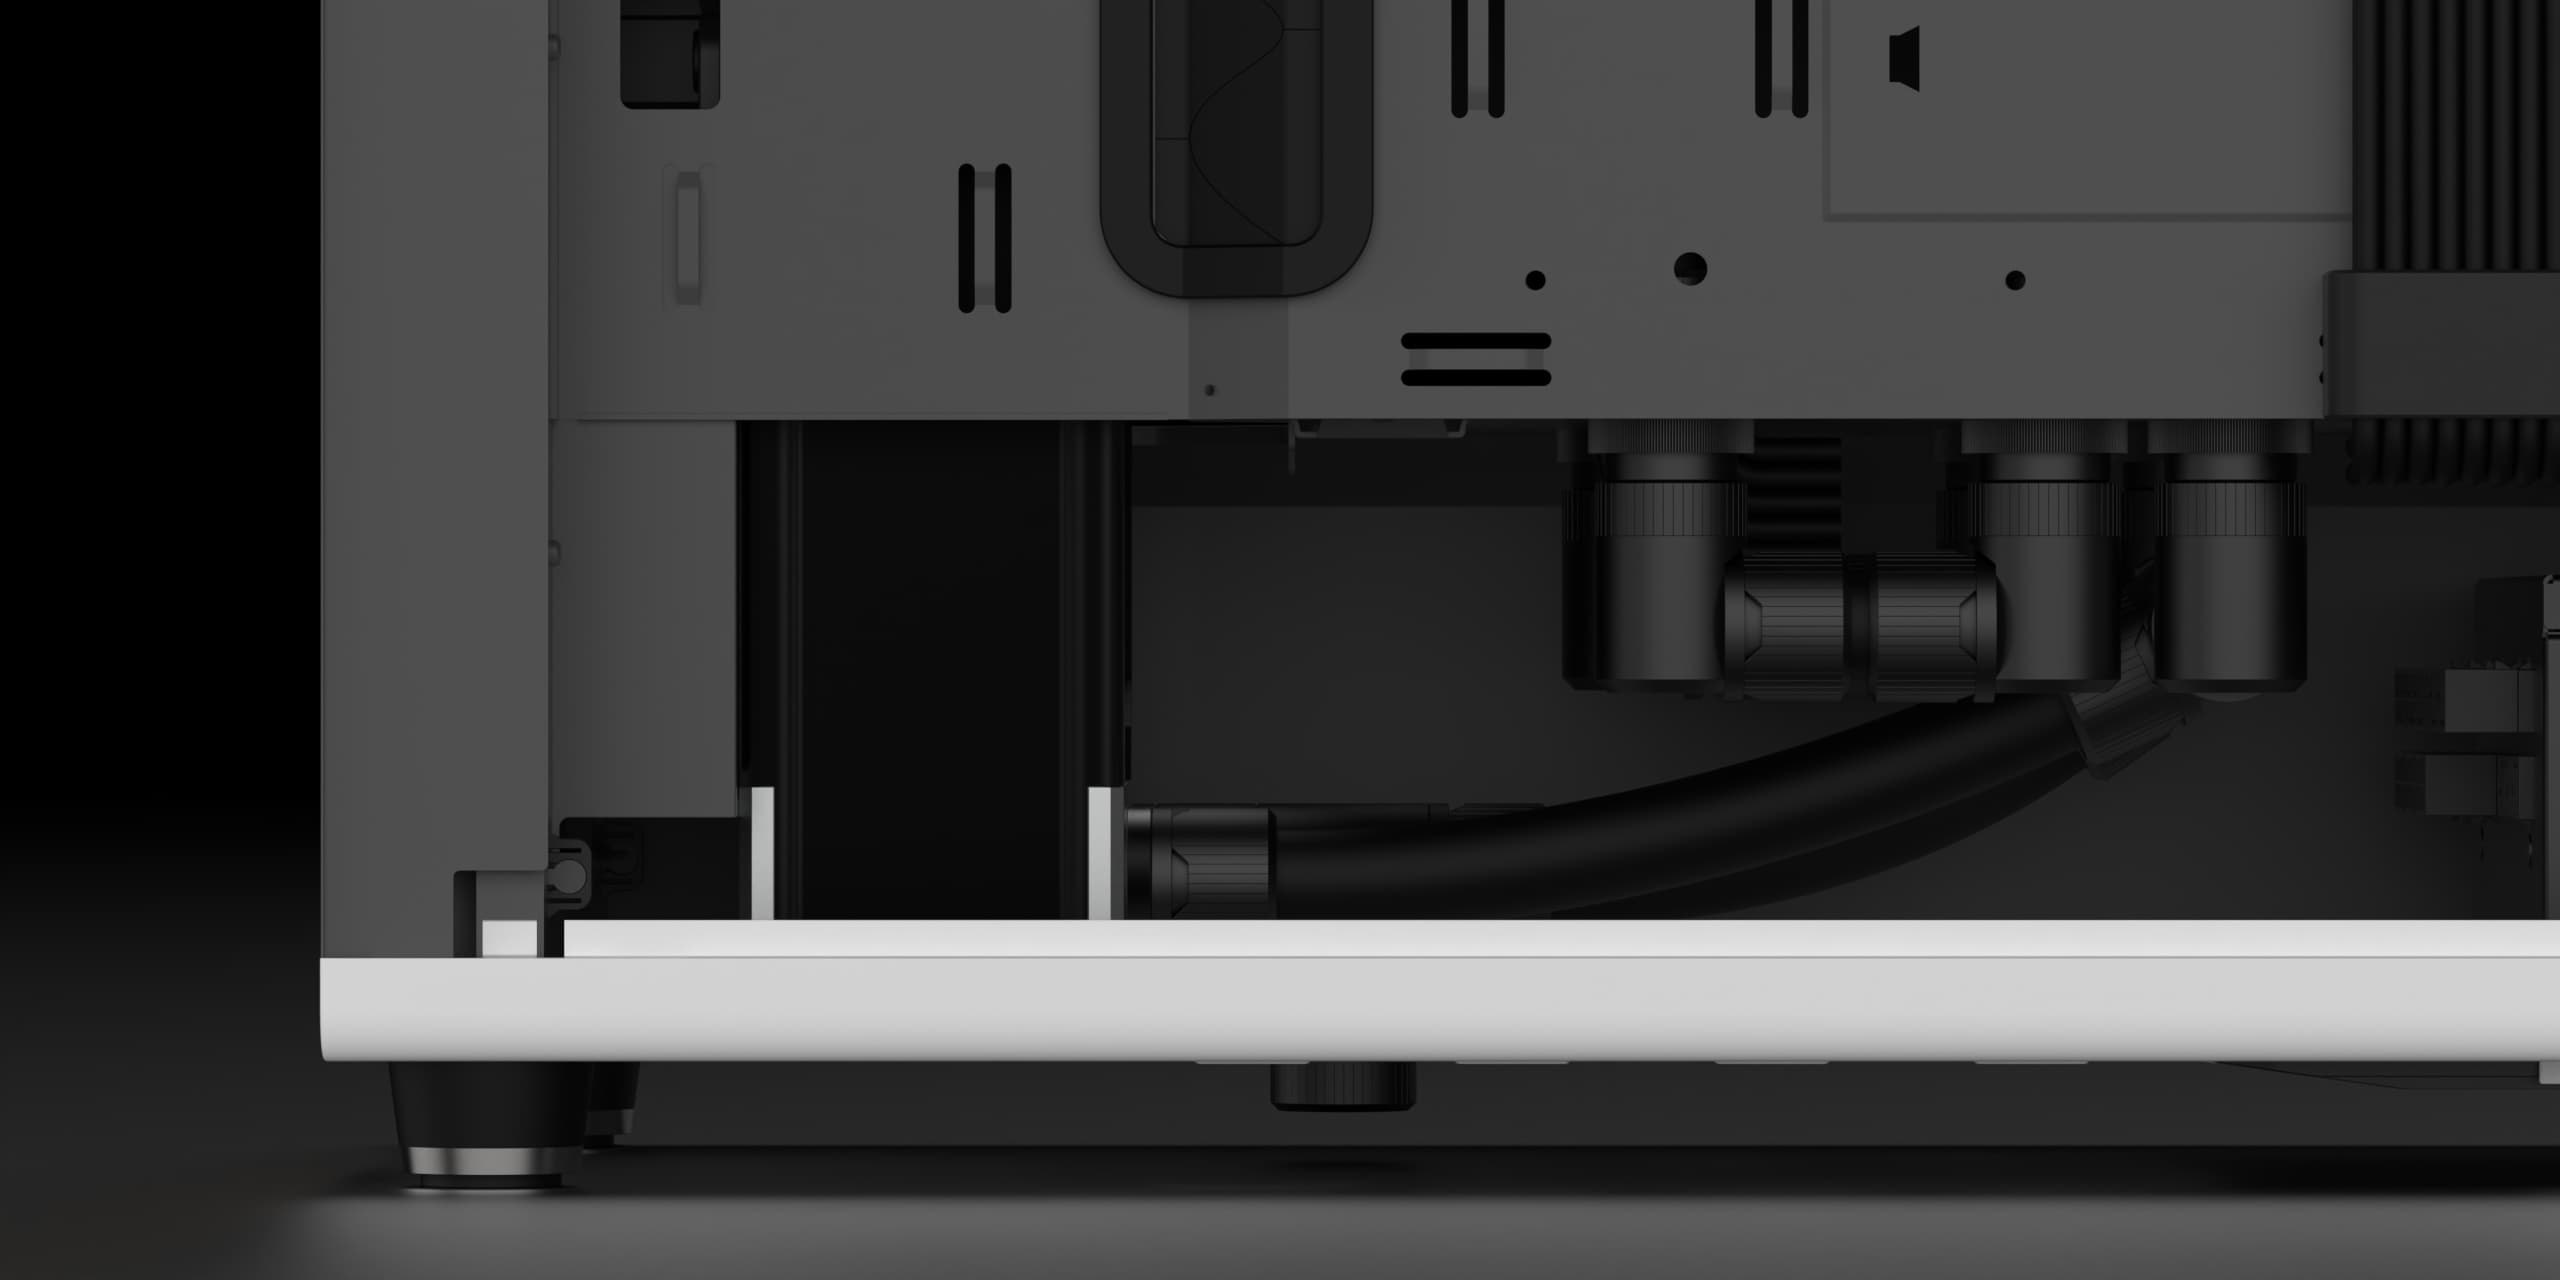
Another piece I've designed is this cover that runs along the bottom edge. This covers the 6-pin to 2x daisy-chained SATA PWR cable that connects to the pump and Corsair hub. Having no 3.5" storage drives leaves the screw holes free to use which is perfect for this cover. While I always opt for a magnetically fit cover first-hand, the strain of the cables underneath was simply exerting too much force onto the plastic preventing it from staying in place.
This piece has a big impact on tidying up the rear chamber since I'm using a pretty big and ugly adapter for the pump MOLEX cable.
To clean up the front I also printed two covers that run along the intake fans. These are magnetically attached and do a great job of hiding any excess cable tucked in this area. I did have to split the design into two pieces (not visible in the image) since it covers the full length of all three fans. My Bambulab A1 printed has a 2563 mm print volume, which does make the diagonal roughly 360 mm. However, accounting for the width of the cover, the printable component length is restricted to ~350 mm unfortunately.
Hopefully this post wasn't as boring as it might've seemed. I've been spending a lot of time crafting custom sleeved cables as well as cutting and installing the tubing so the next post will be jam-packed with exciting content. Not to mention the investment cost of tools and all the different sleeving supplies needed for various cables.
Take care!
What's Next?
005: Cable Sleeving & Tubing
May 9, 2025I've been knees deep in learning to craft cables for the last two weeks, and I've gotta say... Cable sleeving is by far the toughest, most patience-demanding and tedious task I've ever done. This is not something for the light-hearted, and if you've never done it before, be prepared to spend hours on trial and error just learning the intricate techniques to get good results!
To avoid having a mental breakdown crafting cables I've also been cutting the tubing to size and fitted all the tubing runs. Working with the ZMT 10/16 tubing from EK has been a pleasant experience overall and I'm very pleased with how it turned out.
Let's take a peek at some shots of the finished cables and tubing loop!
01
/
While the final result is extraordinarily looking cables, I'm not sure if I want to spend this much time on future builds. Buying custom-sleeved cables from professional artisans such as Ensourced or Mainframe Customs (not to mention Cablemod) will net you the same result or even better, and taking the tool costs into account, you'll probably end up saving some cash.
However, doing it yourself does come with a few perks that you can't buy. You'll be able to get pinpoint precision length on the cables and sleeve components with existing cables in your system such as the fans and front I/O, but I think the biggest plus is that you'll get a better understanding of how things work electrically in your PC.
You'll find a detailed breakdown of the sleeving and the cost it bears below. Let's take a closer look at how everything turned out though!
Sleeving Supplies & Crafted Cables


01
/ 00Sleeving
12VHPWR
24-pin ATX
8-pin CPU/EPS
Tube Preparation
CPU Tubing
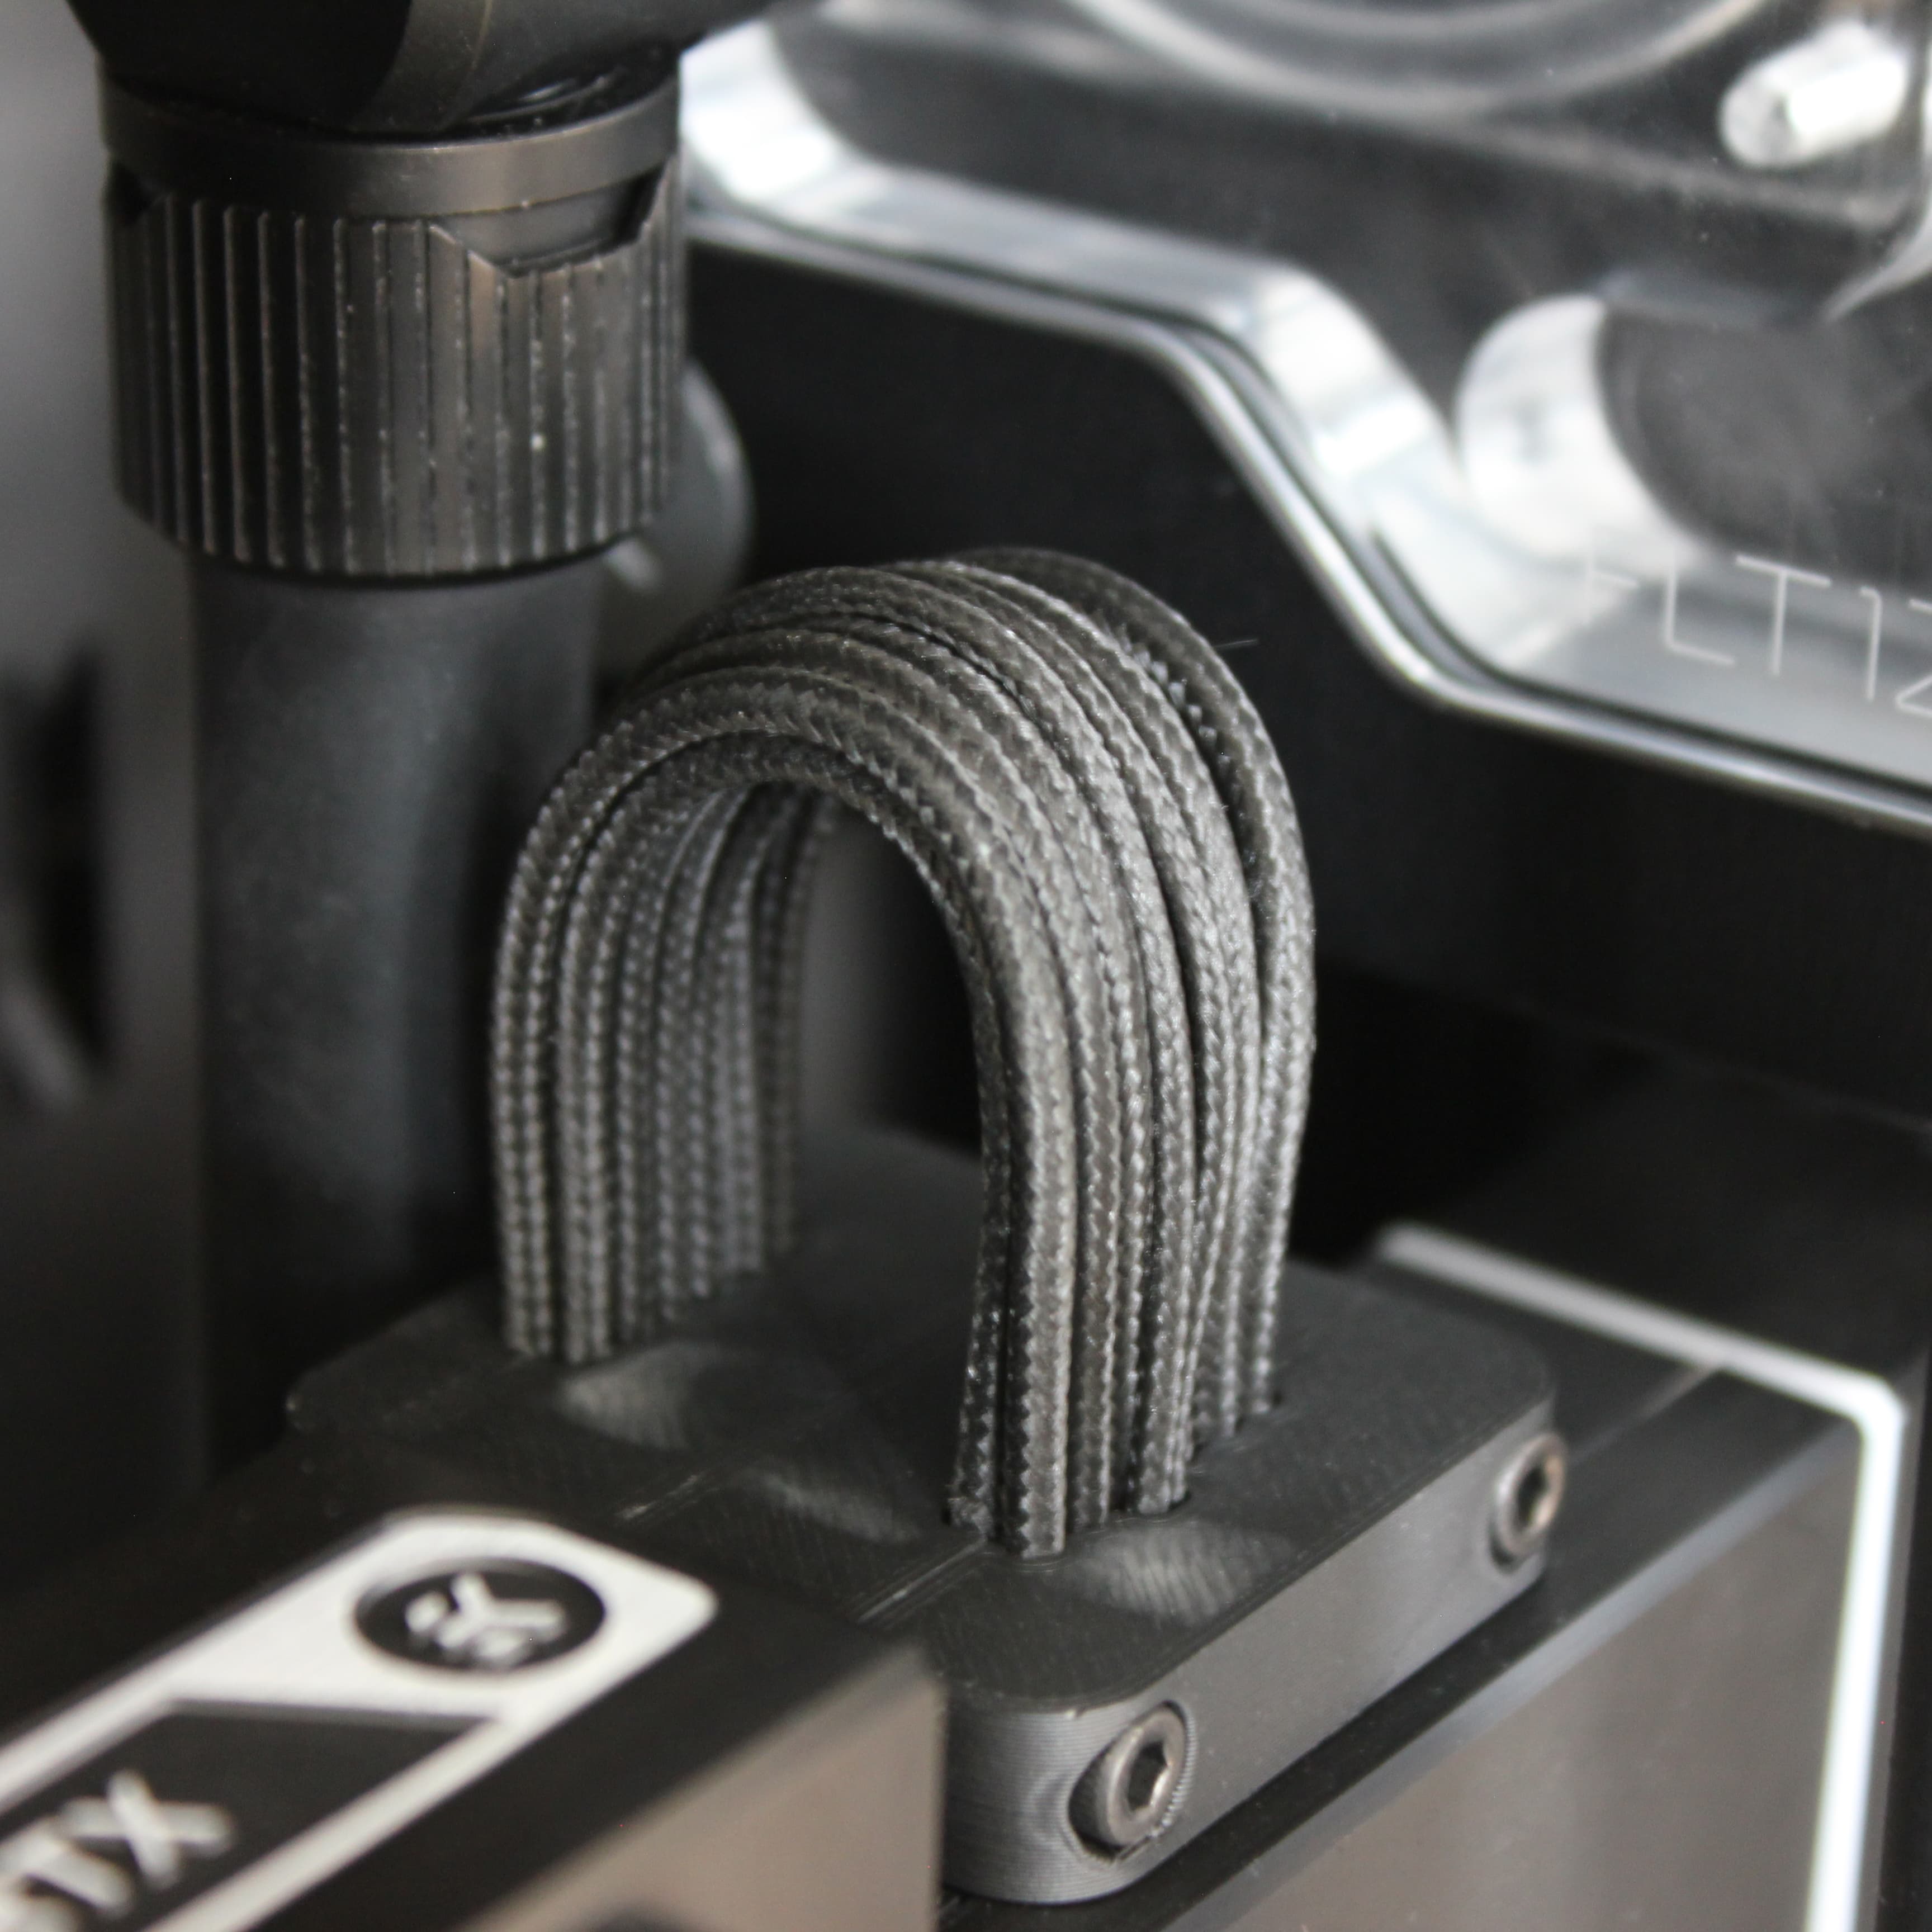
I've chosen not to sleeve every cable in this build for good reason. This is my first experience sleeving cables, so naturally, this activity has been quite time-consuming. Looking back, I regret spending time on sleeving cables for the fans, RGB, and pump since they're barely visible. Plus, the sleeving adds unnecessary thickness and rigidity which only makes the routing more difficult. They were a good learning exercise before crafting the larger cables though.
I'm using the PET sleeving from MDPC-X in a colour called Shade-19 for all cables in this build. This sleeve has a very dark grey tone which I think complements the inner panels of the North very well. I was considering the pitch black sleeve at first but looking at the sample pack I ordered It felt nice to have a slight contrast to the surrounding components. I used 15 AWG wire for the 24-pin and 8-pin cables which is fairly thick and tough to bend. If I were to do this again, I'd opt for a thinner wire such as 17 or 18 AWG for improved flexibility.
After three failed attempts on this, I decided to purchase a pre-built cable from Corsair. For some reason the terminal pins kept failing to lock in place inside the connector. It seems like the "wings" that are supposed to latch on to the tabs inside the plastic housing deform rather than flex. I'm not sure why this is happening, but I'm also not entirely surprised.
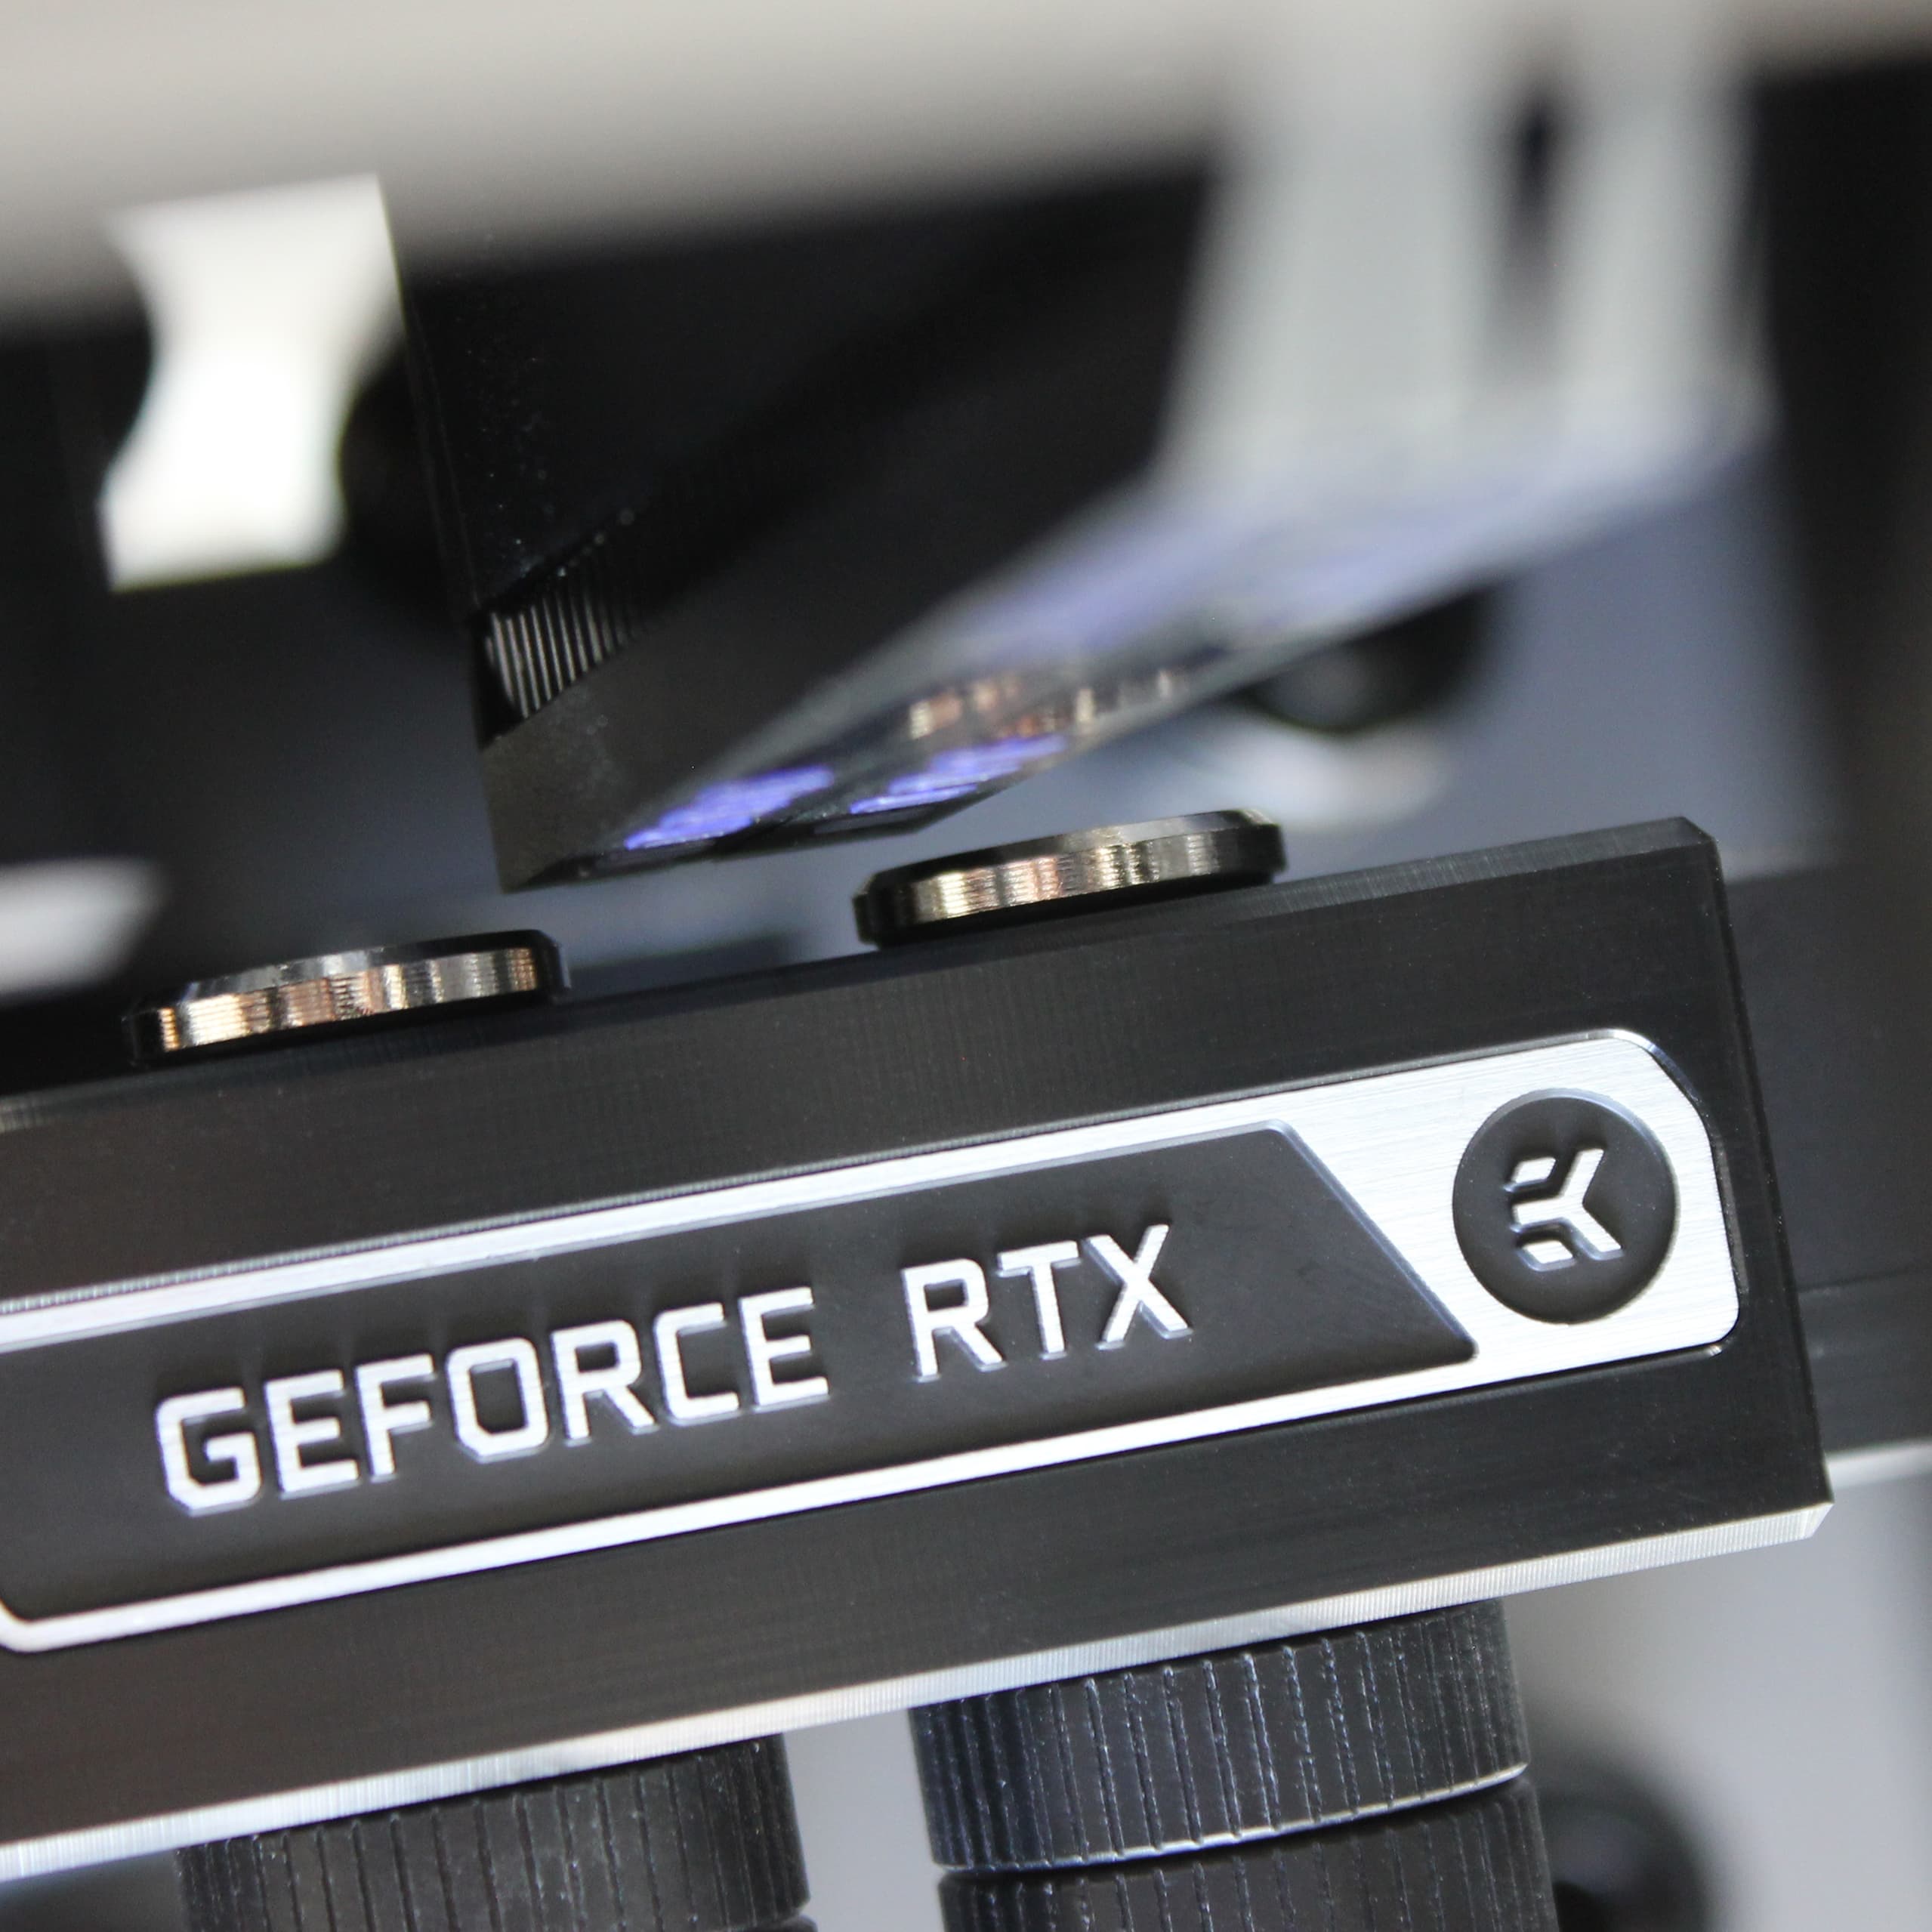
The sleeving doesn't match the other cables, but at this point I just want to get it done. Besides, I do feel more comfortable with a pre-built cable as I don't have to worry about liability if anything goes wrong. I've also designed a comb clamp that routes the cable behind the graphics card. The bend is tight but the comb is also press-fit into the GPU block to keep the connector safely seated.
I understand the need for a different connector here, given the inflated power draw of the 4090 and 5090 GPUs. Having four 8-pin PCIe connectors to supply 600W is not exactly a compact design, and I can imagine that it interferes with the smaller PCBs on the founders edition cards. Regardless, they could have sized it up a bit to improve assembly and maintain adequate safety factors...
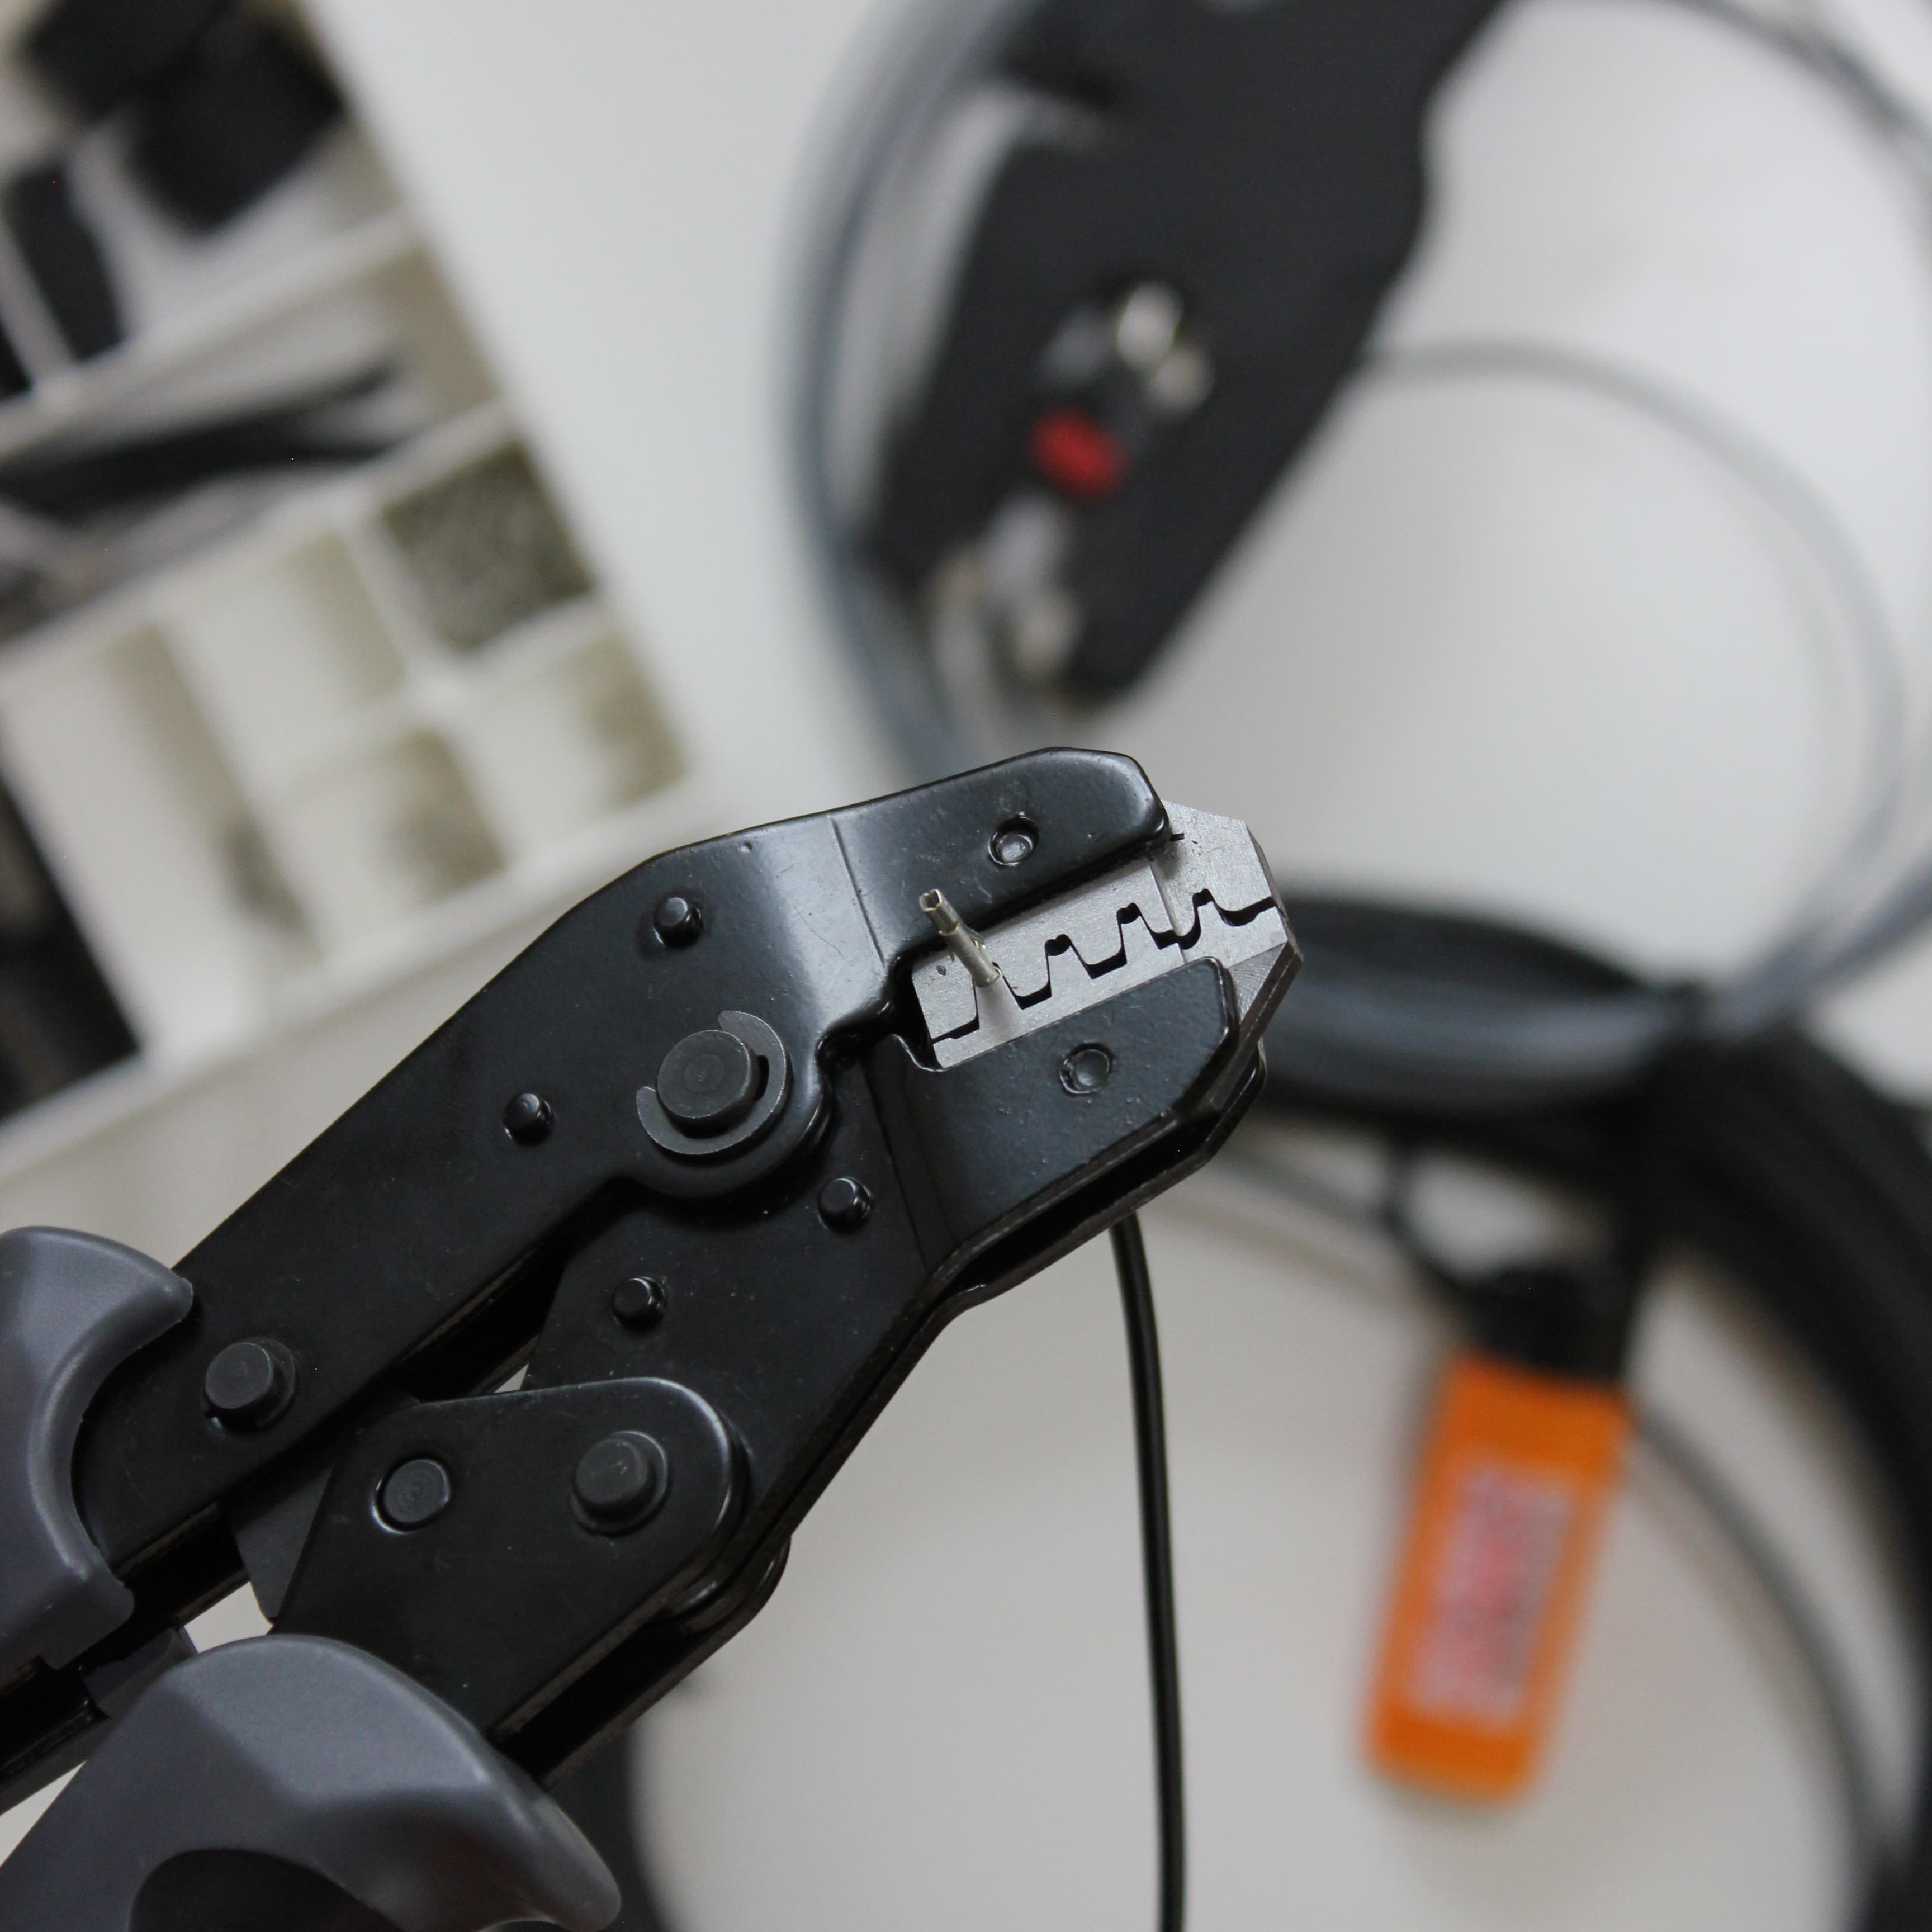
27 wires, 51 terminals, a pile of heatshrink, and tons of sleeving later...the 24-pin ATX cable. Calling this time-consuming would be the understatement of the year. Thankfully, the result is incredible! Just like the 12VHPWR, I've designed a cable guide that allow me to bend the cable quite aggressively to have clearance to the reservoir fittings.
One thing I noticed a bit too late was that some terminals are supposed to be double crimped according to Corsairs type 4 pinout specification. For these I had to use thinner 17 AWG wire, which also meant that I had to redo the sleeving. This also makes the sleeving slightly thicker which is a bit trickier to route.
The 8-pin CPU/EPS connector is located at the top left of the motherboard, and due to the use of two 140 mm fans at the top, there is very limited space to route this cable. Since I can't bend the cable upwards, I had to resort to a sideways 180-degree bend. Similarly to the other cables, I designed a plastic piece that guides the cable through the channel leading to the rear chamber. Since the bend does put some strain on the cable, the plastic piece is fastened with a screw and standoff to the nearby motherboard mounting hole to keep everything steady and aligned.
As opposed to the 12VHPWR and 24-pin cable, this one is a breeze to craft. Less wires + simple pinout = me happy.
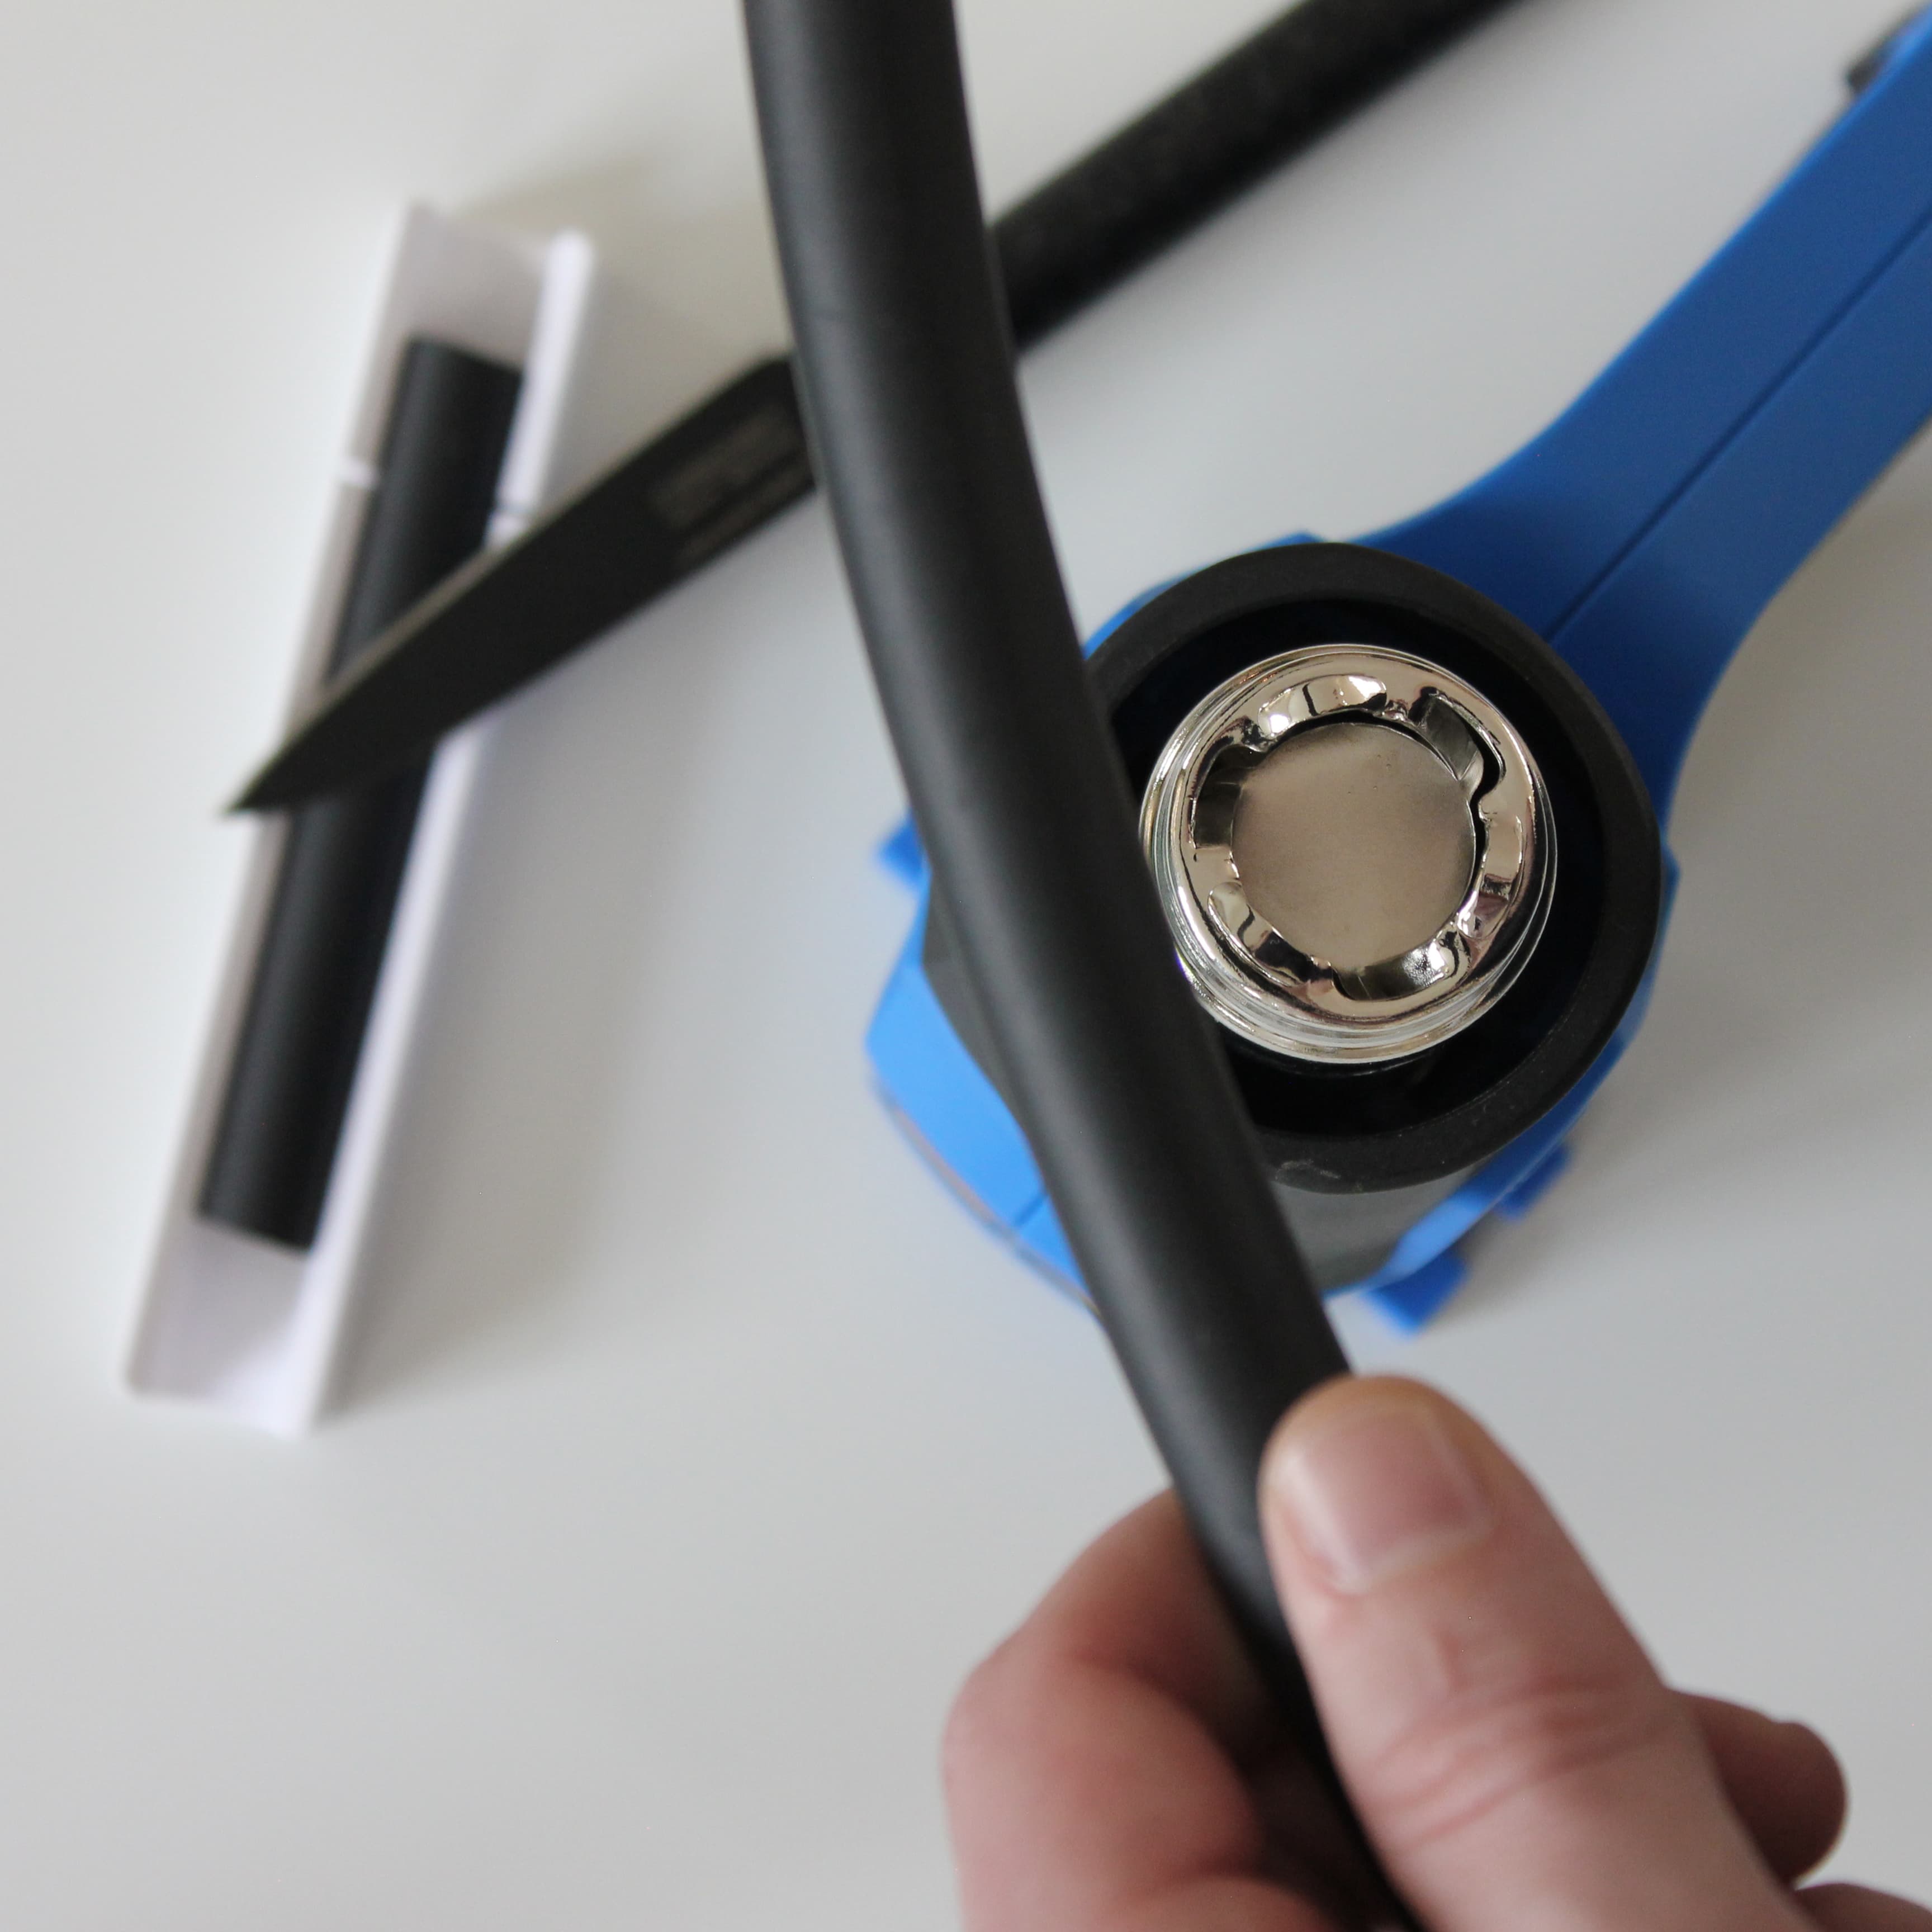
Soft tubing = straight tubing? While it might seem like an odd choice to use soft-tubing in this build, there are a few tubing runs that make good use of the soft material. However, the tubing going in and out from both the GPU and reservoir is completely straight, and I'll have you know that straightening these tubes were not as hard as it seemed!
The EK ZMT tubing (and any soft tubing really) comes packaged in a spiral shape. You could cut just cut it to length and install it right away, but the result is not the best. The tubing naturally wants to retain its original shape, putting unnecessary strain on the fittings and making them appear tilted. I found that a combination of heat, bending, and molding worked the best. I used a heatgun to soften the tubing while manually bending it. When the tubing looked completely straight, I inserted it into a 3D-printed mold to hold it in place while it cooled.
This produced almost completely straight tubing which relieved the strain from the fittings. Another thing that's important is to make sure you cut the tubing as straight as possible, otherwise the ends of the tube will come out at an angle from the compression fittings. I used a regular kitchen knife (not ideal) and cut it using a thin guiding slit in the 3D-printed mold.
The tubing in and out from the CPU are a little tricky in this build because of the vertical GPU riser cable. There's just enough room to fit them, and when they're settled in place they don't align vertically as I intended. Therefore, I designed a tube router that holds them steadily in place. This piece is fastened to the chassis using two M3 screws, and is completely hidden behind the GPU.
Apologies for the slightly unclear image. I forgot to snap a shot of this one before assembly and It's way too much work to disassemble it again. The part I'm referring to is visible as the lighter grey tones that grip both tubes.
The build is almost complete! I'll be filling the loop during the week and doing the first boot so stay updated!
/ Nik
What's Next?
006: Finale
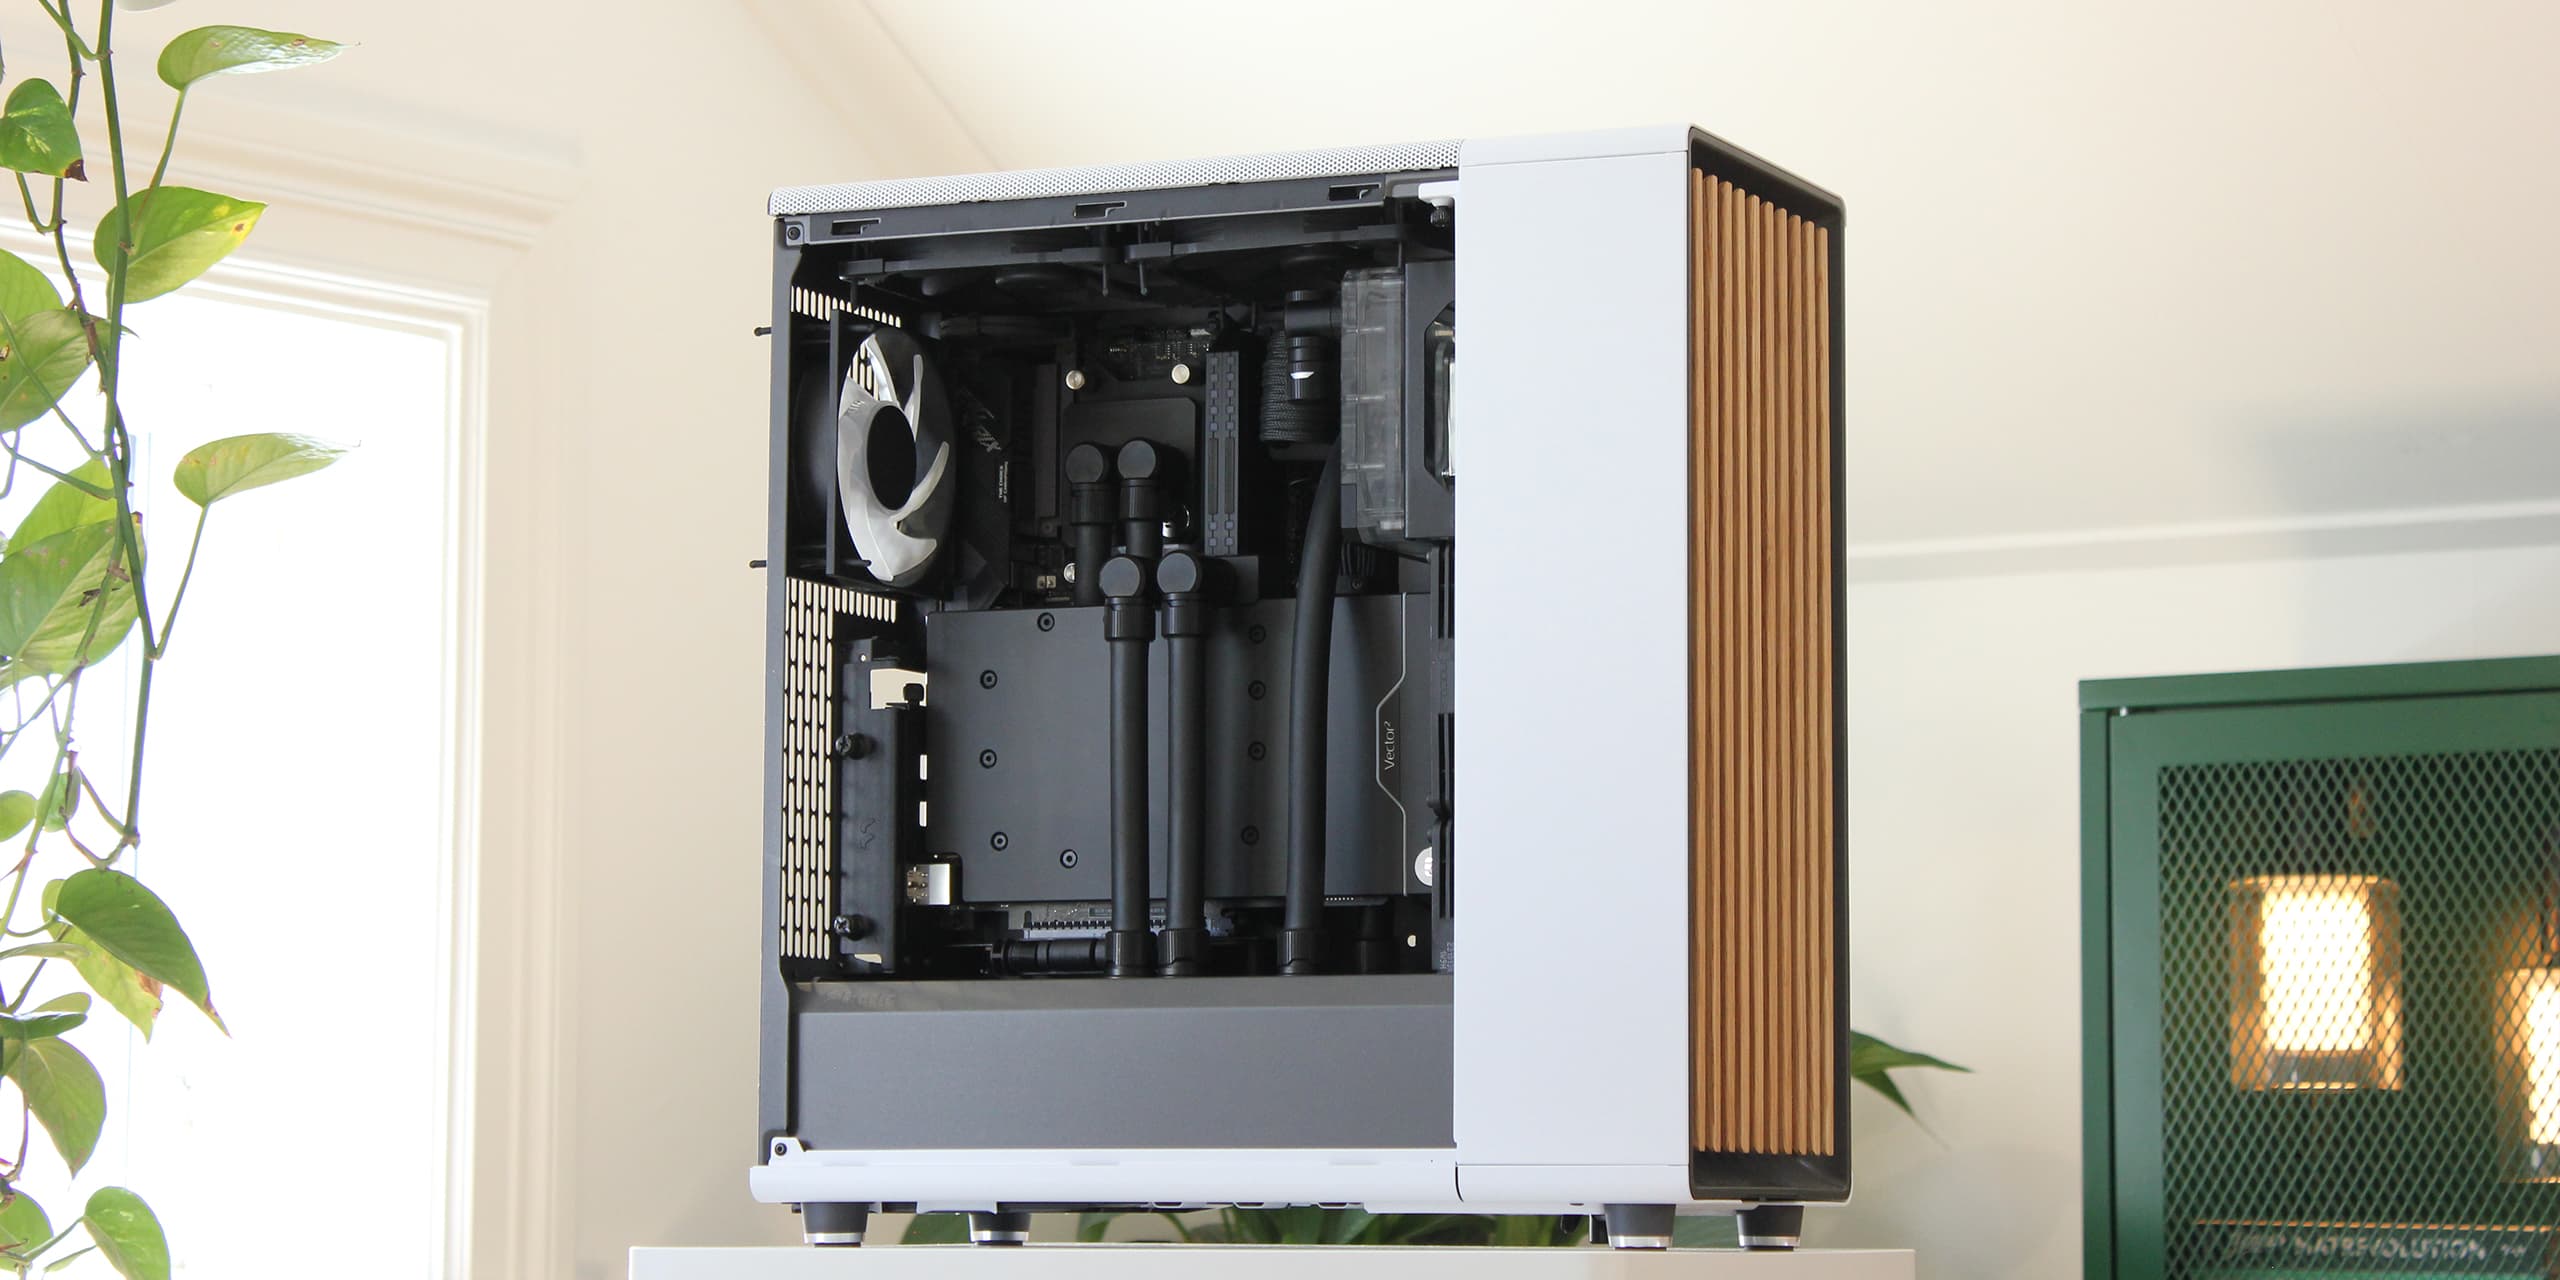
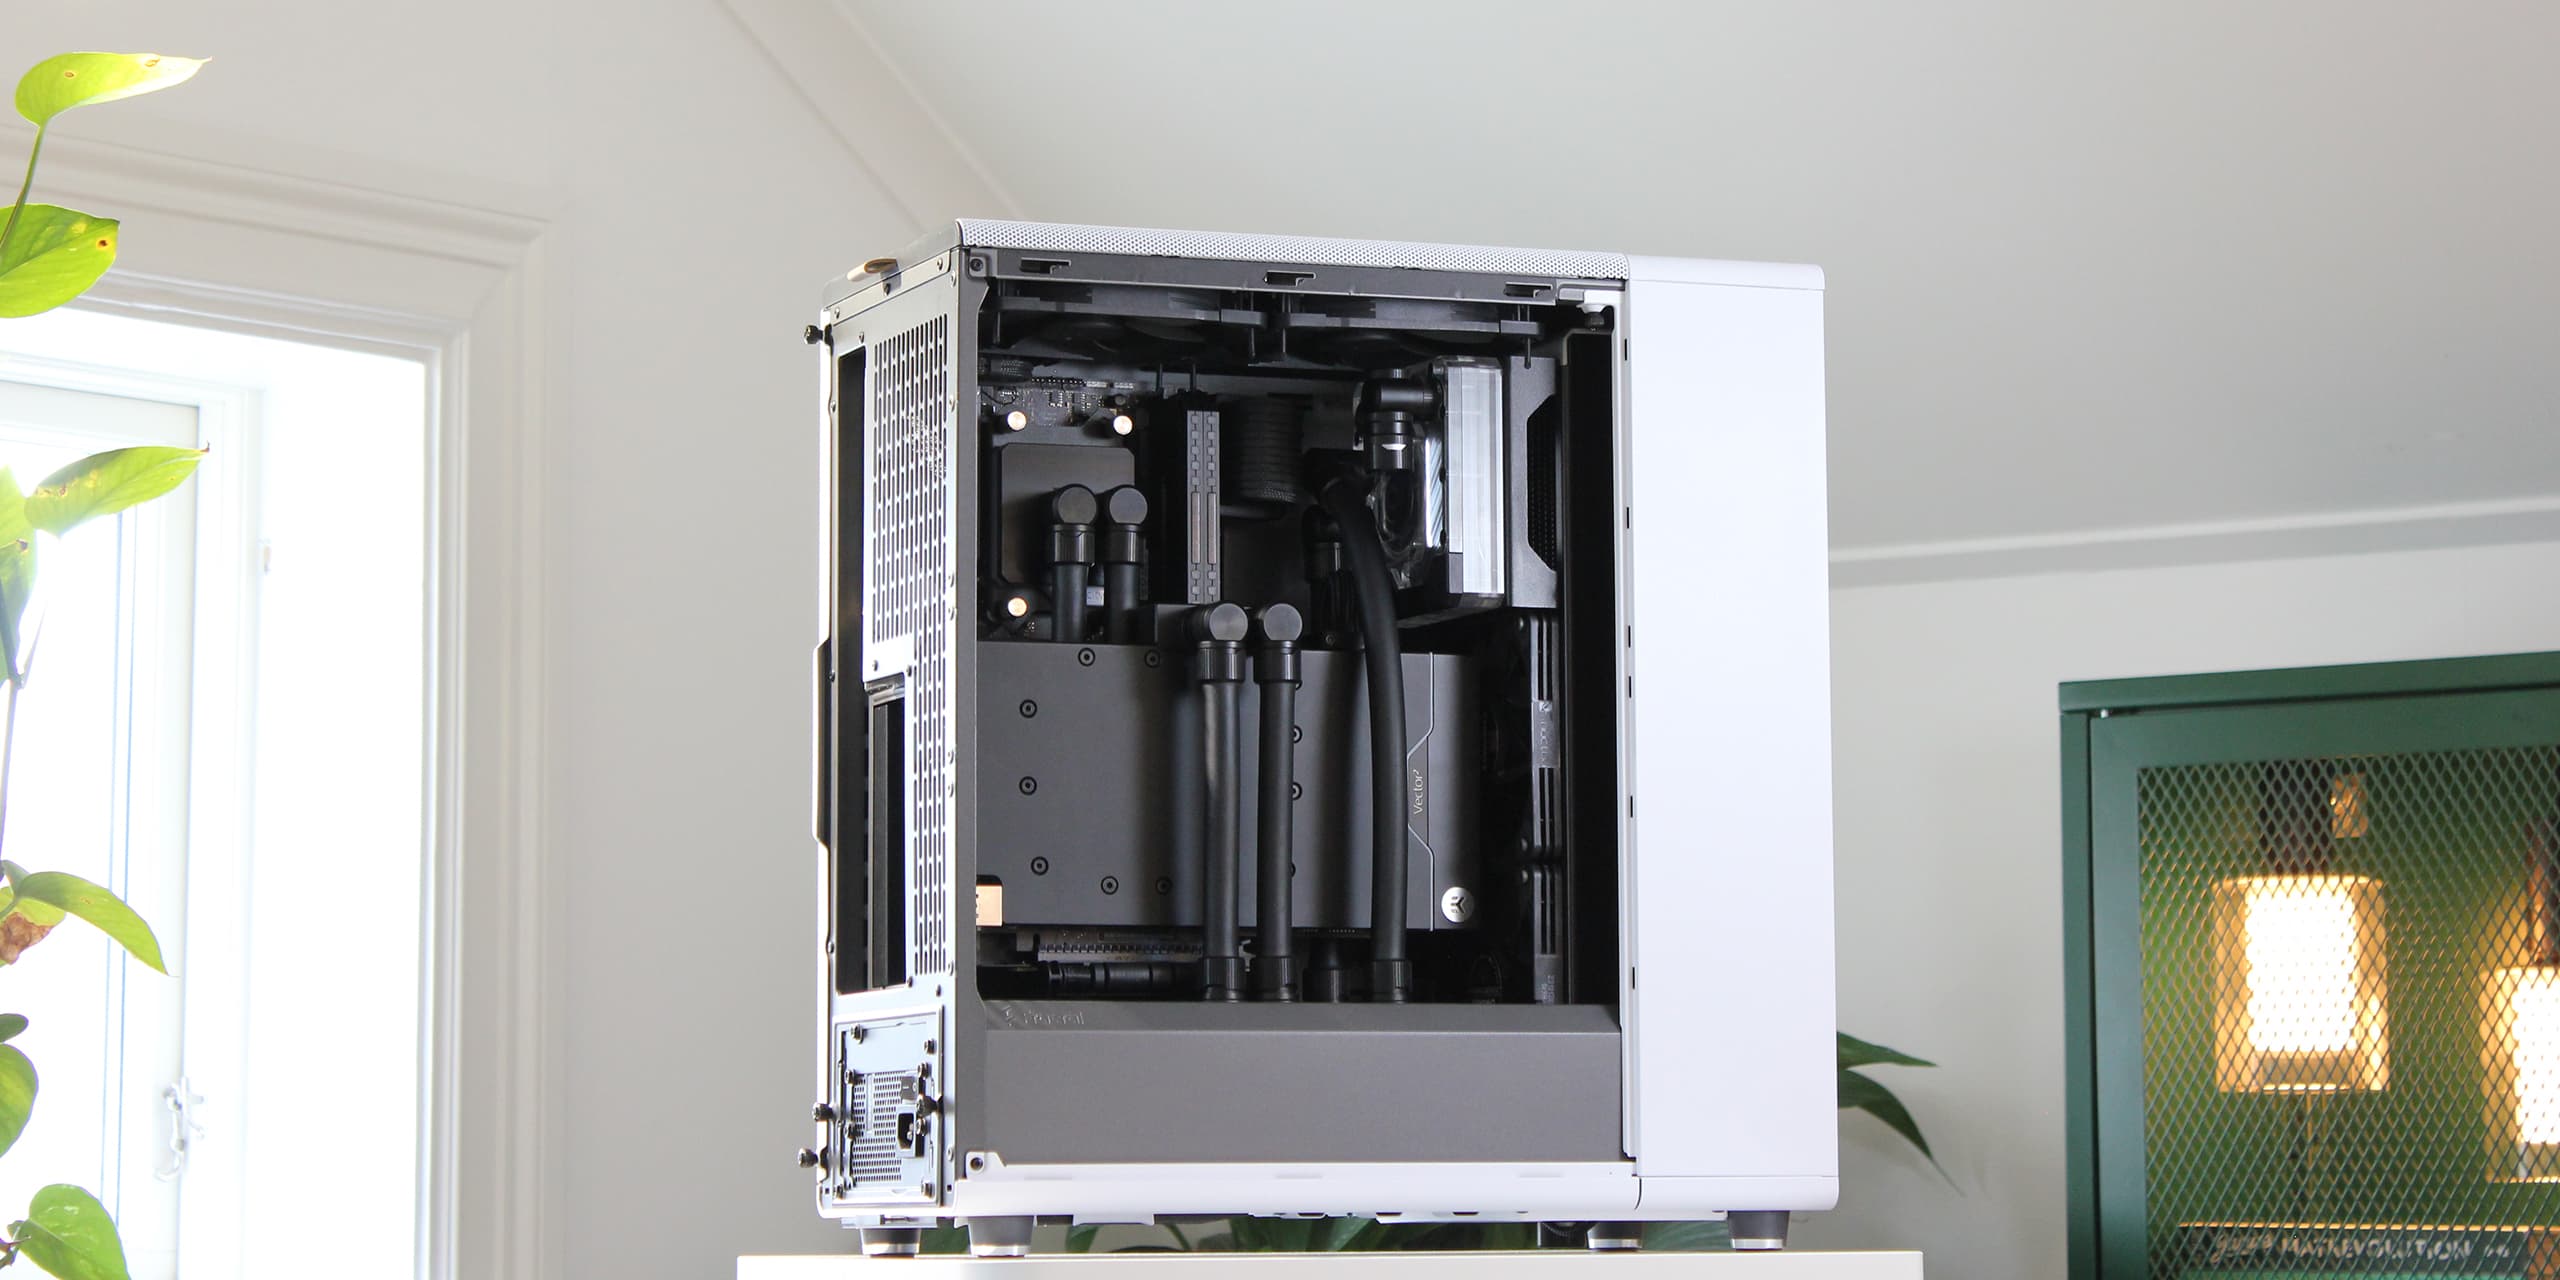
August 25, 2025After a mix of expected and unexpected hurdles, the setup is finally running smoothly—and without a single hiccup! My first experience with liquid cooling has been a rollercoaster of excitement, anxiety, frustration, and joy. If there’s one lesson I’ll take from it all, it’s this: If anything can go wrong, it will go wrong. That said, plenty of things turned out far better than I imagined. Component fitment I doubted, ended up nearly perfect, and overall performance has exceeded expectations. In hindsight, I wouldn’t hesitate for a second to recommend building a liquid-cooled system.
In many ways, the process made me feel like I was reliving my very first PC build—full of challenges, discoveries, and, above all, excitement.
01
/

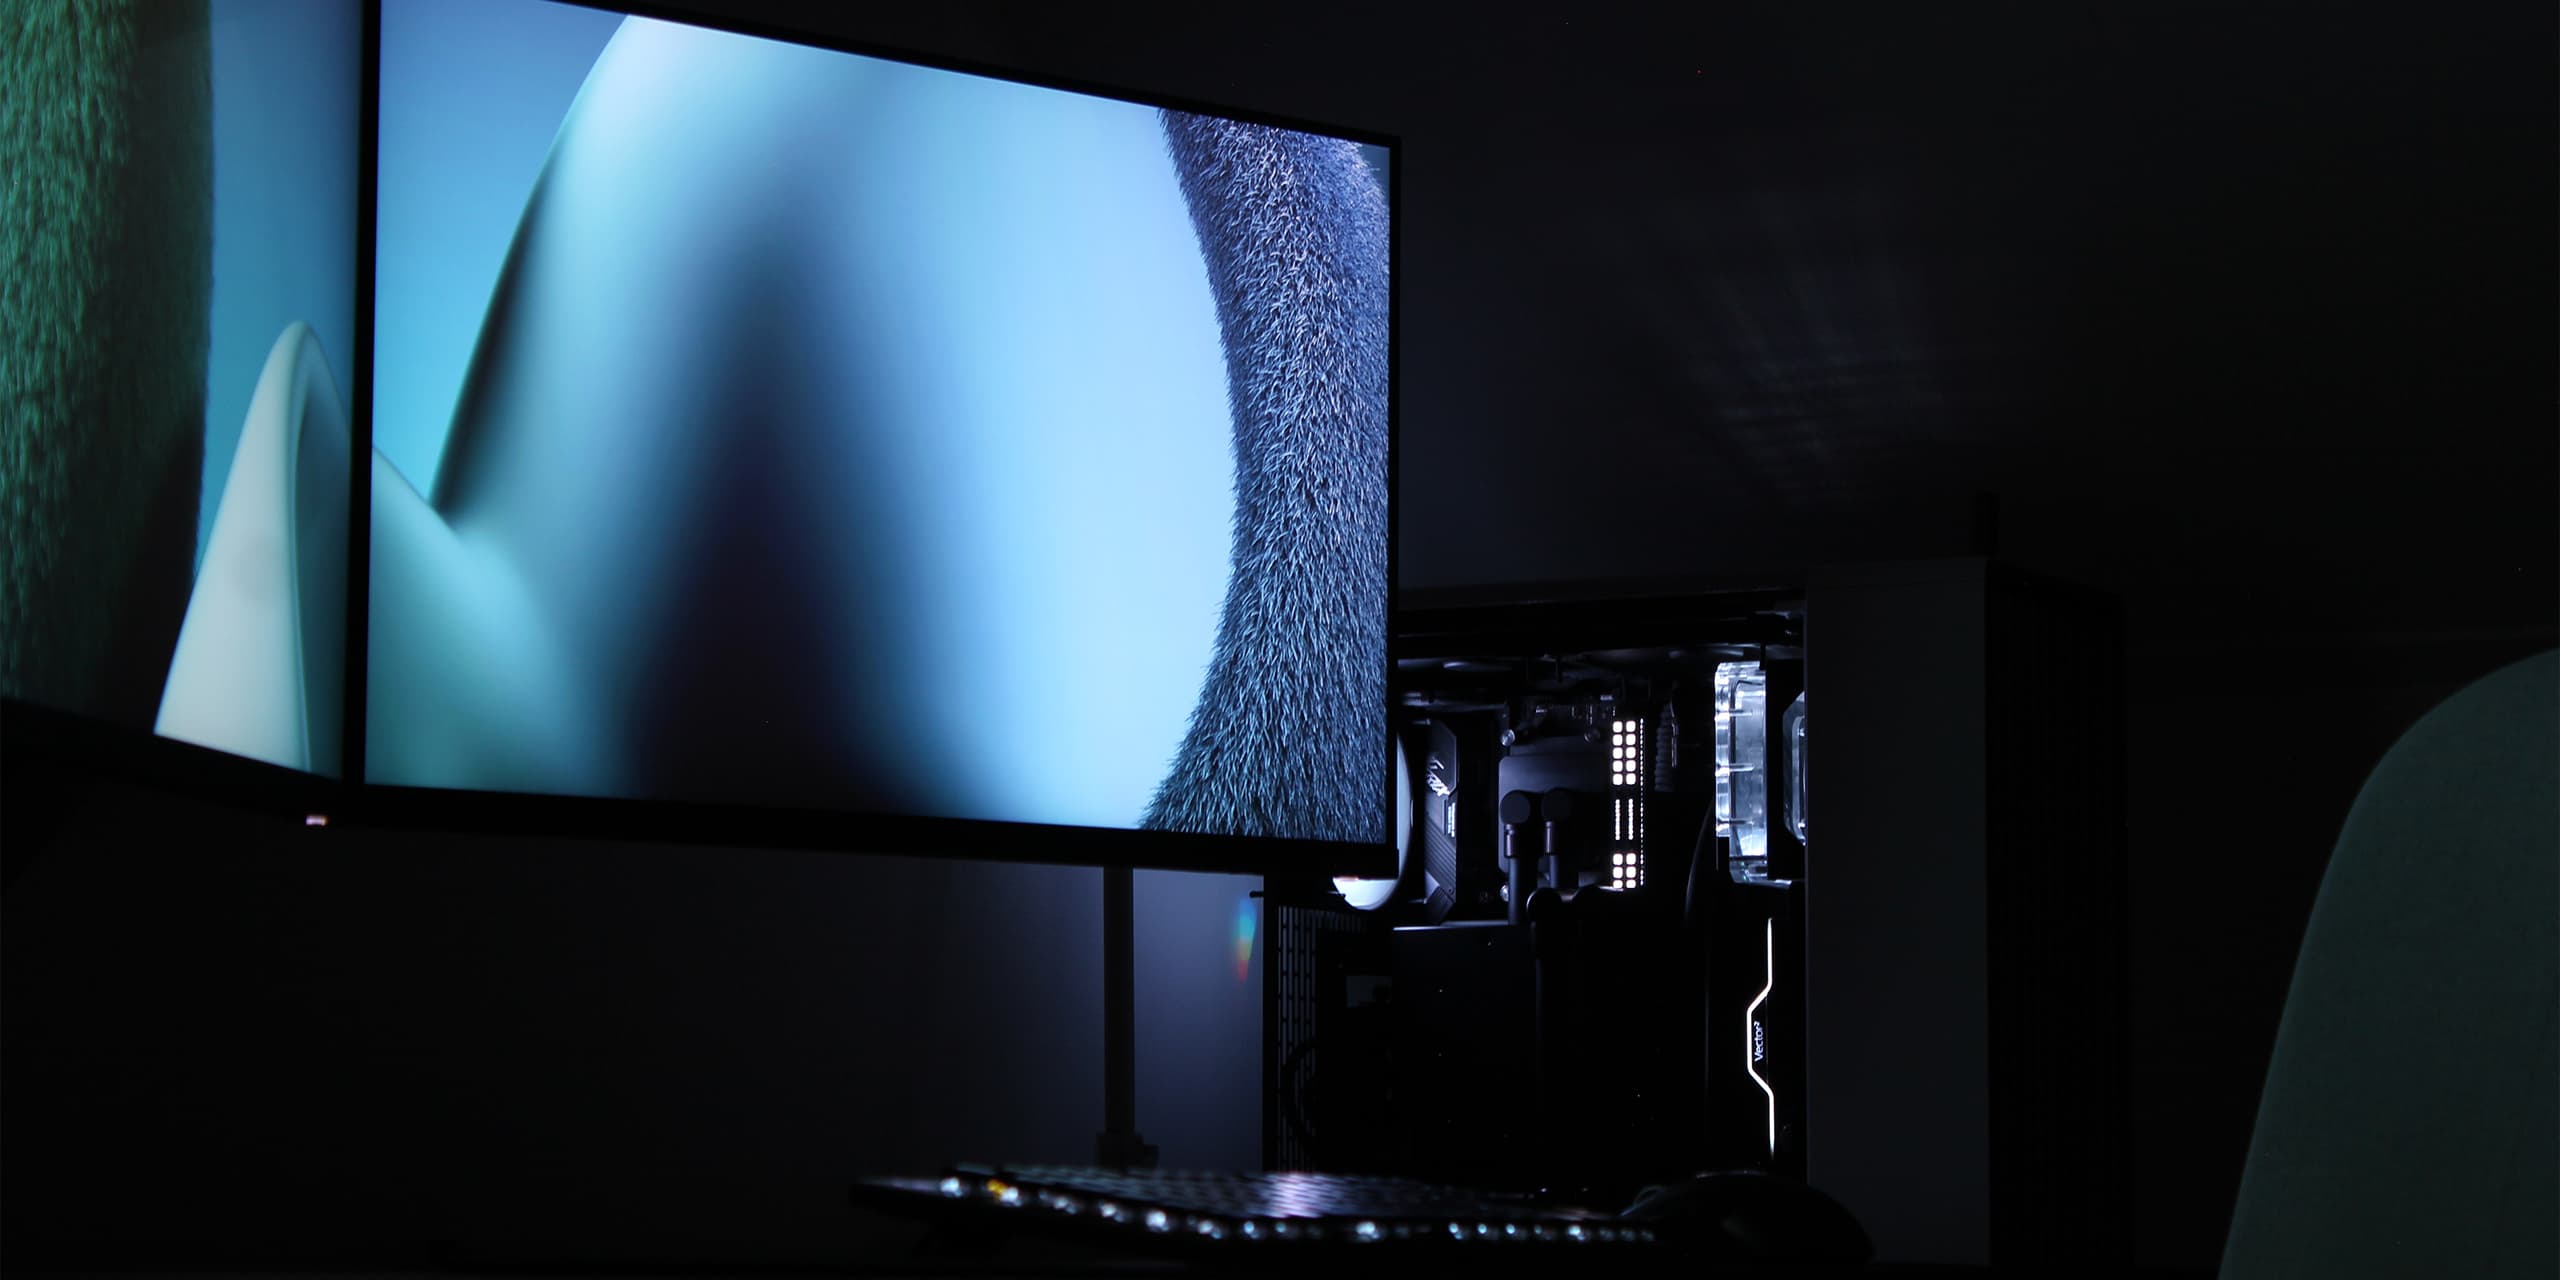
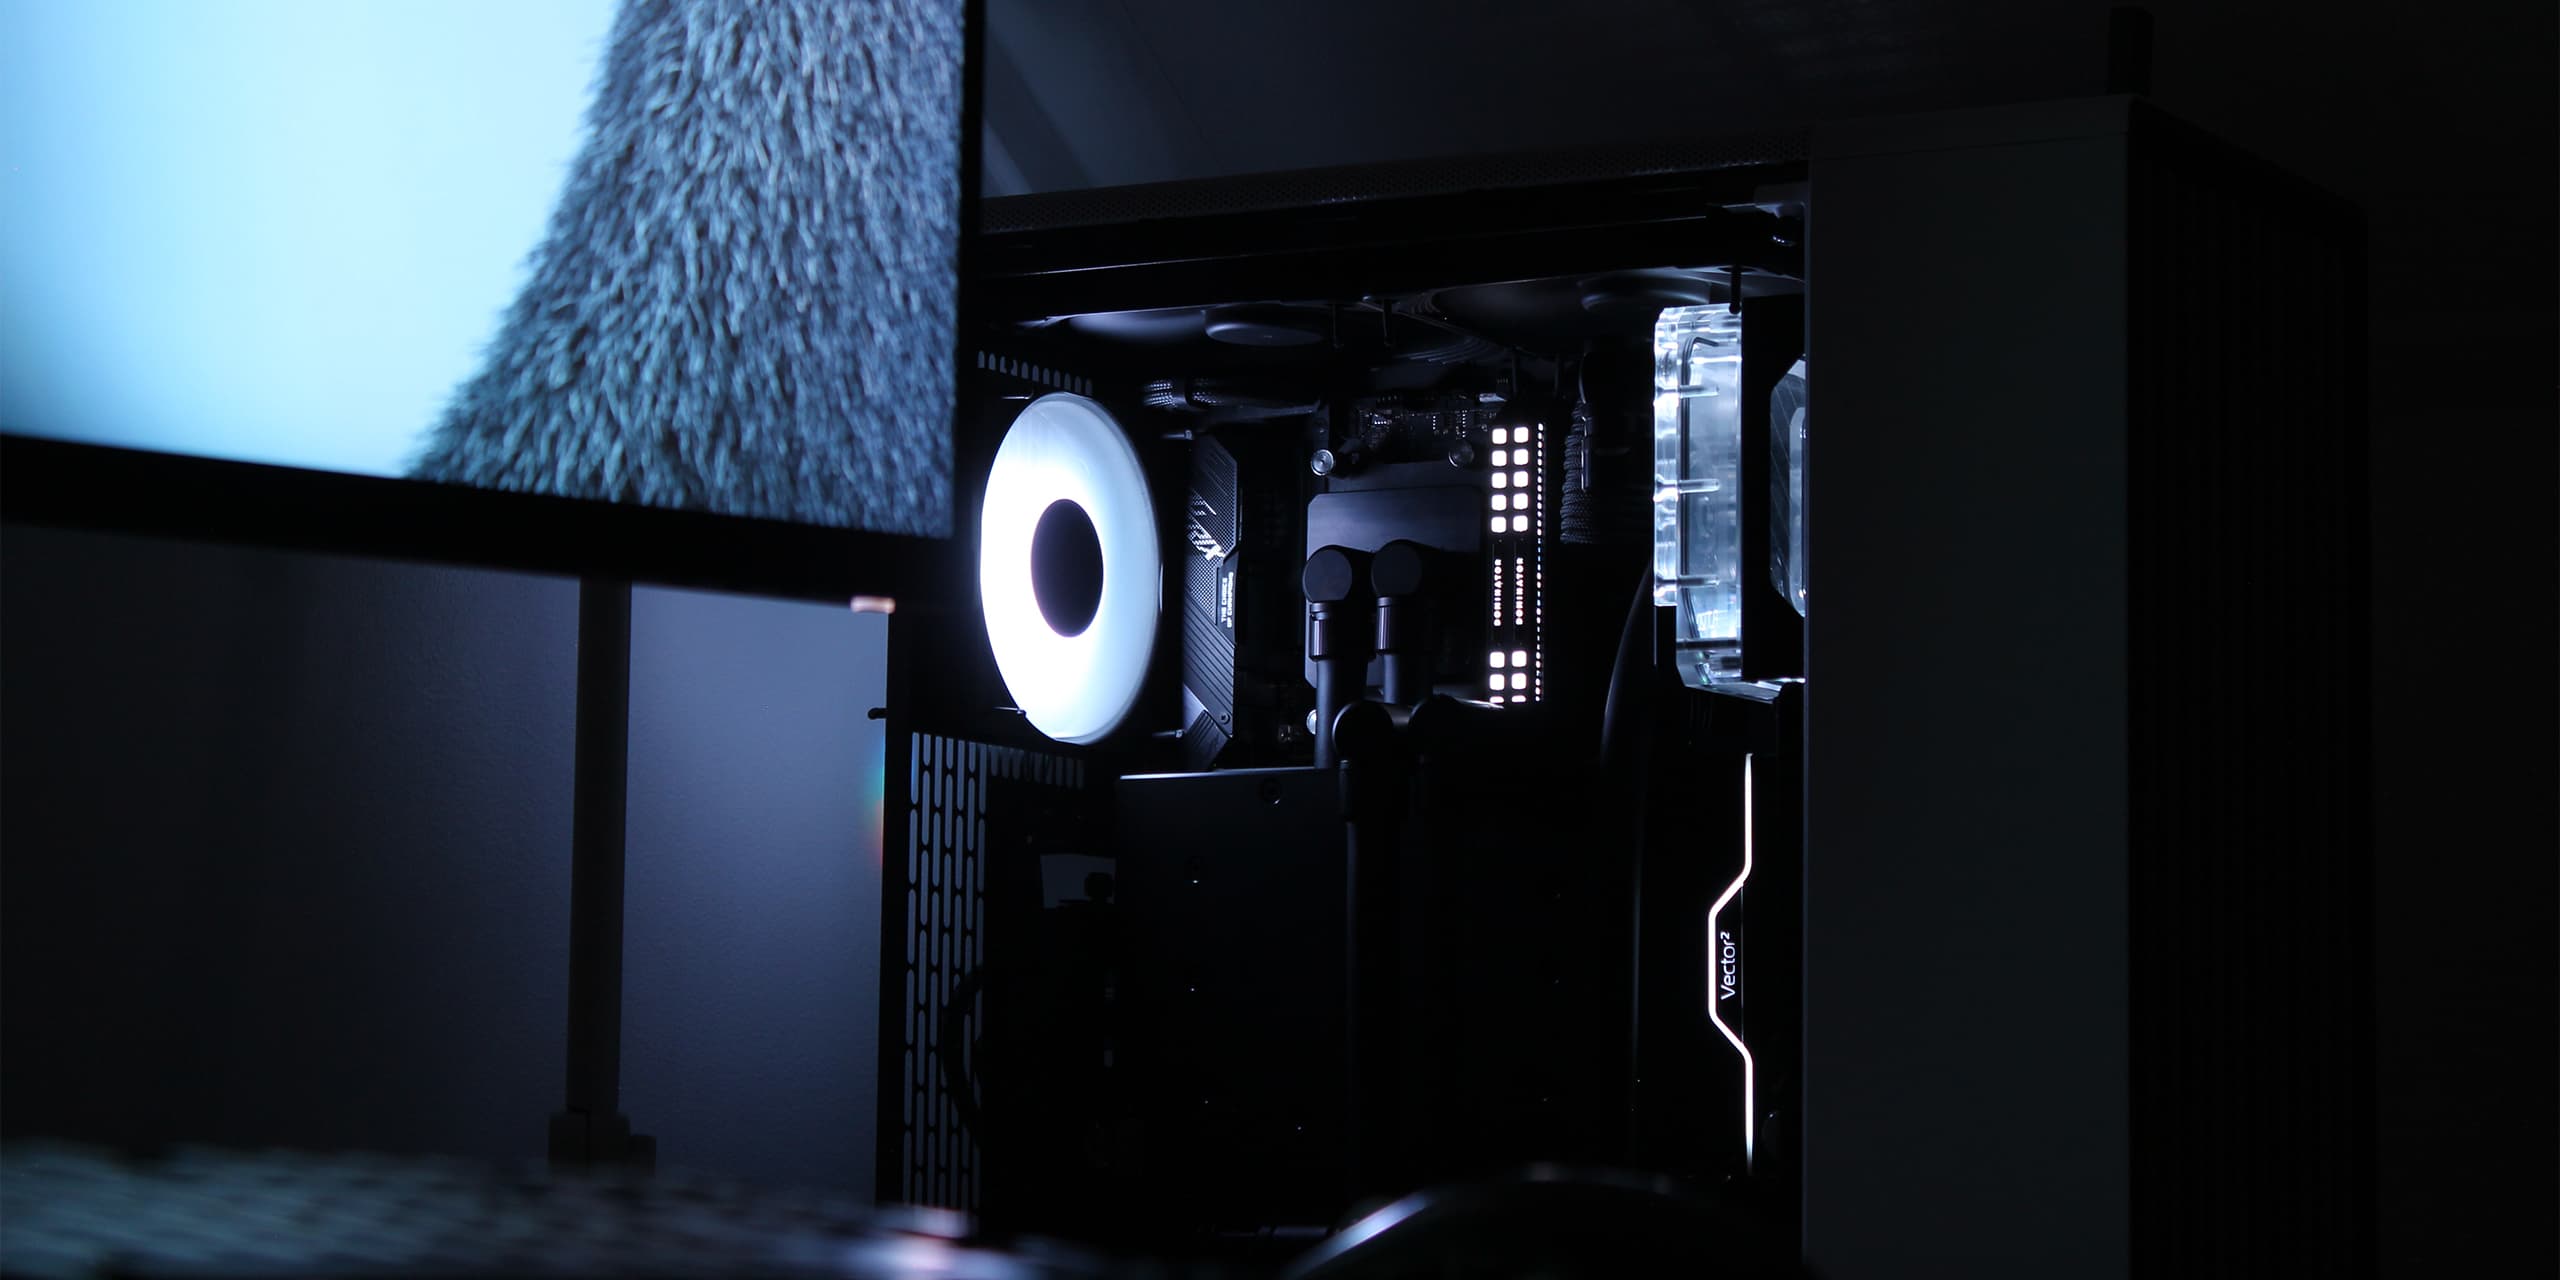
Here's another set of images taken at night to showcase the internal lighting setup. I'm shooting the photos without a side panel because I don't currently own a tempered glass panel. I bought the mesh version of the North back in 2023, and Fractal unfortunately doesn’t sell the tempered glass panel separately.
I'll most likely end up purchasing a TG North/Epoch and reselling it with my mesh panel second-hand at some point.
01
/

This project has been a great learning experience for me. Being my first attempt at custom liquid cooling, I’ve had the privilege of making plenty of mistakes—and learning exactly what not to do next time! With that in mind, I thought it would be useful to share some of the lessons I picked up along the way. Hopefully, they’ll come in handy for others tackling a similar build.
Since the system has gone through a few changes during the project, I’ve also included an updated cost breakdown for all the components, for those who are interested.
Updated Cost Breakdown
01
/ 00Instructions!
QC & Pre-flushing
Bleeding
Control Hub
Lighting
Cooling
As you probably noticed looking at the images above, some changes have been made to the cooling loop. Filling it wasn’t exactly straightforward, and if there’s one lesson I learned the hard way, it’s this: Do not ignore the manufacturer’s instructions—they’re there for a reason! If you're experienced with liquid cooling, you've probably already realised this based on the previous posts. A pump/reservoir combo has a dedicated channel running through the pump: liquid enters from one side and exits from the other. What I overlooked was that only certain ports on the reservoir actually serve as pump outlets. By blocking both of those, I left the pump with nowhere for the liquid to go.
To resolve this, I had to relocate the outlet to one of the dedicated outlet ports specified by EKWB. While I wasn't able to retain the vertical aesthetic in full, I think the curved tube fits quite well. This also necessitated relocation of the fill-valve, which turned out to be a perfect fit at the previously used top-right port, having even better accessibility than before.
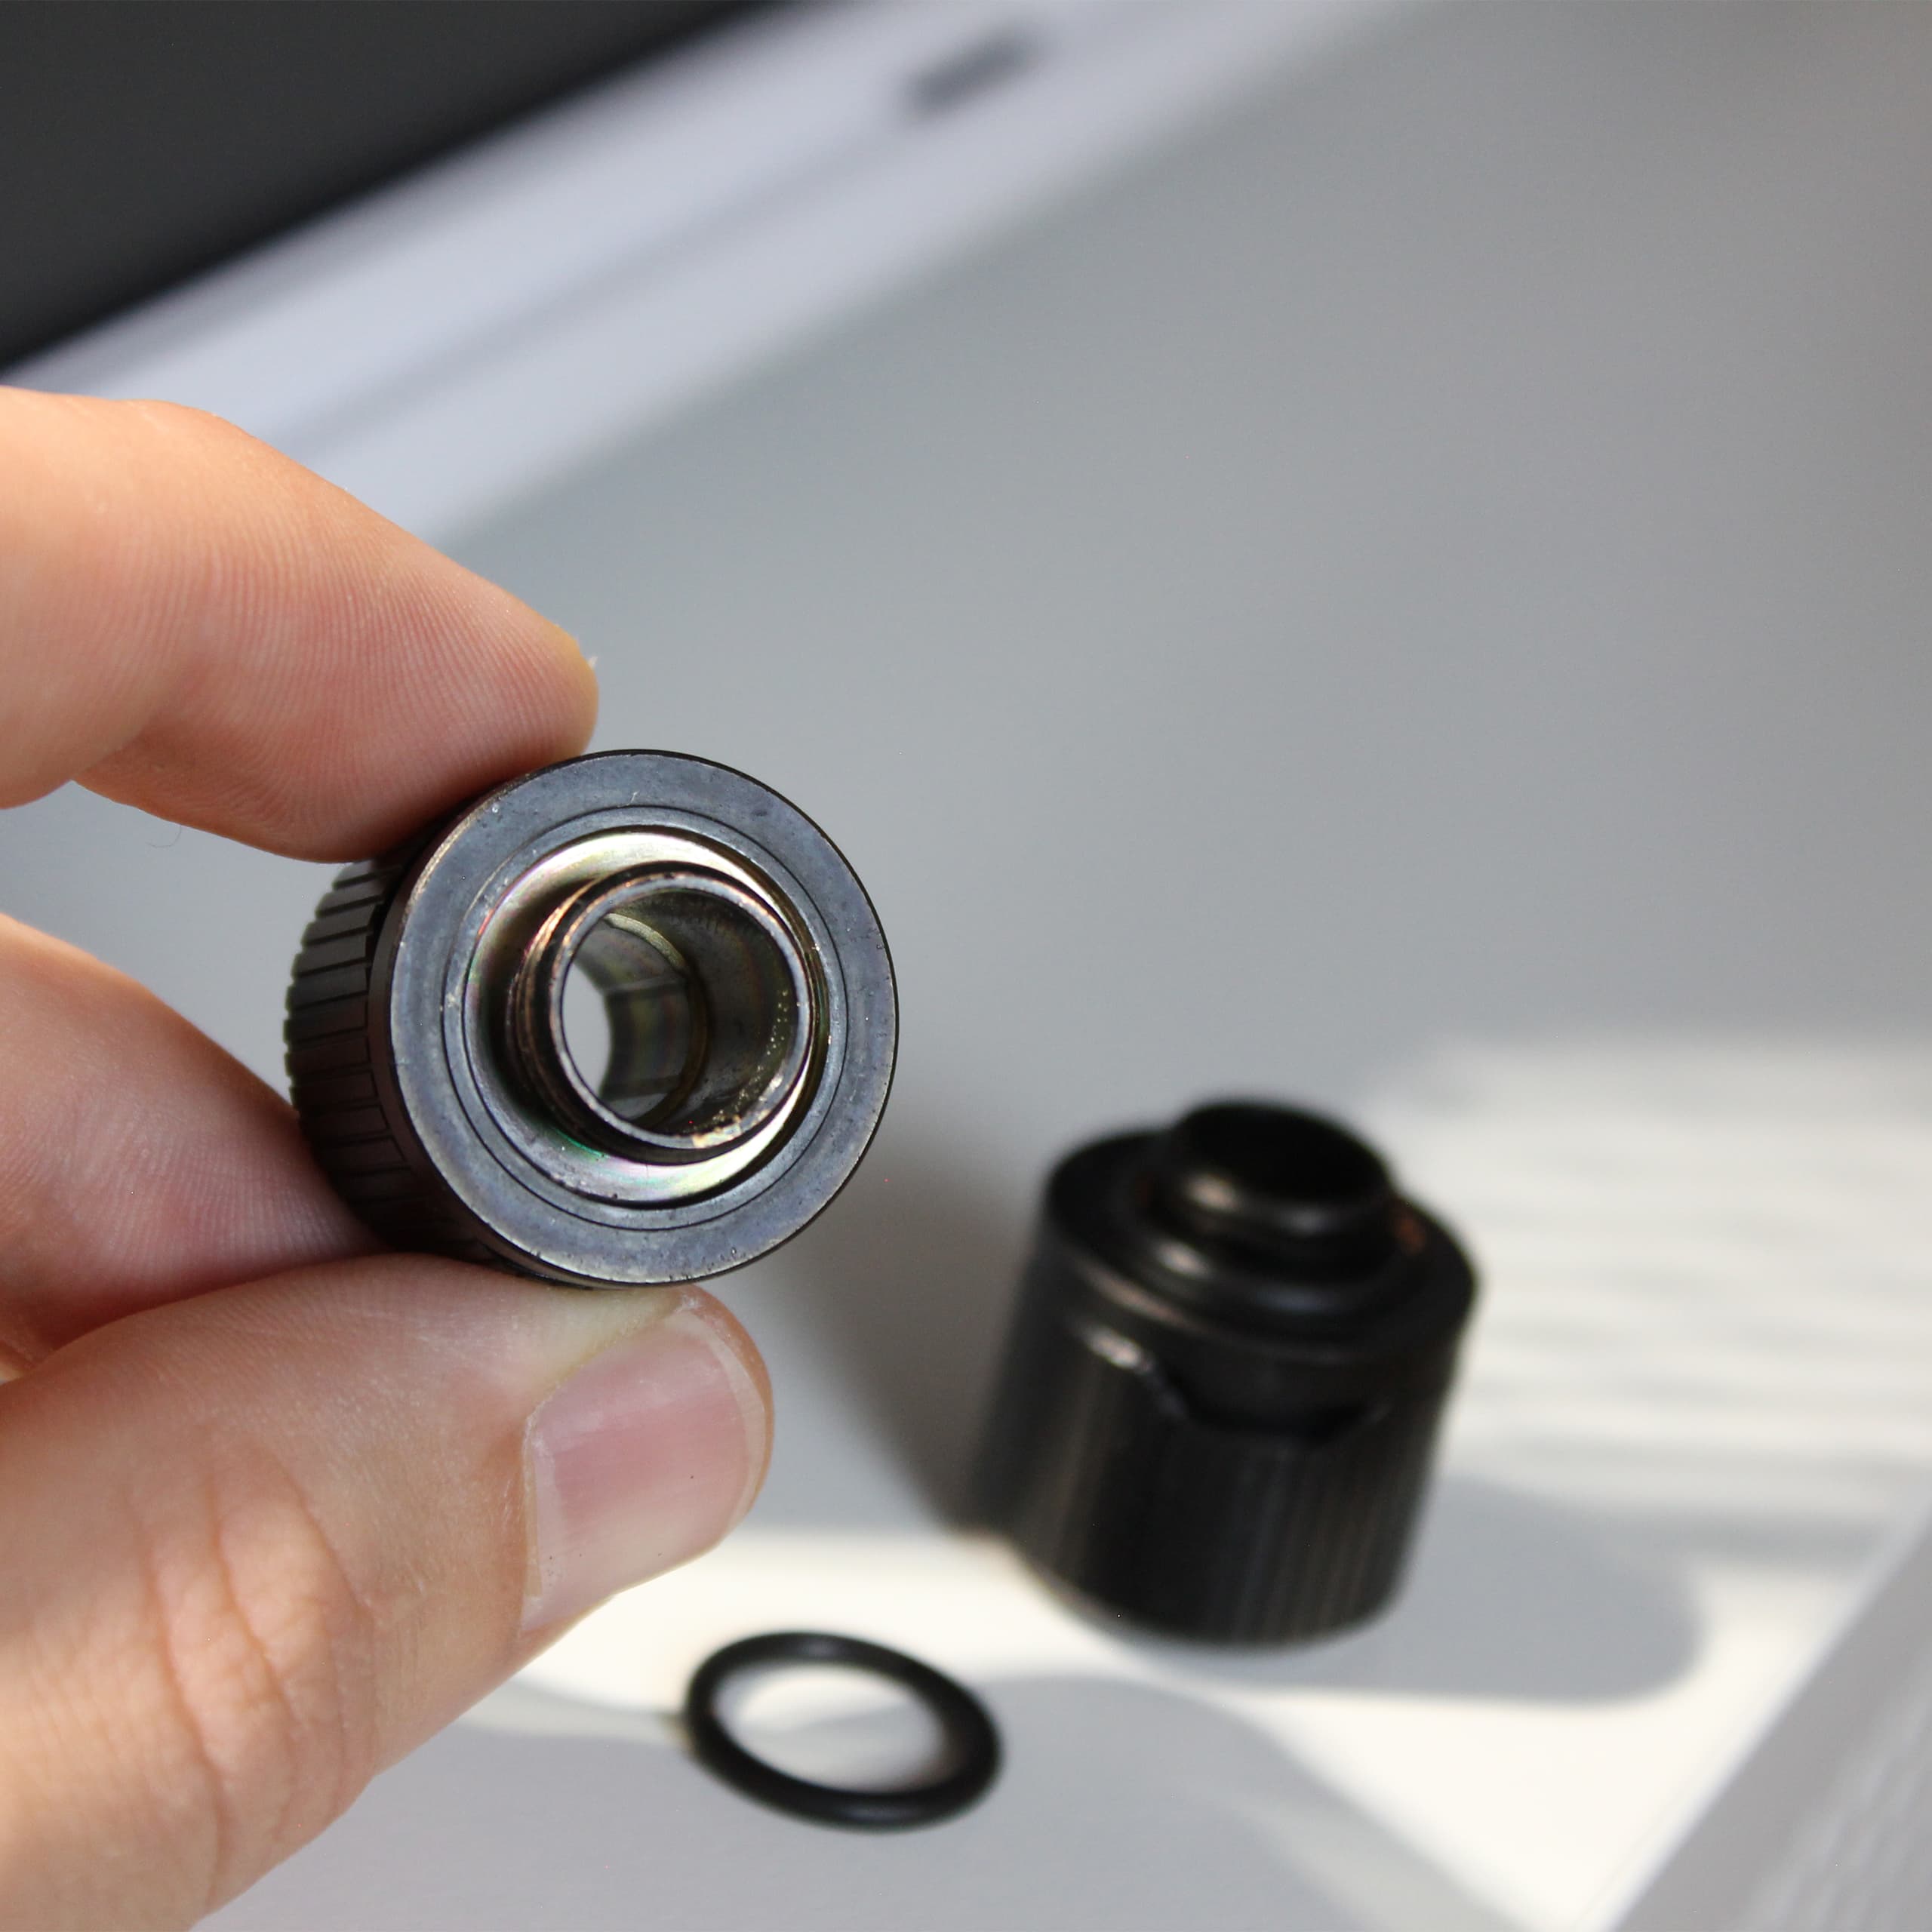
Here's another lesson I learned the hard way: always double-check your fittings for o-rings. While filling the loop, one of my adapter fittings attached to the reservoir suddenly started leaking. Re-tightening it didn’t help, and when I removed the fitting, I quickly realized the o-ring was missing.
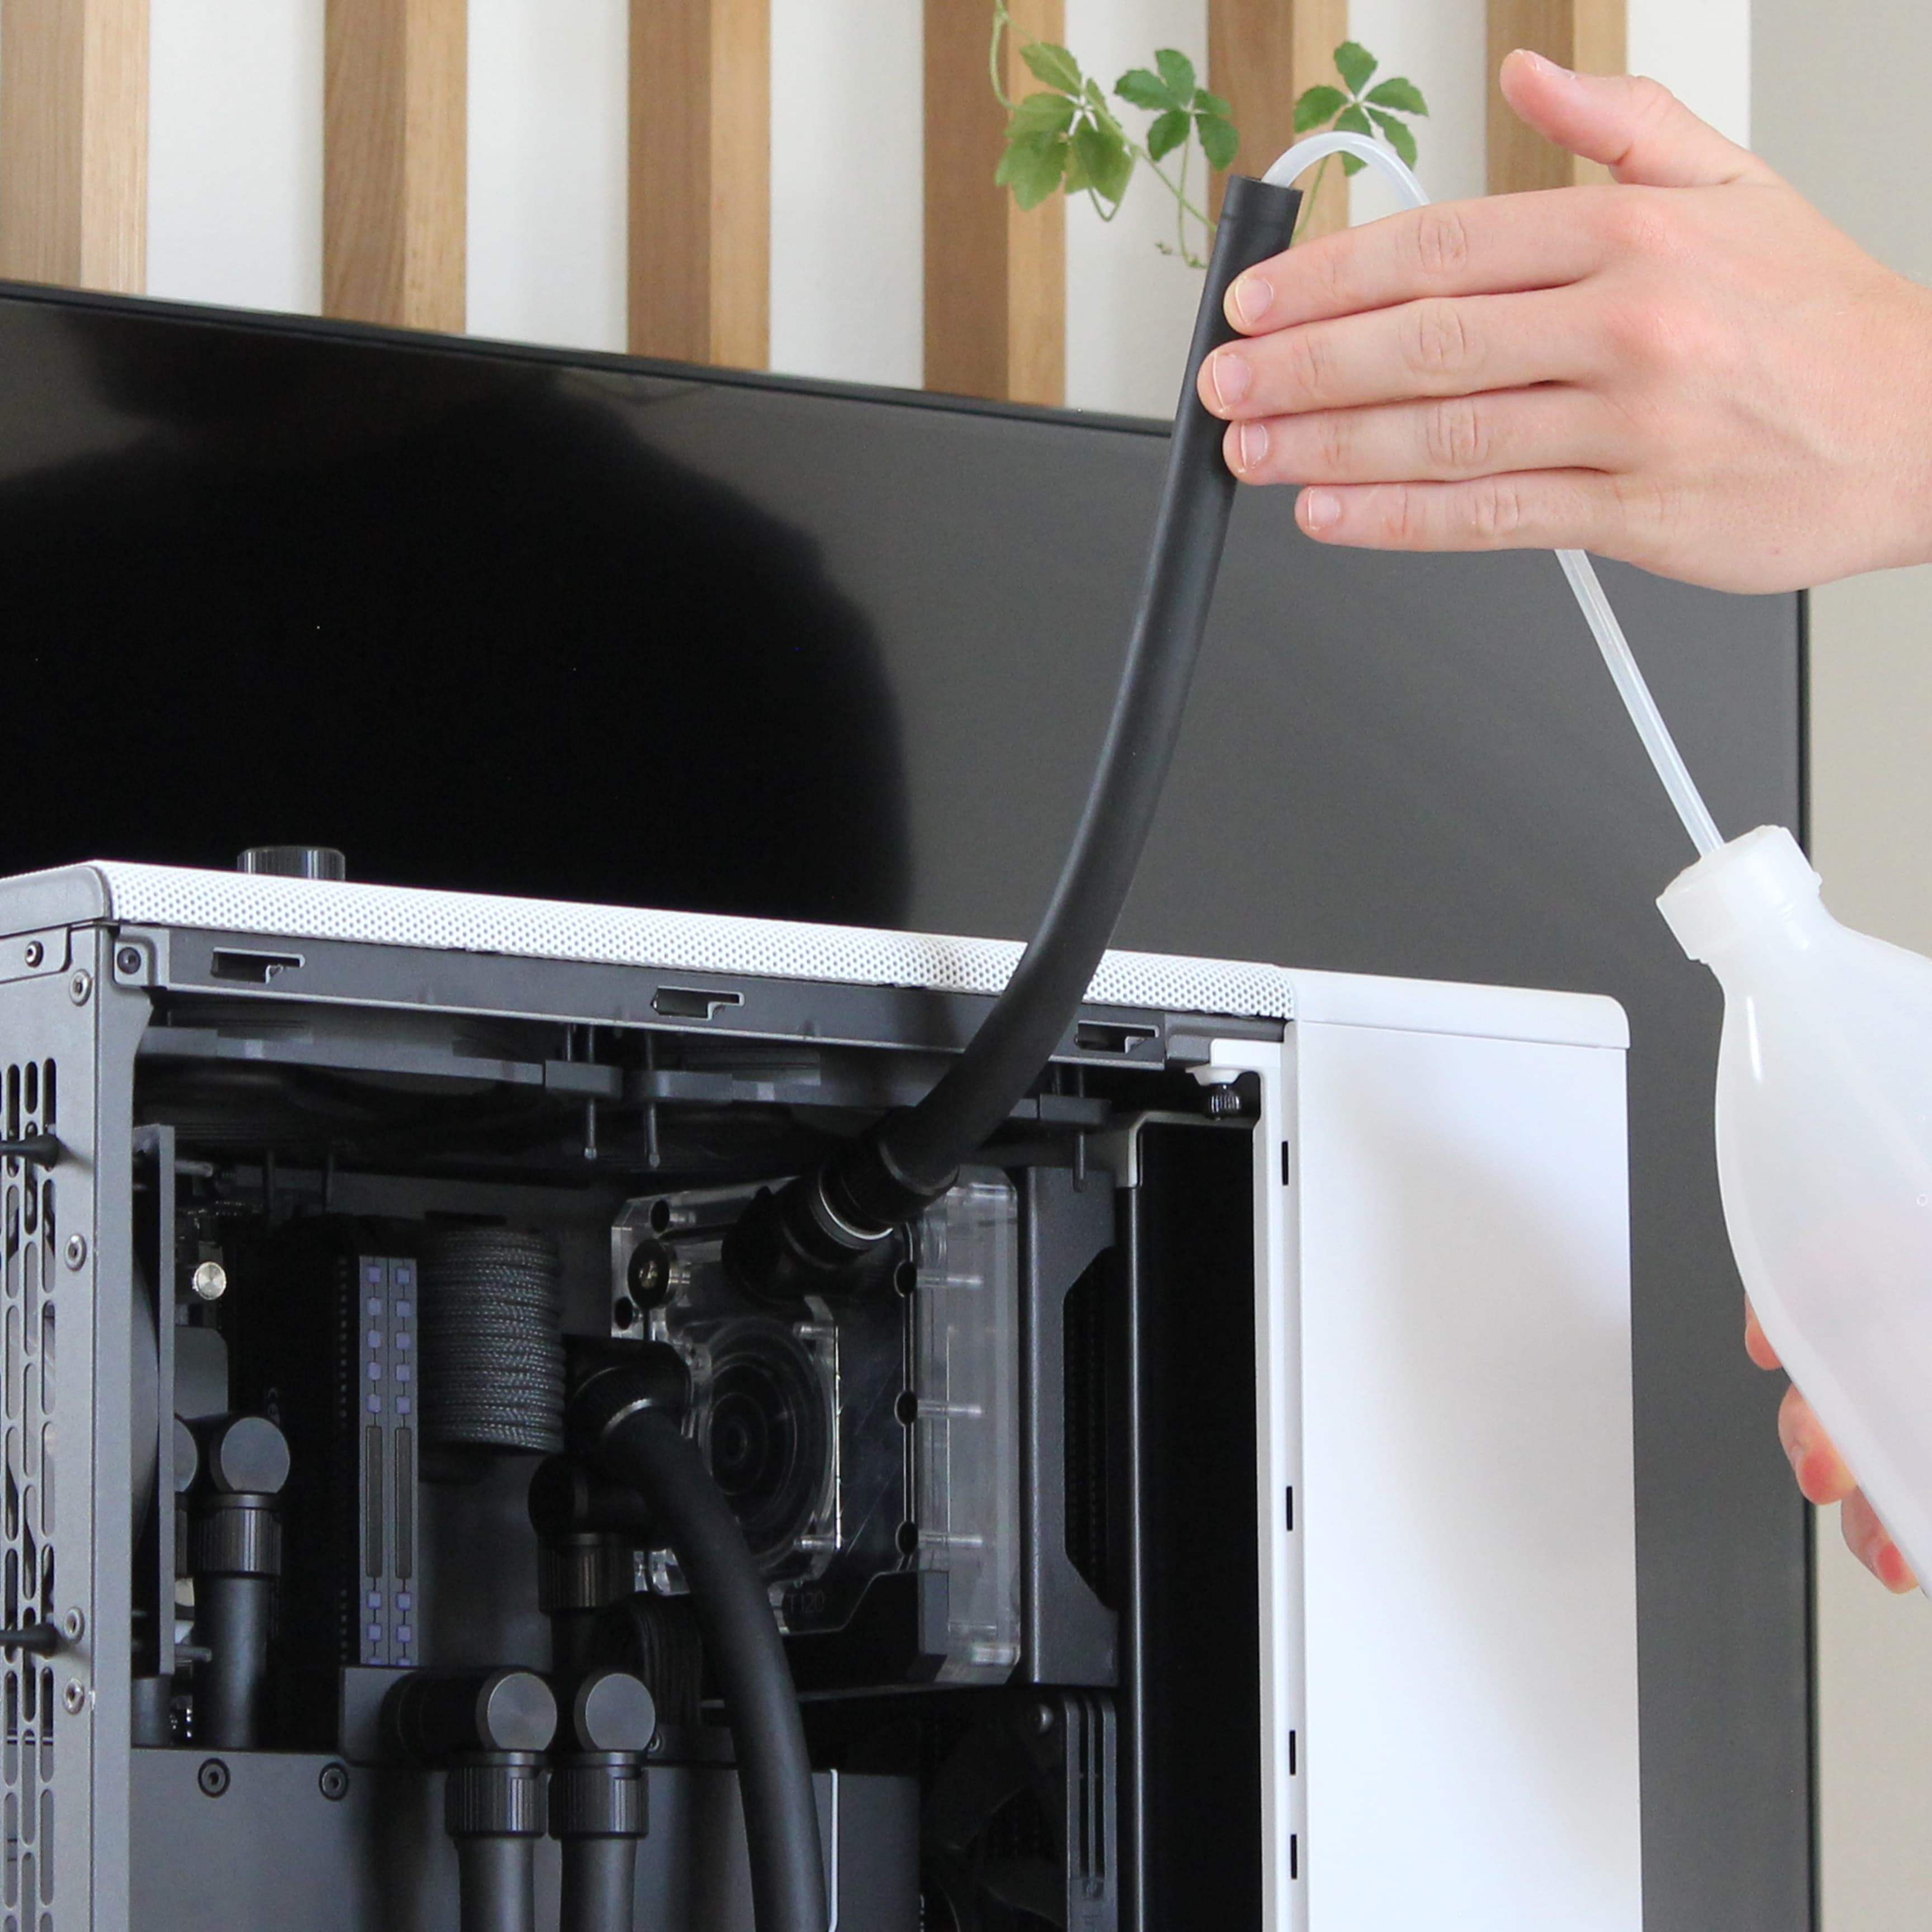
Another important step is pre-flushing components. Waterblocks and radiators often contain debris from manufacturing, which needs to be cleared for optimal performance. Flushing the system after everything is assembled can be tedious, which is why it’s common practice to rinse each component individually before installation. I completely forgot this step and ended up flushing the loop multiple times to remove all debris. Lesson learned—I’ll be doing it properly next time.
All liquid-cooled systems have a common enemy: air. Ideally, your loop should contain only coolant, but the design of components like CPU blocks, GPU blocks, and radiators means some areas restrict flow more than others. These spots are prone to trapping air pockets or bubbles, which can significantly hinder performance. This is why you should always place your reservoir as high as possible in the loop, as it will naturally allow the air to collect at the top of the reservoir.
While I managed to position the top of my reservoir above the CPU and GPU block, I still experienced some air being trapped in the CPU block and radiator. Hoping to release it, I opened the top radiator fitting (accessible through a hole I cut beneath the front I/O shroud). What I hadn’t accounted for was the rapid pressure drop, which caused liquid to spill from the non-visible portion of the top port. Despite having my eye locked on it the entire time, I didn't spot any leakage at all. It wasn't until after I closed the plug that I realised coolant was streaming down the radiator fins into a puddle beneath the PC.
Lesson learned: NEVER open the top radiator port when the loop has been pressurized for an extended period. If you plan to bleed air this way, open the port very carefully (e.g., 1/8th turn for just a few seconds).
This was a challenge I had anticipated—RGB and PWM control is always a hassle, and getting the Corsair iCUE Commander Core XT to work was no different. All the fans and RGB were powered through the hub, but the software never recognized it, leaving me unable to control or monitor anything. After several hours of gruesome troubleshooting (including checking the cables with a multimeter), I gave up.
I contacted Corsair support, who provided a replacement unit that thankfully worked. I’m not sure what was wrong with my original unit, but I’m glad the issue is finally resolved.
To better understand how well my loop was performing, I also installed an Alphacool coolant temperature sensor at the bottom of the radiator. Coolant temperature is an excellent metric for cooling performance, so it was very interesting to see how it responded to stress tests. The sensor is hooked up to the Corsair hub using a standard 2-pin connector.
Another thing I overlooked was that Corsair only officially supports lighting control for their own proprietary RGB devices, which meant my setup required some trial and error to get things right. Unfortunately, the RGB on my CPU block did not cooperate at all, remaining stuck on static or flickering red. After several hours of unsuccessful testing, I decided to leave it unplugged. Not a huge deal, but disappointing nonetheless.
To compensate for the lack of lighting in the left-hand area of the main chamber, I installed an additional fan in the rear. I had an unused EK-Vardar EVO 120ER RGB that turned out to be a perfect fit for this purpose. The Vardar emits a very even and pleasant glow that helps illuminate the surrounding components. Since the fan is only used as a visual prop, I set its speed to the minimum (500 RPM) to make it as silent as possible. Running at such low RPM, the misalignment of the brand sticker on the hub caused a noticeable wobble, so I decided to 3D-print a cover that could be centered more precisely.
Thankfully, the lighting on the GPU block, reservoir, motherboard, and RAM works well. Corsair iCUE allows for some crazy lighting schemes to experiment with, but for the most part, I keep it displaying a static white glow for a clean look.
One thing to keep in mind is that LEDs vary from brand to brand, meaning that setting pure white (#ffffff) on all components is unlikely to produce a visually consistent result. Not to worry though—I was able to achieve fairly similar whiteness through some light tinkering with RGB values and brightness in iCUE.
After running the system for a while, I noticed that my CPU and GPU temperatures were a bit high, and airflow through the radiator could barely be felt, even at higher fan speeds. While thicker radiators do provide more cooling capacity, they are also significantly more restrictive to airflow. This means that if airflow is too low, a thicker radiator could actually perform worse than a thinner model. To ensure sufficient airflow, a push+pull fan configuration is often implemented, where fans are mounted on both sides of the radiator.
From what I’ve gathered online, a general rule of thumb for when push+pull becomes necessary is: radiator thickness equal to or exceeding 45 mm, and/or FPI (fins per inch) equal to or above 16. The radiator in this setup is 60 mm thick and has an FPI count of 18, which strongly suggests that a push+pull configuration is necessary to maintain high enough airflow.
Due to space restrictions in my setup, I wasn’t able to fit regular 120 mm fans on the rear side of the radiator. Luckily, Noctua offers a slimmer option called the NF-A12x15. These fans measure only 15 mm in thickness and provide relatively strong performance. I mounted two of them on the rear side of the radiator, one of which required cutting a small portion of the fan frame to eliminate slight interference with the chassis panel. The performance and noise impact of this addition will be covered in the next post.
This essentially concludes this build log, but I’ll follow up with a performance evaluation and some metrics in a final post. Thanks to everyone who has followed the project—I hope I’ve been able to inspire you to build something for yourself!
Keep things crisp!